Applying visual effects combined with scrolling in SwiftUI
Learn how to apply visual effects to your views while scrolling with SwiftUI.

Visual effects are powerful tools used for improving the aesthetics and usability of applications. Their usage is crucial when it comes to creating engaging and visually appealing interfaces while keeping them dynamic and responsive to interactions, ensuring both clarity and accessibility.
Visual effects are used on application and operational system levels in more places than we imagine. Here are some examples of how visual effects improve the user experience:
- Adjusting blurs, shadows, materials, or the scaling of UI components can create a sense of depth and layering. It establishes a clear visual hierarchy by highlighting key elements on the screen, maintaining context, and enhancing readability.
- The visual feedback from user interactions - rendered as adjusting brightness, contrast, hue, saturation, opacity, scaling, rotation, etc. - emphasizes user actions or changes in the app's state.
- They are also employed in the creation of smooth transitions between different parts of the app, making navigation feel natural and fluid.
Let's explore how to use the visualEffect(_:) modifier to implement visual effects in a SwiftUI view.
The visualEffect(_:) modifier allows changing the visual properties by applying effects to a view and providing the geometry values of that view.
// 1.
MyView()
    // 2.
    .visualEffect { content, proxy in
        // 3.
        content
            .hueRotation(Angle(degrees: proxy.frame(in: .global).origin.y / 10))
    }
- Create a
View. - Call the
visualEffect(_:)method. In the closure, it is possible to access the content - the view to which the effects have to be applied - and theGemoetryProxy- the geometry values of the content. - Adjust the color, scale, rotate, and transform this content as you wish, by applying the effect directly to the view.
For a more complete overview of the effects, check theVisualEffectprotocol documentation.
By providing geometry values of the content the visual effect is applied to, allow better control over the view when creating custom scroll experiences.
Here is how you could take advantage of it when integrated into a ScrollView, for example:
import SwiftUI

struct VisualEffectExample: View {

    var body: some View {

        ScrollView(.vertical) {
            LazyVStack {
                ForEach(0..<10) { item in
                    RoundedRectangle(cornerRadius: 32)
                        .fill(Color.blue)
                        .frame(height: 200)
                        .visualEffect { content, proxy in
                            content
                                .hueRotation(
                                    Angle(degrees: proxy.frame(in: .global).origin.y / 8)
                                )
                        }
                }
                .padding()
            }
        }

    }
}
In this example, a hueRotation effect is applied to the elements within a vertical ScrollView. The hue dynamically changes based on each element's vertical position, resulting in a smooth gradient of shifting colors. As the rectangles move downward, their color gradually changes from blue to a pinkish shade.
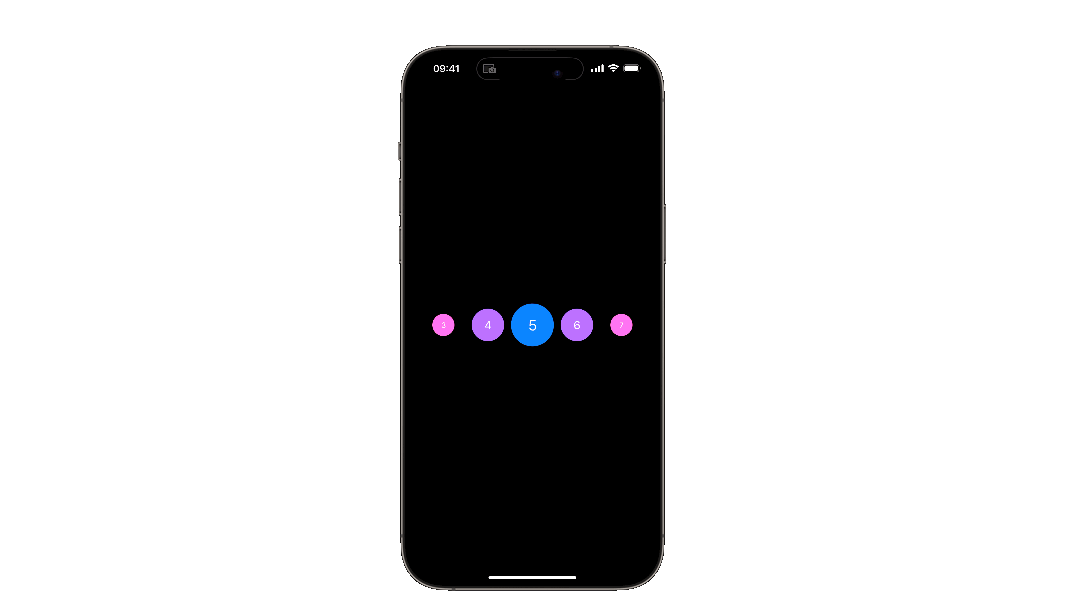
Combining different effects provides endless creative opportunities for customization. The following example mixes and matches the following effects:
import SwiftUI

struct VisualEffectHorizontalExample: View {

    private var screenWidth: CGFloat = .init(UIScreen.main.bounds.width)

    var body: some View {
        ScrollView(.horizontal, showsIndicators: false) {

            LazyHStack(spacing: 20) {
                ForEach(1..<11) { item in
                    HStack {
                        ZStack {
                            Circle()
                                .fill(Color.blue)
                                .frame(height: 50)
                                .padding(4)
                            Text("\(item)")
                                .foregroundStyle(.white)
                        }
                        .visualEffect { content, proxy in
                            let frame = proxy.frame(in: .global)
                            let screenWidth = self.screenWidth

                            // the center X of the screen
                            let centerXScreen = screenWidth / 2

                            // the distance from the center of the screen to the center of the frame
                            let distanceX = abs(centerXScreen - frame.midX)

                            // the scale factor
                            let scale = 1.5 - (distanceX / centerXScreen)

                            // the hue rotation angle
                            let hueRotationDegrees = Angle.degrees((1 - distanceX) / -1.50)

                            return content
                                .scaleEffect(scale)
                                .hueRotation(hueRotationDegrees)
                                .brightness(distanceX / centerXScreen * 0.3)
                        }
                    }
                    .scrollTargetLayout()
                }
            }

        }
        .defaultScrollAnchor(.center)
        .contentMargins(.horizontal, screenWidth / 2)
    }

}
In the example above, the circles change size, color, and brightness as the view is scrolled. They become larger and dimmer when near the center, with their hue shifting towards blue.