Camera capture setup in a SwiftUI app
In this short tutorial you will learn how to set a camera feed capture in a SwiftUI app.

There are numerous guides discussing how to obtain a camera feed on an iOS app. Let’s explore a method that works on all devices that have at least one integrated camera.
You will learn the easiest and quickest method to obtain a live feed and use it in an app created with SwiftUI. It serves as a foundation for incorporating a camera feed into projects that need so.
Let’s start!
Step 1 - Setting up the project
Open Xcode and create a new macOS app project.
To have access to the device’s camera you must request user authorization. The first step is to add the camera usage description key to the target properties in the Info tab.
Go into the project settings, select the app target, and select the Info tab.
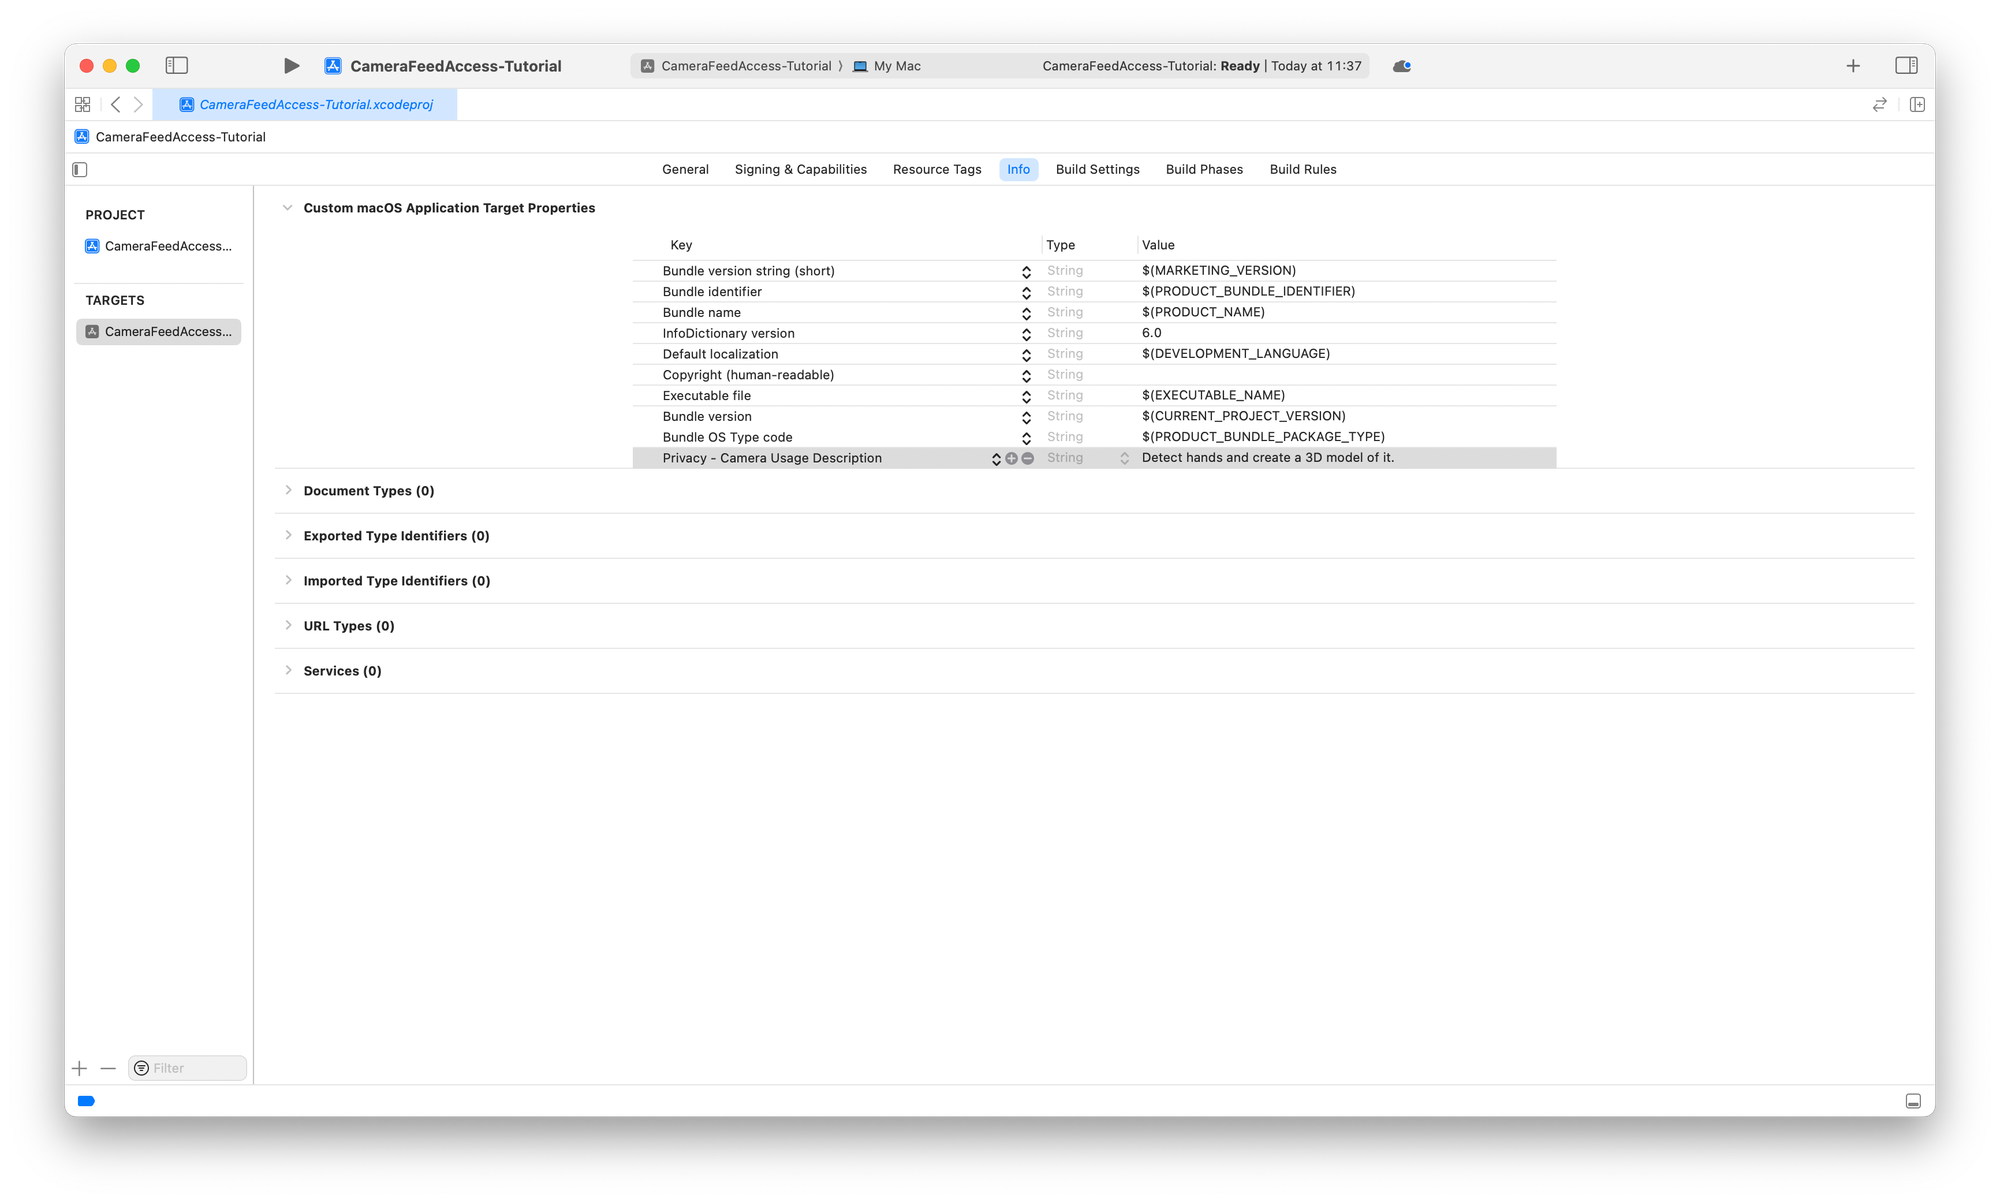
Under the Custom macOS Application Target Properties section add a new key called Privacy - Camera Usage Description and as a value add the description of why the application needs access to that resource.
Apple suggests using an active sentence that describes how and why the app collects the data. It can be formatted like:
This app use the <resource> for <actual usage>
An example would be:
The app records audio during the night to detect snoring sounds.
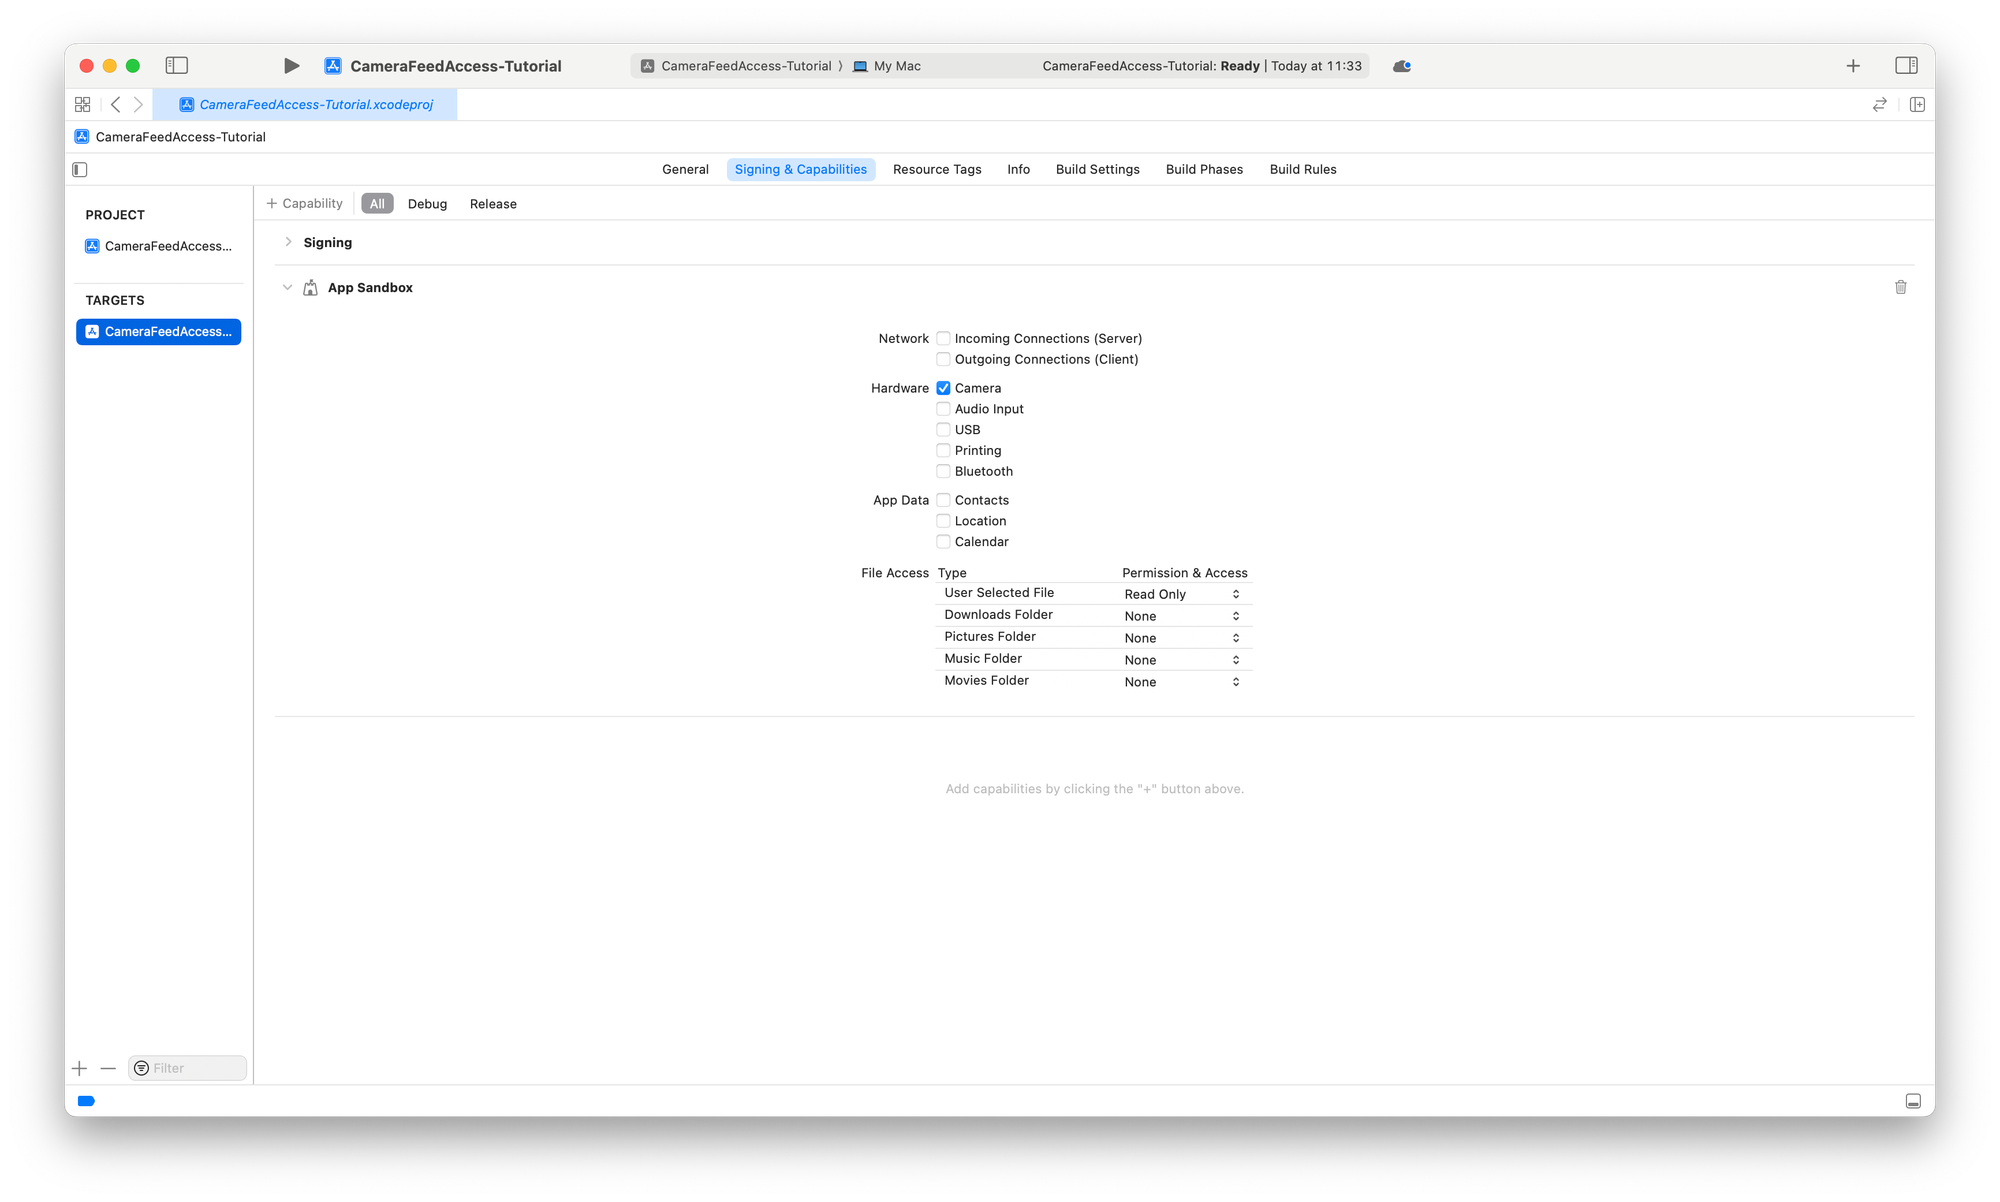
If your app also includes macOS among its targets, you must modify sandboxing options by checking this box to allow access to the resource.
Since we create a macOS project, in your project settings:
- Select the app target and select the Signing & Capabilities tab
- Under the section App Sandbox make sure the Camera option is marked
Step 2 - Creating a camera manager
To manage the camera feed let's create a CameraManager class that will handle:
- The configuration of the camera feed
- The session of the camera feed
Create a new Swift file and name it CameraManager.swift. In it, create a class called CameraManager that inherits from the NSObject class.
import Foundation
import AVFoundation

class CameraManager: NSObject {

}
In the CameraManager class define the following properties:
import Foundation
import AVFoundation

class CameraManager: NSObject {
    // 1.
    private let captureSession = AVCaptureSession()
    // 2.
    private var deviceInput: AVCaptureDeviceInput?
    // 3.
    private var videoOutput: AVCaptureVideoDataOutput?
    // 4.
    private let systemPreferredCamera = AVCaptureDevice.default(for: .video)
    // 5.
    private var sessionQueue = DispatchQueue(label: "video.preview.session")
}
Firstly, let's define the necessary properties:
captureSession: anAVCaptureSessionobject that performs real-time capture and adds appropriate inputs and outputsdeviceInput: anAVCaptureDeviceInputthat describes the media input from a capture device to a capture sessionvideoOutput: anAVCaptureVideoDataOutputobject used to have access to video frames for processingsystemPreferredCamera: anAVCaptureDeviceobject represents the hardware or virtual capture device that can provide one or more streams of media of a particular typesessionQueue: the queue on which theAVCaptureVideoDataOutputSampleBufferDelegatecallbacks should be invoked. It is mandatory to use a serial dispatch queue to guarantee that video frames will be delivered in order.
Now that we have all the necessary stored properties, we will use a computed property to check the current state of the authentication request.
If the user has not granted permission to access the camera, we will request it here. This request will be made only when the resource is needed in our application.
Add the following code to the CameraManager class:
class CameraManager: NSObject {

    ...

    private var isAuthorized: Bool {
        get async {
            let status = AVCaptureDevice.authorizationStatus(for: .video)

            // Determine if the user previously authorized camera access.
            var isAuthorized = status == .authorized

            // If the system hasn't determined the user's authorization status,
            // explicitly prompt them for approval.
            if status == .notDetermined {
                isAuthorized = await AVCaptureDevice.requestAccess(for: .video)
            }

            return isAuthorized
        }
    }
}
The last ingredient we need to start receiving the camera feed is a variable that allows us to manage the continuous stream of data provided by it through an AVCaptureVideoDataOutputSampleBufferDelegate object.
We will use an AsyncStream, which provides a convenient way to create an asynchronous sequence without manually implementing an asynchronous iterator.
Add the following code to the CameraManager class:
class CameraManager: NSObject {

	...

    private var addToPreviewStream: ((CGImage) -> Void)?

    lazy var previewStream: AsyncStream<CGImage> = {
        AsyncStream { continuation in
            addToPreviewStream = { cgImage in
                continuation.yield(cgImage)
            }
        }
    }()

}
Step 3 - Create the CameraManager Body
Now that we have all the necessary ingredients, let’s begin the implementation of the functions for:
- Configuring the
AVFoundationsession to prepare the device - Subsequently, starting the session to begin receiving data
For convenience, we will configure the session and start it at the same time we initialize the CameraManager object.
Add the following code to the CameraManager class:
import Foundation
import AVFoundation

class CameraManager: NSObject {

    ...

    // 1.
    override init() {
        super.init()

        Task {
            await configureSession()
            await startSession()
        }
    }

    // 2.
    private func configureSession() async {

    }

    // 3.
    private func startSession() async {

    }

}
- In the
CameraManagerinitializer, we are going to configure and start theAVCaptureSessionat the same time. This could be handled in other ways, depending on your specific needs. - The
configureSession()function will be responsible for initializing all our properties and defining the buffer delegate. - The
startSession()function will only be responsible for starting the camera session.
Before starting to write the configureSession() method we need to put some things in place.
Converting a CMSampleBuffer to CGImage
To work seamlessly with the image buffer returned by a sample buffer delegate, let’s create two extensions:
- A computed property for the
CMSampleBufferclass that allows us to get aCGImageobject out of the buffer - A computed property for the
CIImageclass, part of the Core Image framework, that allows us to get aCGImagerepresentation of theCIImageobject.
This will allow us to convert a CMSampleBuffer to CGImage, enabling the implementation of the captureOutput(_:didOutput:from:) method.
Create a new Swift file called CMSampleBuffer+Extension.swift and add the following code:
import AVFoundation
import CoreImage

extension CMSampleBuffer {

    var cgImage: CGImage? {
        let pixelBuffer: CVPixelBuffer? = CMSampleBufferGetImageBuffer(self)

        guard let imagePixelBuffer = pixelBuffer else {
            return nil
        }

        return CIImage(cvPixelBuffer: imagePixelBuffer).cgImage
    }

}
CMSampleBuffer+Extension.swift
Create a new Swift file called CIImage+Extension.swift and add the following code:
import CoreImage

extension CIImage {

    var cgImage: CGImage? {
        let ciContext = CIContext()

        guard let cgImage = ciContext.createCGImage(self, from: self.extent) else {
            return nil
        }

        return cgImage
    }

}
CIImage+Extension.swift
Conforming to the Capture Video Data Output Sample Buffer Delegate protocol
We need to be able to receive the various buffer frames from the camera. To achieve this, we must implement the captureOutput(_:didOutput:from:) function defined in the AVCaptureVideoDataOutputSampleBufferDelegate protocol.
At the end of the CameraManager.swift file add the following code:
extension CameraManager: AVCaptureVideoDataOutputSampleBufferDelegate {

    func captureOutput(_ output: AVCaptureOutput,
                       didOutput sampleBuffer: CMSampleBuffer,
                       from connection: AVCaptureConnection) {
        guard let currentFrame = sampleBuffer.cgImage else { return }
        addToPreviewStream?(currentFrame)
    }

}
The captureOutput(_:didOutput:from:) function is called whenever the camera captures a new video frame.
Configuring the session
In the configureSession() method, we will:
- Initialize the various properties necessary to obtain the camera feed
- Import the sample buffer delegate
- Add an input and output for the buffer
private func configureSession() async {
    // 1.
    guard await isAuthorized,
          let systemPreferredCamera,
          let deviceInput = try? AVCaptureDeviceInput(device: systemPreferredCamera)
    else { return }

    // 2.
    captureSession.beginConfiguration()

    // 3.
    defer {
        self.captureSession.commitConfiguration()
    }

    // 4.
    let videoOutput = AVCaptureVideoDataOutput()
    videoOutput.setSampleBufferDelegate(self, queue: sessionQueue)

    // 5.
    guard captureSession.canAddInput(deviceInput) else {
        print("Unable to add device input to capture session.")
        return
    }

    // 6.
    guard captureSession.canAddOutput(videoOutput) else {
        print("Unable to add video output to capture session.")
        return
    }

    // 7.
    captureSession.addInput(deviceInput)
    captureSession.addOutput(videoOutput)

}
- Check user authorization, if the selected camera is available, and if can take the input through the
AVCaptureDeviceInputobject - Start the configuration, marking the beginning of changes to the running capture session’s configuration
- At the end of the execution of the method commits the configuration to the running session
- Define the video output and set the Sample Buffer Delegate and the queue for invoking callbacks
- Check if the input can be added to the capture session
- Checking if the output can be added to the session
- Adds the input and the output to the
AVCaptureSession
With the configuration of our capture session complete to start it is simple, we just need to call the startRunning() function of the AVCaptureSession object. It starts the flow of data through the capture pipeline of the session.
It is important to check user authorization beforehand, to avoid potential crashes.
Add the following code to the startSession() method in the CameraManager class:
class CameraManager: NSObject {

    ...

    private func startSession() async {
		/// Checking authorization
        guard await isAuthorized else { return }
        /// Start the capture session flow of data
        captureSession.startRunning()
    }

}
Step 4 - Handle the buffer stream
The last step is to create the connection between CameraManager and a SwiftUI view. For this, we create a class that acts as a view model and publishes the changes to the SwiftUI interface using the Observation framework. It will allow us to publish the current frame in real-time, which is returned by the SampleBufferDelegate.
Create a new Swift file, call it ViewModel.swift, and add the following code:
import Foundation
import CoreImage
import Observation

@Observable
class ViewModel {
    var currentFrame: CGImage?
    private let cameraManager = CameraManager()

    init() { }
}
ViewModel.swift
Let’s create a method called handleCameraPreviews(). It will handle the updates of the AsyncStream and move the update of the published variables to the MainActor, updating the UI.
@Observable
class ViewModel {

    ...

    func handleCameraPreviews() async {
        for await image in cameraManager.previewStream {
            Task { @MainActor in
                currentFrame = image
            }
        }
    }

}
Now call the handleCameraPreviews() method when initializing the ViewModel object.
import Foundation
import CoreImage

@Observable
class ViewModel {

    var currentFrame: CGImage?
    private let cameraManager = CameraManager()

    init() {
        Task {
            await handleCameraPreviews()
        }
    }

    func handleCameraPreviews() async { ... }
}
Step 5 - Create a CameraView in SwiftUI
The view responsible for managing the camera has a straightforward implementation. The body of the view is simply an Image view, which we will set to fullscreen in this example.
Create a new SwiftUI View file and call it CameraView.swift. Add the following code to it:
import SwiftUI

struct CameraView: View {

    @Binding var image: CGImage?

    var body: some View {
        GeometryReader { geometry in
            if let image = image {
                Image(decorative: image, scale: 1)
                    .resizable()
                    .scaledToFit()
                    .frame(width: geometry.size.width,
                           height: geometry.size.height)
            } else {
                ContentUnavailableView("No camera feed", systemImage: "xmark.circle.fill")
                    .frame(width: geometryProxy.size.width,
                           height: geometryProxy.size.height)
            }
        }
    }

}
Now let’s add our CameraView in the ContentView and connect it to the ViewModel that uses the CameraManager to stream the images from the camera input.
Add the following code to the ContentView.swift file:
import SwiftUI

struct ContentView: View {

    @State private var viewModel = ViewModel()

    var body: some View {
        CameraView(image: $viewModel.currentFrame)
    }
}
Final Result
The authorization popup should be displayed correctly when running the project on the Mac.
Pro-tip: In case we need to reset the permissions granted, especially the access to the room, to test again if the authentication request is done correctly you can run this command from the terminal:tccutil reset Camera com.createwithswift.Camera-SwiftUI
The CameraManager is currently quite basic, but the possibilities are virtually limitless from here. You can work on features like saving photos and videos, adjusting video resolution, adding audio from the microphone, altering the rendering pipeline with custom shaders, or, as we will explore in the upcoming articles, using the Vision framework to track and analyze the content captured by the camera.
You can find all the necessary information for implementing these features in the AVFoundation documentation.

You can check out the full project on the following repository, containing all the code described in the tutorial. Feel free to check it out and leave a star in case you find it useful!
 create-with-swift