
Creating App Intents using Assistant Schemas
Integrate your app functionalities with the system and Apple Intelligence using Assistant Schemas.

Apple’s iOS user experience is shifting towards voice-based, where interactions with Siri allow users to perform any task on their device.
With the integration of Apple intelligence, the device should be able to understand which actions the user is referring to by speaking and perform them on behalf of the user in and across apps.
The ability of the system to recognize the feature and perform it for the user is the result of the combination of different technologies:
- The
AppIntentsframework, which is responsible for the exposition of the content and the features of an app to the system; - Apple Intelligence models, enabling the comprehension of those features to translate the vocal command into an actual action.
This shift impacts the design choices concerning intent development: if the device must be able to perform any kind of action for the user, the regulation behind choosing which actions to expose to the system moves from exposing only the most important ones to implementing an intent for all the possible actions of an app by default.
Apple Intelligence models are trained on and expect specific patterns to start processing and reasoning over the voice request prompted by the user. To support this new approach and create a system that guarantees and simplifies intent development, Apple introduced a series of schema protocols grouped around content-related domains, such as books, media, journals, cameras, browsers, etc., that developers can leverage when creating intents.

On one hand, this system grouping makes it easier to find, implement, and customize the type of object you want to expose to the system and the type of action you want to perform on it; on the other hand, it guarantees the structural compliance patterns that AI models expect to process, recognize, and execute the request, whether it is an action or an object.
The @AssistantSchema
An intent consists of basically two parts:
- An intent - the action to perform;
- An entity - the object on which that action is performed.
The role of the schema is to ensure that intents' properties conform to the rules about intent requirements and entity shapes and behavior expected by Apple Intelligence and the system.
Schema
The schema, an action or a content type within the domain, the specific API for the app intent, app entity, or app enum you create.
Apple Developer Documentation
There are 3 different types of AssistantSchemas:
EntitySchema- defining the object to perform that action on;IntentSchema- defining an object to perform;EnumSchema- defining an enumeration.
These protocols are not meant to be used directly but passed as parameters to their related @AssistantSchema macro. The macros make sure your app entity, intent, or enum conforms to an assistant schema.
There are 3 different types of @AssistantSchema macros:
AssistantEntity(schema:)- checks that the entity conforms to an assistant entity;AssistantIntent(schema:)- checks that the intent conforms to an assistant intent;AssistantEnum(schema:)- checks that the enum conforms to an assistant enumeration.
Let’s see how to implement them.
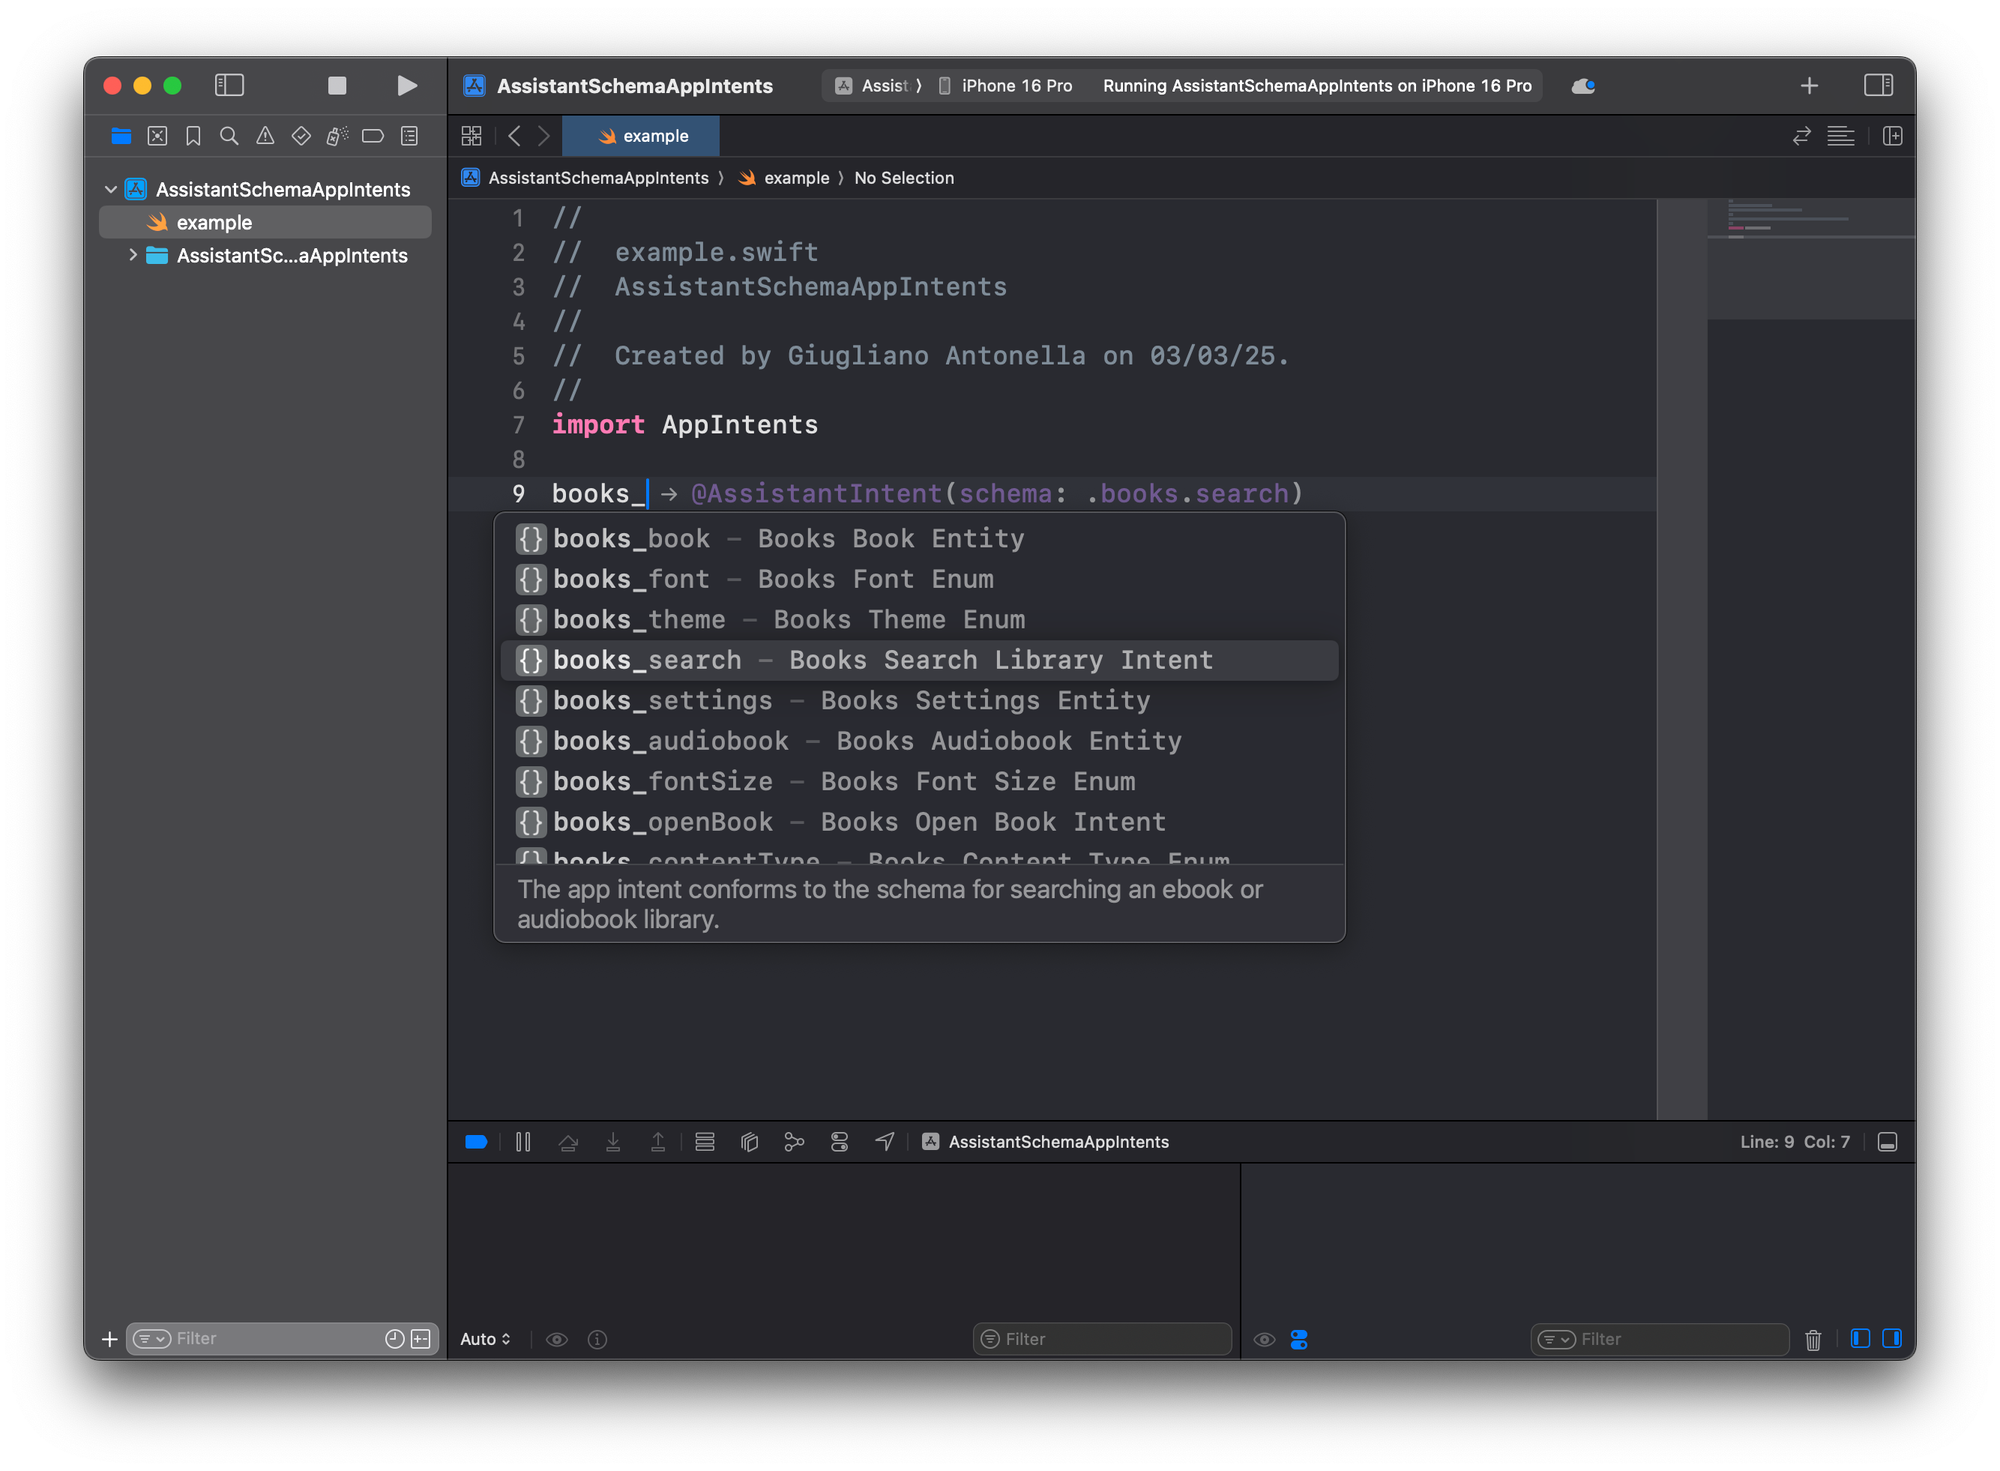
To start, import the AppIntents framework and choose the one that suits your case the best — among all the possible predetermined intents — directly in Xcode just by typing domain_, as in the example above.
import AppIntents

@AssistantIntent(schema: .books.openBook)
struct OpenBookIntent: OpenIntent {
    var target: <#BookEntity#>

    func perform() async throws -> some IntentResult {
        .result()
    }
}
In this example, we choose to create the intent that enables the opening of a book entity object. The code snippet that we are provided with needs to be implemented.
import AppIntents

@AssistantIntent(schema: .books.openBook)
Another approach could be starting to manually type @AssistantIntent(schema:) and pass as a parameter an AssistantSchema.Intent, which in these case is .books.openBook, and then proceed with creating our intent.
Creating an intent using AssistantSchema
Starter Project
To explore how to create an intent leveraging AssistantSchema we are going to use the following project.
This is a books library sample app that lets you keep track of the books on your bookshelf.
This starter project contains:
- The
Appfile - representing the entry point of the app - The View folder:
BooksListView- lists all of your stored books in a List viewBookDetailView- the view showing the details of a bookAddBookView- the form handling the creation of a new book and storing itWebView- the view responsible for rendering the file associated with a book if classified as an eBook.
- The Model folder:
Book- defining the book objectDataModel- data persisted usingSwiftData
- Manager folder
NavigationManager- handling the navigation pathDataManager- handling the data
- Intents folder - an empty folder where we are going to place our intents related files.
The NavigationManager and the shared Modelcontainer are initialized in the entry point of the app and shared across.
Once you download the project, launch the app and create a couple of books. They will be needed to launch and test the intent later.
Goal of the Tutorial
In this tutorial, we are going to create an intent that allows you to open a specific book from your list.
As said before, an intent consists of basically two things:
- An intent - the action to perform;
- An entity - the object on which that action is performed.
So, we must create both the intent (the action of opening a book) and the entity (the book object that will be opened).
Step 1 - Creating the Intent
import AppIntents

@AssistantIntent(schema: .books.openBook)
struct OpenBookIntent: OpenIntent {
    var target: <#BookEntity#>

    func perform() async throws -> some IntentResult {
        .result()
    }
}
OpenBookIntent.swfit
In the Intents folder, create a new file called OpenBookIntent.swift where we are going to implement the intent:
- Import the
AppIntentsframework; - Start typing
books_and choose the openBook option. You will be provided with a code snippet, which, at the moment, will present some errors. Don’t worry about them for now.
Step 2 - Creating the Entity
import AppIntents

@AssistantEntity(schema: .books.book)
struct BookEntity {
    struct BookEntityQuery: EntityStringQuery {
        func entities(for identifiers: [BookEntity.ID]) async throws -> [BookEntity] { [] }
        func entities(matching string: String) async throws -> [BookEntity] { [] }
    }

    static var defaultQuery = BookEntityQuery()
    var displayRepresentation: DisplayRepresentation { "Unimplemented" }

    let id = UUID()

    var title: String?
    var seriesTitle: String?
    var author: String?
    var genre: String?
    var purchaseDate: Date?
    var contentType: <#BookContentType#>?
    var url: URL?
}
In the Intents folder, create a new file called BookEntity.swift where we are going to implement the entity:
- Import the
AppIntentsframework; - Start typing
books_and choose the book one. You will be provided back with a code snippet and it will produce some errors, again, don’t worry about that for now.
import AppIntents

@AssistantEntity(schema: .books.book)
struct BookEntity {
    struct BookEntityQuery: EntityStringQuery {
        func entities(for identifiers: [BookEntity.ID]) async throws -> [BookEntity] { [] }
        func entities(matching string: String) async throws -> [BookEntity] { [] }
    }

    static var defaultQuery = BookEntityQuery()
    var displayRepresentation: DisplayRepresentation { "Unimplemented" }

    // 1.
    let id: UUID

    var title: String?
    var seriesTitle: String?
    var author: String?
    var genre: String?
    var purchaseDate: Date?
    // 2.
    var contentType: BookContentType?
    var url: URL?

    // 3.
    init(item: Book) {
        id = item.id

        title = item.title
        author = item.author
        genre = item.genre?.rawValue
        contentType = item.contentType
        url = item.url
    }
}- Change the
idfrom creating a new instance to only declaring it. - Assign the right type to
contentTypemeaning the one used inBookobject. - Add the constructor: the entity object will be created from the content of the Book object it refers to.
Now, to connect the entity - BookEntity - and its related type - Book:
extension Book {
    // This computed property initializes a BookEntity from a Book
    var entity: BookEntity {
        let entity = BookEntity(item: self)
        return entity
    }
}
- Create an extension of
Bookthe type; - Declare a computed property called
entitythat initializes theBookEntitywhen theBookobject is created.
Step 3 - Connect the Intent and the Entity
struct OpenBookIntent: OpenIntent {
    // The target property holds the book entity (the object on which the action is performed)
    var target: BookEntity

    ...
}
Assign the BookEntity just created to the intent target property.
At this point, the errors should be gone. After building the app on your device, if you open the Shortcuts app, you will see that creating a shortcut is possible. However, it won’t work for now due to two different reasons:
- It is expecting an object on which to perform the action, which you still cannot add as there’s no list of stored books where to pick one;
- The intent logic to be performed still needs to be implemented.
So, there is still a logic that needs to be implemented to make it work. The intent action should work as follows:
- It should be able to query among all the stored books in the database so that, when creating the intent, the user can choose which one to open when the intent is launched, meaning choosing which book to open.
- Based on its ID, it should be able to retrieve the right book among all the stored ones.
Step 4 - Querying Stored Books
struct BookEntity {
	// 1. Helps the system locate BookEntity instances based on an identifier or a search string
    struct BookEntityQuery: EntityStringQuery {
        func entities(for identifiers: [BookEntity.ID]) async throws -> [BookEntity] { [] }
        func entities(matching string: String) async throws -> [BookEntity] { [] }
    }

    // 2. Provide a default query implementation so the system knows how to fetch books
    static var defaultQuery = BookEntityQuery()

    // 3. Used by the system to display the entity in a human-readable way
    var displayRepresentation: DisplayRepresentation { "Unimplemented" }

    ...
}
In the BookEntity type, there is a nested type called BookEntityQuery conforming to EntityStringQuery, and a property called defaultQuery. They help the system locate BookEntity instances based on an identifier or a search string.
The entities(for identifiers:) and entities(matching string:) functions that needs to be implemented are the methods used to retrieve instance.
struct BookEntityQuery: EntityStringQuery {
    // Return a list of BookEntity objects for the given identifiers
    @MainActor
    func entities(for identifiers: [BookEntity.ID]) async throws -> [BookEntity] {
        let entries = try await DataManager.collectBooks(for: identifiers)
        return entries.map(\.entity)
    }

    // Return a list of BookEntity objects matching a search string
    func entities(matching string: String) async throws -> [BookEntity] {
        let entries = try await DataManager.collectBooks(matching: string)
        return entries.map(\.entity)
    }

    // Suggest a list of entities from your data store
    func suggestedEntities() async throws -> [BookEntity] {
        let entries = try await DataManager.collectAllBooks()
        return entries.map(\.entity)
    }
}
We implement them by leveraging the DataManager methods:
entities(for identifiers:)- return a list ofBookEntityobjects for the given identifiers;entities(matching string:)- return a list ofBookEntityobjects matching a search string;
And, we add a third one, suggestedEntities() - suggest a list of entities (books) from your data store.
This represents the logic for retrieving the stored books and choosing which one will be the object on which to perform the intent.
Now set how to display the data by implementing its DisplayRepresentation.
struct BookEntity {

  ...

  var displayRepresentation: DisplayRepresentation {
      DisplayRepresentation(stringLiteral: title ?? "No title")
  }

  ...

}
We choose to compute it based on the title of each book.
Step 5 - Implementing the perform() method
Now, let’s create the logic of the perform() method of the Intent.
struct OpenBookIntent: OpenIntent {

    ...

    func perform() async throws -> some IntentResult {
        // Retrieve the identifier from the target book entity
        let id = target.id

        // Retrieve the book in data manager using the identifier
        let books = try await DataManager.collectBooks(for: [id])

        guard let book = books.first else {
            throw fatalError("Entity Not Found")
        }

        // Returns the result
        return .result()
    }
}- Access the
idof the entity from thetarget. The intent uses the ID of the object to look for it and open it, because of that we need to persist the data. - Retrieve the right book from the database based on the
id. - Return the result.
At this point, the logic is implemented. The only thing still missing is opening the app in the Book Detail View when the right book has been retrieved.
At the entry point of the app, BooksShelfStarterApp, import the AppIntents framework.
import SwiftUI
import AppIntents

@main
struct BooksShelfStarterApp: App {

	...

    // Shared navigation manager to handle routing within the app
    let navigationManager: NavigationManager

    // Initialize the navigation manager and register it as a shared dependency
    init() {
        let navigationManager = NavigationManager()
        AppDependencyManager.shared.add(dependency: navigationManager)
        self.navigationManager = navigationManager
    }

    var body: some Scene {
        WindowGroup {
            BooksList()
        }
        .modelContainer(modelContainer)

        // Inject the navigation manager into the environment
        .environment(navigationManager)
    }
}
Declare and initialize an instance of NavigationManager as a shared dependency, then inject it into the environment.
This manager handles the app's navigation path. When an intent tells it to open a book, it appends the book to the navigation path, allowing the UI to navigate to the book’s detail view.
So, the intent needs the navigationManager to navigate to the corresponding BookDetail view.
import AppIntents

@AssistantIntent(schema: .books.openBook)
struct OpenBookIntent: OpenIntent {

    var target: BookEntity

    // 1. Navigation manager dependency for routing
    @Dependency
    private var navigationManager: NavigationManager

    @MainActor
    func perform() async throws -> some IntentResult {
        ...

        // 2. Navigation manager to open the book's detail view
        navigationManager.openBook(book: book)

        ...
    }
}- Create a
NavigationManagerdependency for routing. - In
perform(), callopenBook(book:)method to navigate to the retrieved book’s detailed view.
This is the final version of the project, including all that was explored during the tutorial.
With AppIntents and AssistantSchemas, developers can easily expose app actions and content in a structured way that aligns with Apple’s intelligence models. This allows the system to understand natural language commands and seamlessly execute tasks, like opening a specific book from a digital library.
Developers ensure that voice commands translate into precise operations within the app by defining intents for actions and entities for the objects involved.
As voice interactions become more widespread, using these frameworks opens the door to creating more intelligent and cohesive app experiences, enabling users to accomplish tasks through simple voice commands effortlessly.