
Detecting face landmarks with the Vision framework
Learn how to use the Vision framework to analyze an image and detect specific facial features.

Among the numerous possible image-analysis requests, Vision also allows our apps to easily detect the facial features in an image where people are pictured throughout DetectFaceLandmarksRequest . The features that it can detect are the following:
faceContourleftEyerightEyeleftPupilrightPupilleftEyebrowrightEyebrowmedianLinenosenoseCrestinnerLipsouterLips
The request first locates all faces in the input image and then analyzes each to detect facial features.
Let’s see how to use this request by implementing a function called detectFaceLandmarks(image:) that handles the whole process of facial feature detection on an UIImage passed as a parameter and returns a collection of observations.
import Vision

func detectFaceLandmarks(image: UIImage) async throws -> [FaceObservation]? {
      //1. The picture to perform the detection on
      guard let ciImage = CIImage(image: image) else { return nil }
      do {
    	  //2.  The Vision request to perform
          let request = DetectFaceLandmarksRequest()
          //3. Performing the request on the image
          let results = try await request.perform(on: ciImage, orientation: .up)
          //4. The FaceObservations resulting from the performed request
          return results
      } catch {
          print("Error performing face detection: \(error.localizedDescription)")
      }
      return nil
  }
detectFaceLandmarks(image:) works as follows:
- it creates a
CIImageinstance from theUIImageto be analyzed; - then, it sets an instance of the
Visionrequest type needed to perform; - it performs the request on the image using
perform(on:orientation:), specifying the orientation of the image - this is fundamental as theVisioncoordinate origin differs from that of SwiftUI’s one; - it returns the
FaceObservationcollection resulting from the performed request.
A FaceObservation type collects a lot information based on the performed type of request it comes from, in this case the most relevant are:
confidence- pointing out the level of confidence in the observation’s accuracy ranged in between 0 and 1, where 1 represents the most confident;boundingBox- representing the bounding box of the object;pitch- the rotational angle of the face around the x-axis;roll- the rotational angle of the face around the z-axis;yaw- the rotational angle of the face around the y-axis;landmarks- a collection of facial features that the request detects.
This latter, the landmarks property, is a FaceObservation.Landmarks2D and stores as FaceObservation.Landmarks2D.Region all the facial features stated in the list mentioned above. In addition, there is an extra region, allPoints , collecting all the points from all the facial features detected.
Each detected region exposes the coordinates of that specific facial feature as a collection of NormalizedPoint .
These facial feature coordinates are normalized and relative to the boundingBox, which is the smallest rectangle that can fully contain the face. The coordinates are scaled based and accordingly to the position and size of the boundingBox . They range from 0 to 1 within the bounding box meaning that a point (0,0) corresponds to the bottom-left, while a (1,1) one corresponds to the top-right of the bounding box.
By having coordinates relative to this box, it allows the landmarks to be described in a uniform way, regardless of the actual size or position of the face within the original image.
However, SwiftUI's coordinate system differs: its origin (0,0) is at the top-left corner, with the y-coordinate increasing downward; so, when it comes to move from Vision coordinates system to SwiftUI one, some translation needs to be performed.
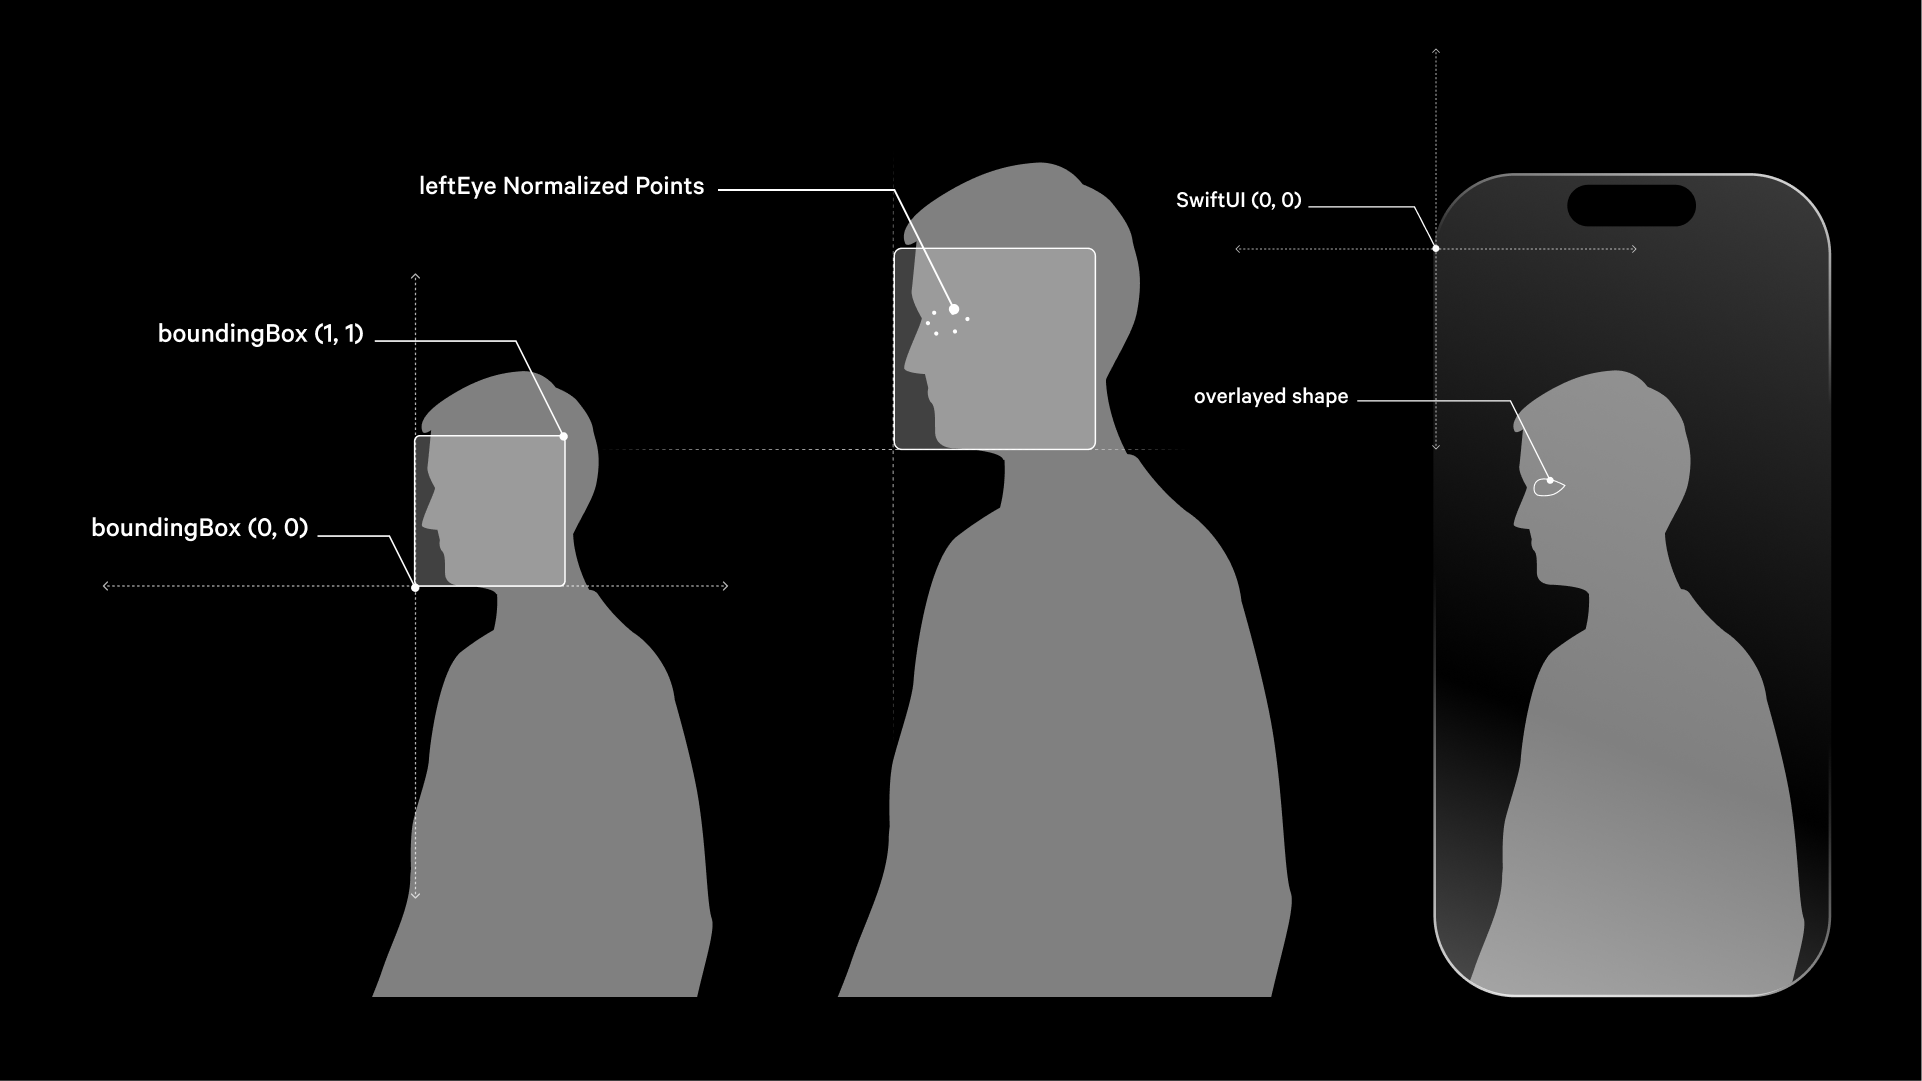
Let’s suppose that we want to draw shapes out of these coordinates that overlay the image which they were detected from, what we need to do is to convert and scale them to the displayed image space - which is rendered by SwiftUI - to be sure they are going to be placed in the right position, meaning right on top of the relative region they were detected from.
struct FaceLandmarksEye: Shape {
    // Store the FaceObservation
    var observation: FaceObservation
    // Store the size of displayed image
    var displayedSize: CGSize

    func path(in rect: CGRect) -> Path {
        var path = Path()

        // 1. The left eye normalized points
        guard let leftEyePoints = observation.landmarks?.leftEye.points else { return path }

        //2. Extract face bounding box to map coordinates
        let boundingBox = observation.boundingBox.cgRect

        //3. Convert and scale points to the displayed image space
        let transformedPoints = leftEyePoints.map { point -> CGPoint in
            let x = boundingBox.origin.x + point.x * boundingBox.width
            let y = boundingBox.origin.y + point.y * boundingBox.height
            return CGPoint(
		            // 4. Scale x
                x: x * displayedSize.width,
                // 5. Flip y-axis
                y: (1 - y) * displayedSize.height
            )
        }

        //6. Ensure we have enough points to create a path
        guard transformedPoints.count > 1 else { return path }

        //7. Start the path at the first point
        path.move(to: transformedPoints.first!)

        //8. Draw lines connecting the points
        for i in 1..<transformedPoints.count {
            path.addLine(to: transformedPoints[i])
        }

        //9. Close the eye shape
        path.addLine(to: transformedPoints.first!)

        //10. The final path
        return path
    }
}
This shape translates normalized facial landmark data into a drawable path that represents the left eye's contour on the displayed image. In this custom shape FaceLandmarksEye we are creating a path out from a FaceObservation , personalizing the method path(in rect:) to focus on a specific landmark region.
The method works as follows:
- First, it retrieves the left eye region normalized points from the
FaceObservation; - It extracts the face
boundingBoxto map the coordinates; - Then, it converts and scales the points to the displayed image space: the translation moves the Vision coordinates which are normalized 0 to 1 and relative to the image into the SwiftUI ones. To convert them, it multiplies the Vision coordinates into the actual screen positions, meaning accordingly to
displayedSize.widthanddisplayedSize.height. - It scales the x;
- It scales the y: since Vision’s system sets the origin (0,0) at the bottom-left, but SwiftUI’s (0,0) is at the top-left, we need to flip the y-axis;
- then, it ensures to have enough points to create a path;
- it starts the path at the first point;
- it draws the lines connecting the points;
- it closes the eye shape;
- and, it returns the path.
Now, let’s try to integrate the facial features detection and the shape in a view.
import SwiftUI
import Vision

struct ContentView: View {

    @State private var observations: [FaceObservation]? = nil
    @State private var imageSize: CGSize = .zero

    var body: some View {
        VStack {
            Image("picture")
                .resizable()
                .scaledToFit()
                .overlay(
                    ForEach(observations ?? [], id: \.self) { item in
                        FaceLandmarksEye(observation: item, displayedSize: imageSize)
                            .stroke(Color.blue, lineWidth: 2)
                    }
                )
                .background(GeometryReader { proxy in
                    Color.clear.onAppear {
                        self.imageSize = proxy.size
                    }
                })
        }
        .frame(height: 400)

        Button("Detect Face Landmarks") {
            self.detectFaces()
        }
        .padding()
    }

    private func detectFaces() {
        Task {
            do {
                guard let image = UIImage(named: "picture"),
                      let faceObservations = try await detectFaceLandmarks(image: image) else { return }
                self.observations = faceObservations
            } catch {
                print("Error detecting face landmarks: \(error)")
            }
        }
    }
}

// The face landmarks detection
func detectFaceLandmarks(image: UIImage) async throws -> [FaceObservation]? {
    ...
}
// The custom shape
struct FaceLandmarksEye: Shape {
    ...
}
In the example above, a view displays an image and overlays a blue outline around the detected left eye using Vision framework's face landmarks detection. When the "Detect Face Landmarks" button is tapped, detectFaces() asynchronously processes the image to identify facial landmarks. The FaceLandmarksEye struct, conforming to the Shapeprotocol, constructs a path outlining the left eye based on the detected landmarks. It transforms normalized landmark coordinates into the displayed image’s coordinate space, ensuring accurate overlay. By capturing imageSize dynamically using GeometryReader the overlay scales correctly even if the image resizes.
Applying DetectFaceLandmarksRequest on a subset of FaceObservation
As you can see from this example, the request also detects a face reflected in the screen of the computer portrayed in the picture.
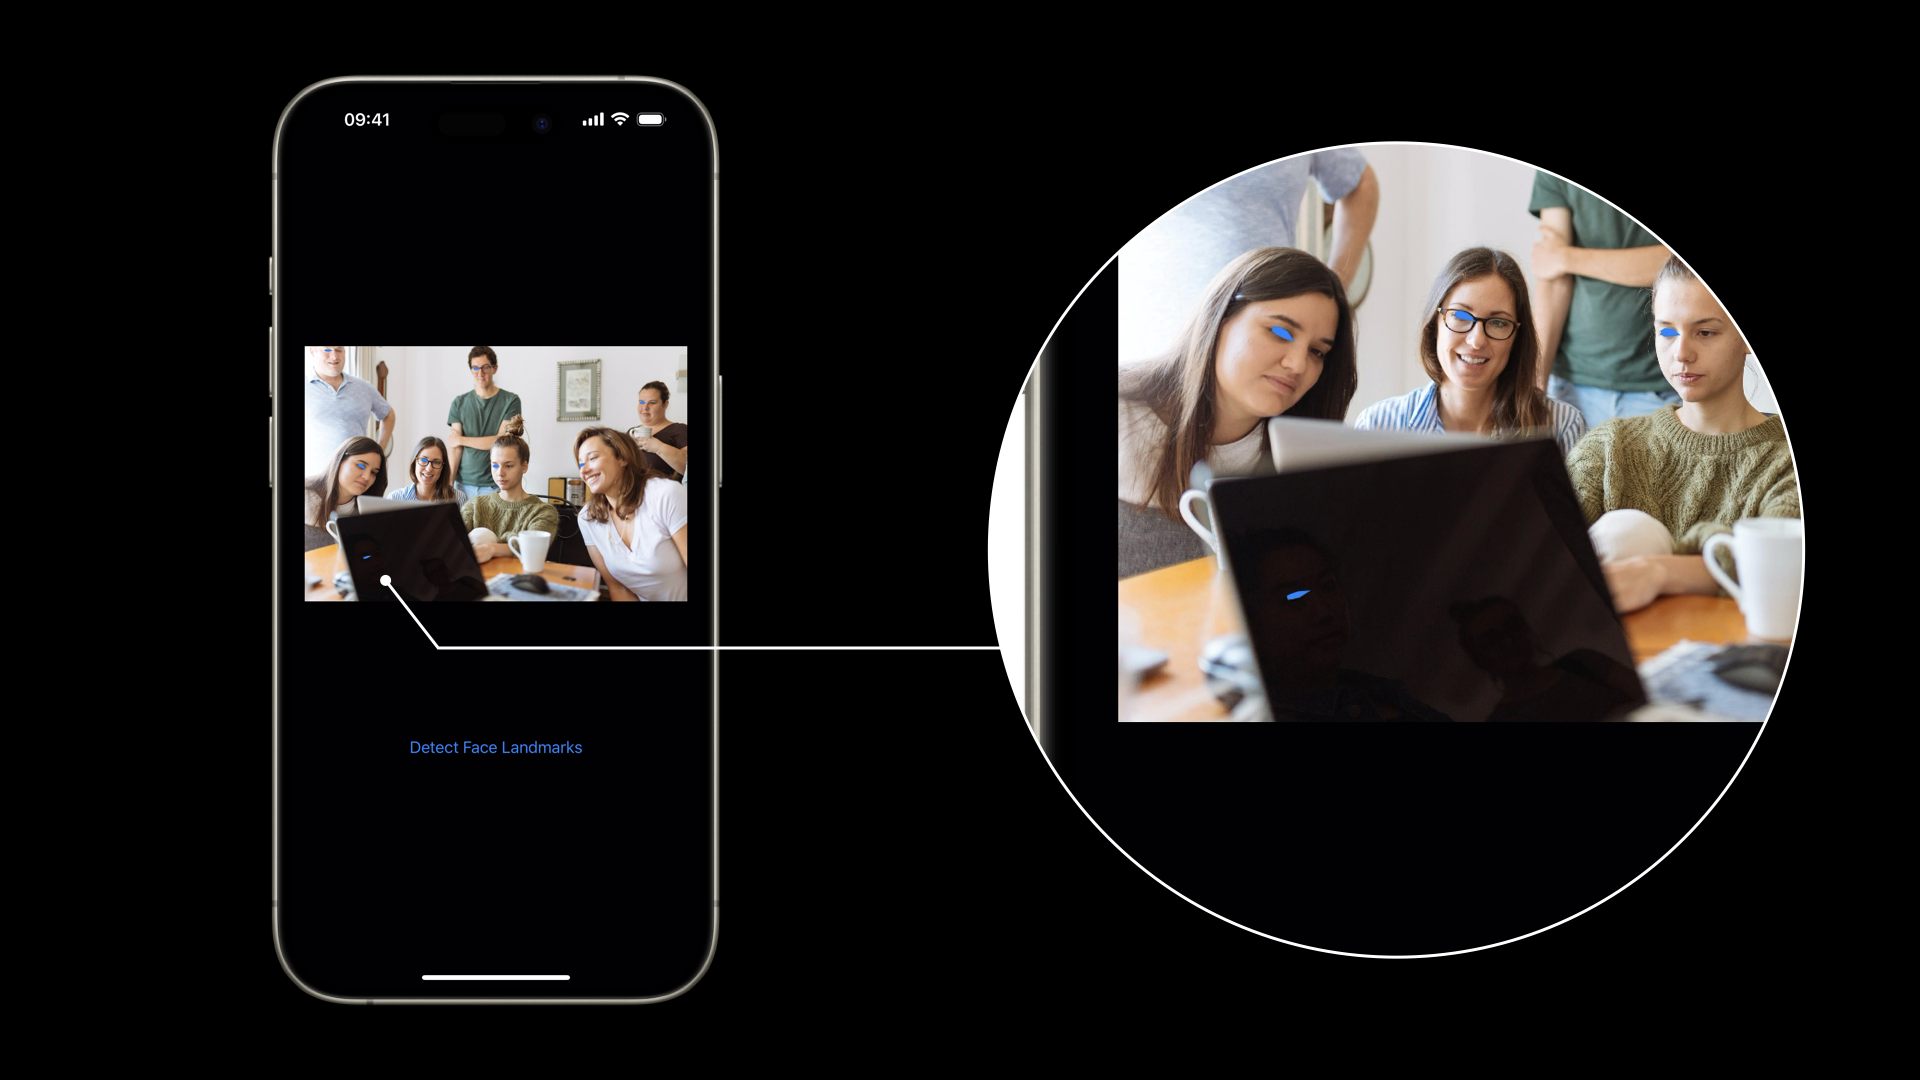
In cases like this, when you don’t want to perform the detection on all the faces present in the image, you can use the inputFaceObservations property to define the subset of faces on which to perform the detection - by default it is set on nil enabling the facial features detection on all the faces processed in the image.
Let’s see how to use it.
In this example we are going to create our subset by filtering the FaceObservation resulting from DetectFaceRectanglesRequest.
import Vision

func detectFaceLandmarks(image: UIImage) async throws -> [FaceObservation]? {
    // The image to analyze
    guard let ciImage = CIImage(image: image) else { return nil }
    do {
	// 1. Detecting the face rectangles
        let faceRectanglesRequest = DetectFaceRectanglesRequest()
        let results = try await faceRectanglesRequest.perform(on: ciImage, orientation: .up)
        // 2. Filtering the results based on the confidence level
        let filteredResults = results.filter({$0.confidence > 0.7})

        // 3. Detecting the face landmarks
        var faceLandmarksRequest = DetectFaceLandmarksRequest()
        // 4. Setting the inputFaceObservations with our subset
        faceLandmarksRequest.inputFaceObservations = filteredResults
        // 5. Performing the request
        let faceLandmarksResults = try await faceLandmarksRequest.perform(on: ciImage, orientation: .up)
        // 6. Returning the observations
        return faceLandmarksResults

    } catch {
        print("Error performing face detection: \(error.localizedDescription)")
    }
    return nil
}
detectFaceLandmarks(image:) performs two different Vision analysis:
- first, it detects the face rectangles;
- then, it filters the resulting observation based on the level of confidence;
- it sets another Vision request to detect the facial features;
- it sets the filtered observations as
inputFaceObservations; - then, it performs the request;
- and, finally, it returns the observations.
As you can see now, it is able to correctly highlight only the left eye of the faces that we expected.