
Displaying tabular data in SwiftUI using Table View
Learn how to use tables to represent data in your SwiftUI apps.

The Table view component is particularly useful for representing tabular data within our macOS and iPadOS apps. Each row in a Table represents an item from your data source, while columns display specific properties of the item.
In this article, we will explore how to implement a Table view, focusing on managing the way data is displayed within the table.
Before we start we need a collection of items that will be displayed on the table. For this purpose, we are going to define a custom type to be used in the examples called Project:
struct Project: Identifiable {
    let id = UUID()
    let appName: String
    let developmentHours: Int
    let frameworkNumbers: Int
    let downloads: Int
    let revenue: Double
}
Organizing data in columns
We can now create a collection of items within our view that will organized in a table layout using the Table view component.
import SwiftUI
struct ContentView: View {
@State var projects = [
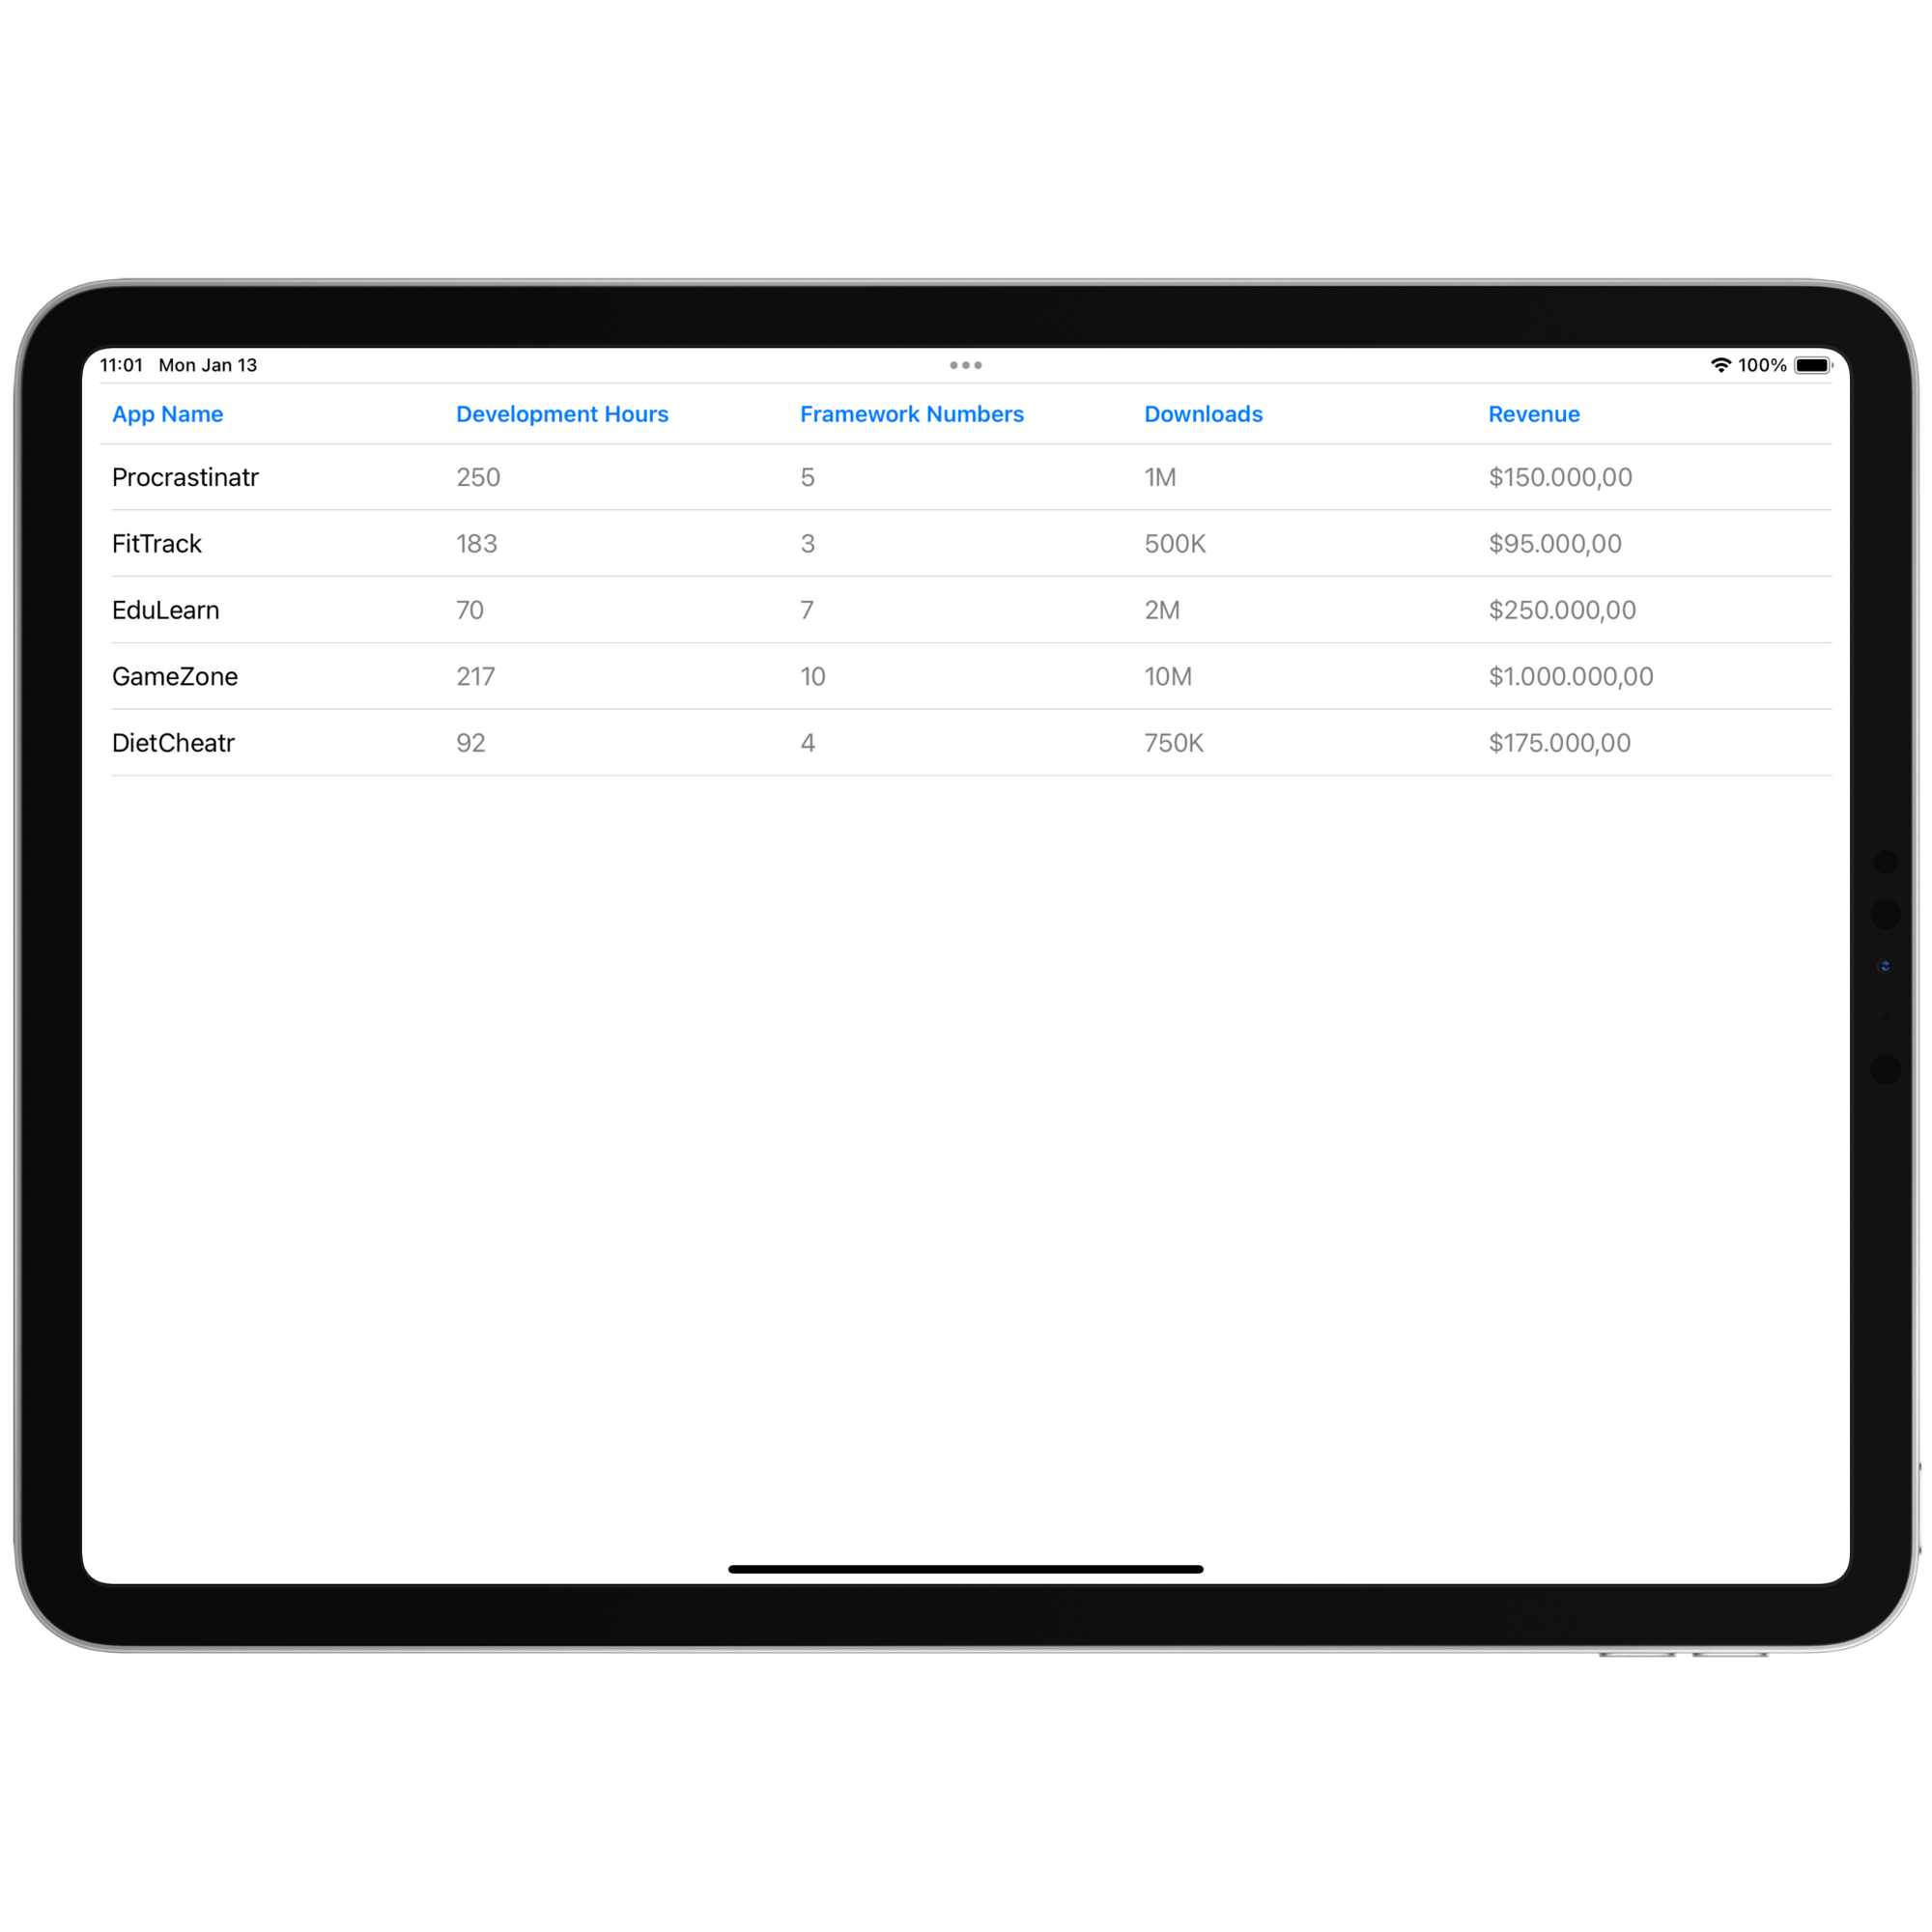
Project(appName: "Procrastinatr", developmentHours: 250, frameworkNumbers: "5", downloads: "1M", revenue: 150000.0),
Project(appName: "FitTrack", developmentHours: 183, frameworkNumbers: "3", downloads: "500K", revenue: 95000.0),
Project(appName: "EduLearn", developmentHours: 70, frameworkNumbers: "7", downloads: "2M", revenue: 250000.0),
Project(appName: "GameZone", developmentHours: 217, frameworkNumbers: "10", downloads: "10M", revenue: 1000000.0),
Project(appName: "DietCheatr", developmentHours: 92, frameworkNumbers: "4", downloads: "750K", revenue: 175000.0)
]
var body: some View {
Table(projects) {
// Table content here
}
}
}In the example above we are using the Table component with the initializer that requires the collection of data to be displayed and a @TableColumnBuilder result builder that will be responsible for creating table column content from closures.
Each column in the table is represented by a TableColumn object, which defines how a view is displayed for each row.
import SwiftUI

struct ContentView: View {
    @State var projects = [ ... ]

    var body: some View {
        Table(apps) {
            TableColumn("App Name", value: \.appName) { app in
                Text(app.appName)
            }
        }
    }

}
If we only need to display string properties, we can use the convenience initializer that eliminates the need for an explicit content closure. This initializer directly renders the string as a Text View, simplifying the implementation.
Table(apps) {
    TableColumn("App Name", value: \.appName)
}
To represent value types that are not strings, the view can be explicitly created:
import SwiftUI

struct ContentView: View {
    @State var projects = [
        Project(appName: "Procrastinatr", developmentHours: 250, frameworkNumbers: "5", downloads: "1M", revenue: 150000.0),
        Project(appName: "FitTrack", developmentHours: 183, frameworkNumbers: "3", downloads: "500K", revenue: 95000.0),
        Project(appName: "EduLearn", developmentHours: 70, frameworkNumbers: "7", downloads: "2M", revenue: 250000.0),
        Project(appName: "GameZone", developmentHours: 217, frameworkNumbers: "10", downloads: "10M", revenue: 1000000.0),
        Project(appName: "DietCheatr", developmentHours: 92, frameworkNumbers: "4", downloads: "750K", revenue: 175000.0)
    ]

    var body: some View {

        Table(projects) {
            TableColumn("App Name", value: \.appName)

            TableColumn("Development Hours", value: \.developmentHours) { app in
                Text("\(app.developmentHours)")
            }

            TableColumn("Framework Numbers", value: \.frameworkNumbers) { app in
                Text("\(app.frameworkNumbers)")
            }

            TableColumn("Downloads", value: \.downloads) { app in
                Text("\(app.downloads)")
            }

            TableColumn("Revenue", value: \.revenue) { app in
                Text("$\(app.revenue, specifier: "%.2f")")
            }
        }

    }

}
Organizing data in rows
Another possibility is just defining the different columns of the table and providing value with static rows. Use the init(of:columns:rows:) initializer where we need to specify the value type of the content that is going to be displayed and the rows closure that takes a TableRow object, that takes a single parameter as a static rows.
struct ContentView: View {
var body: some View {
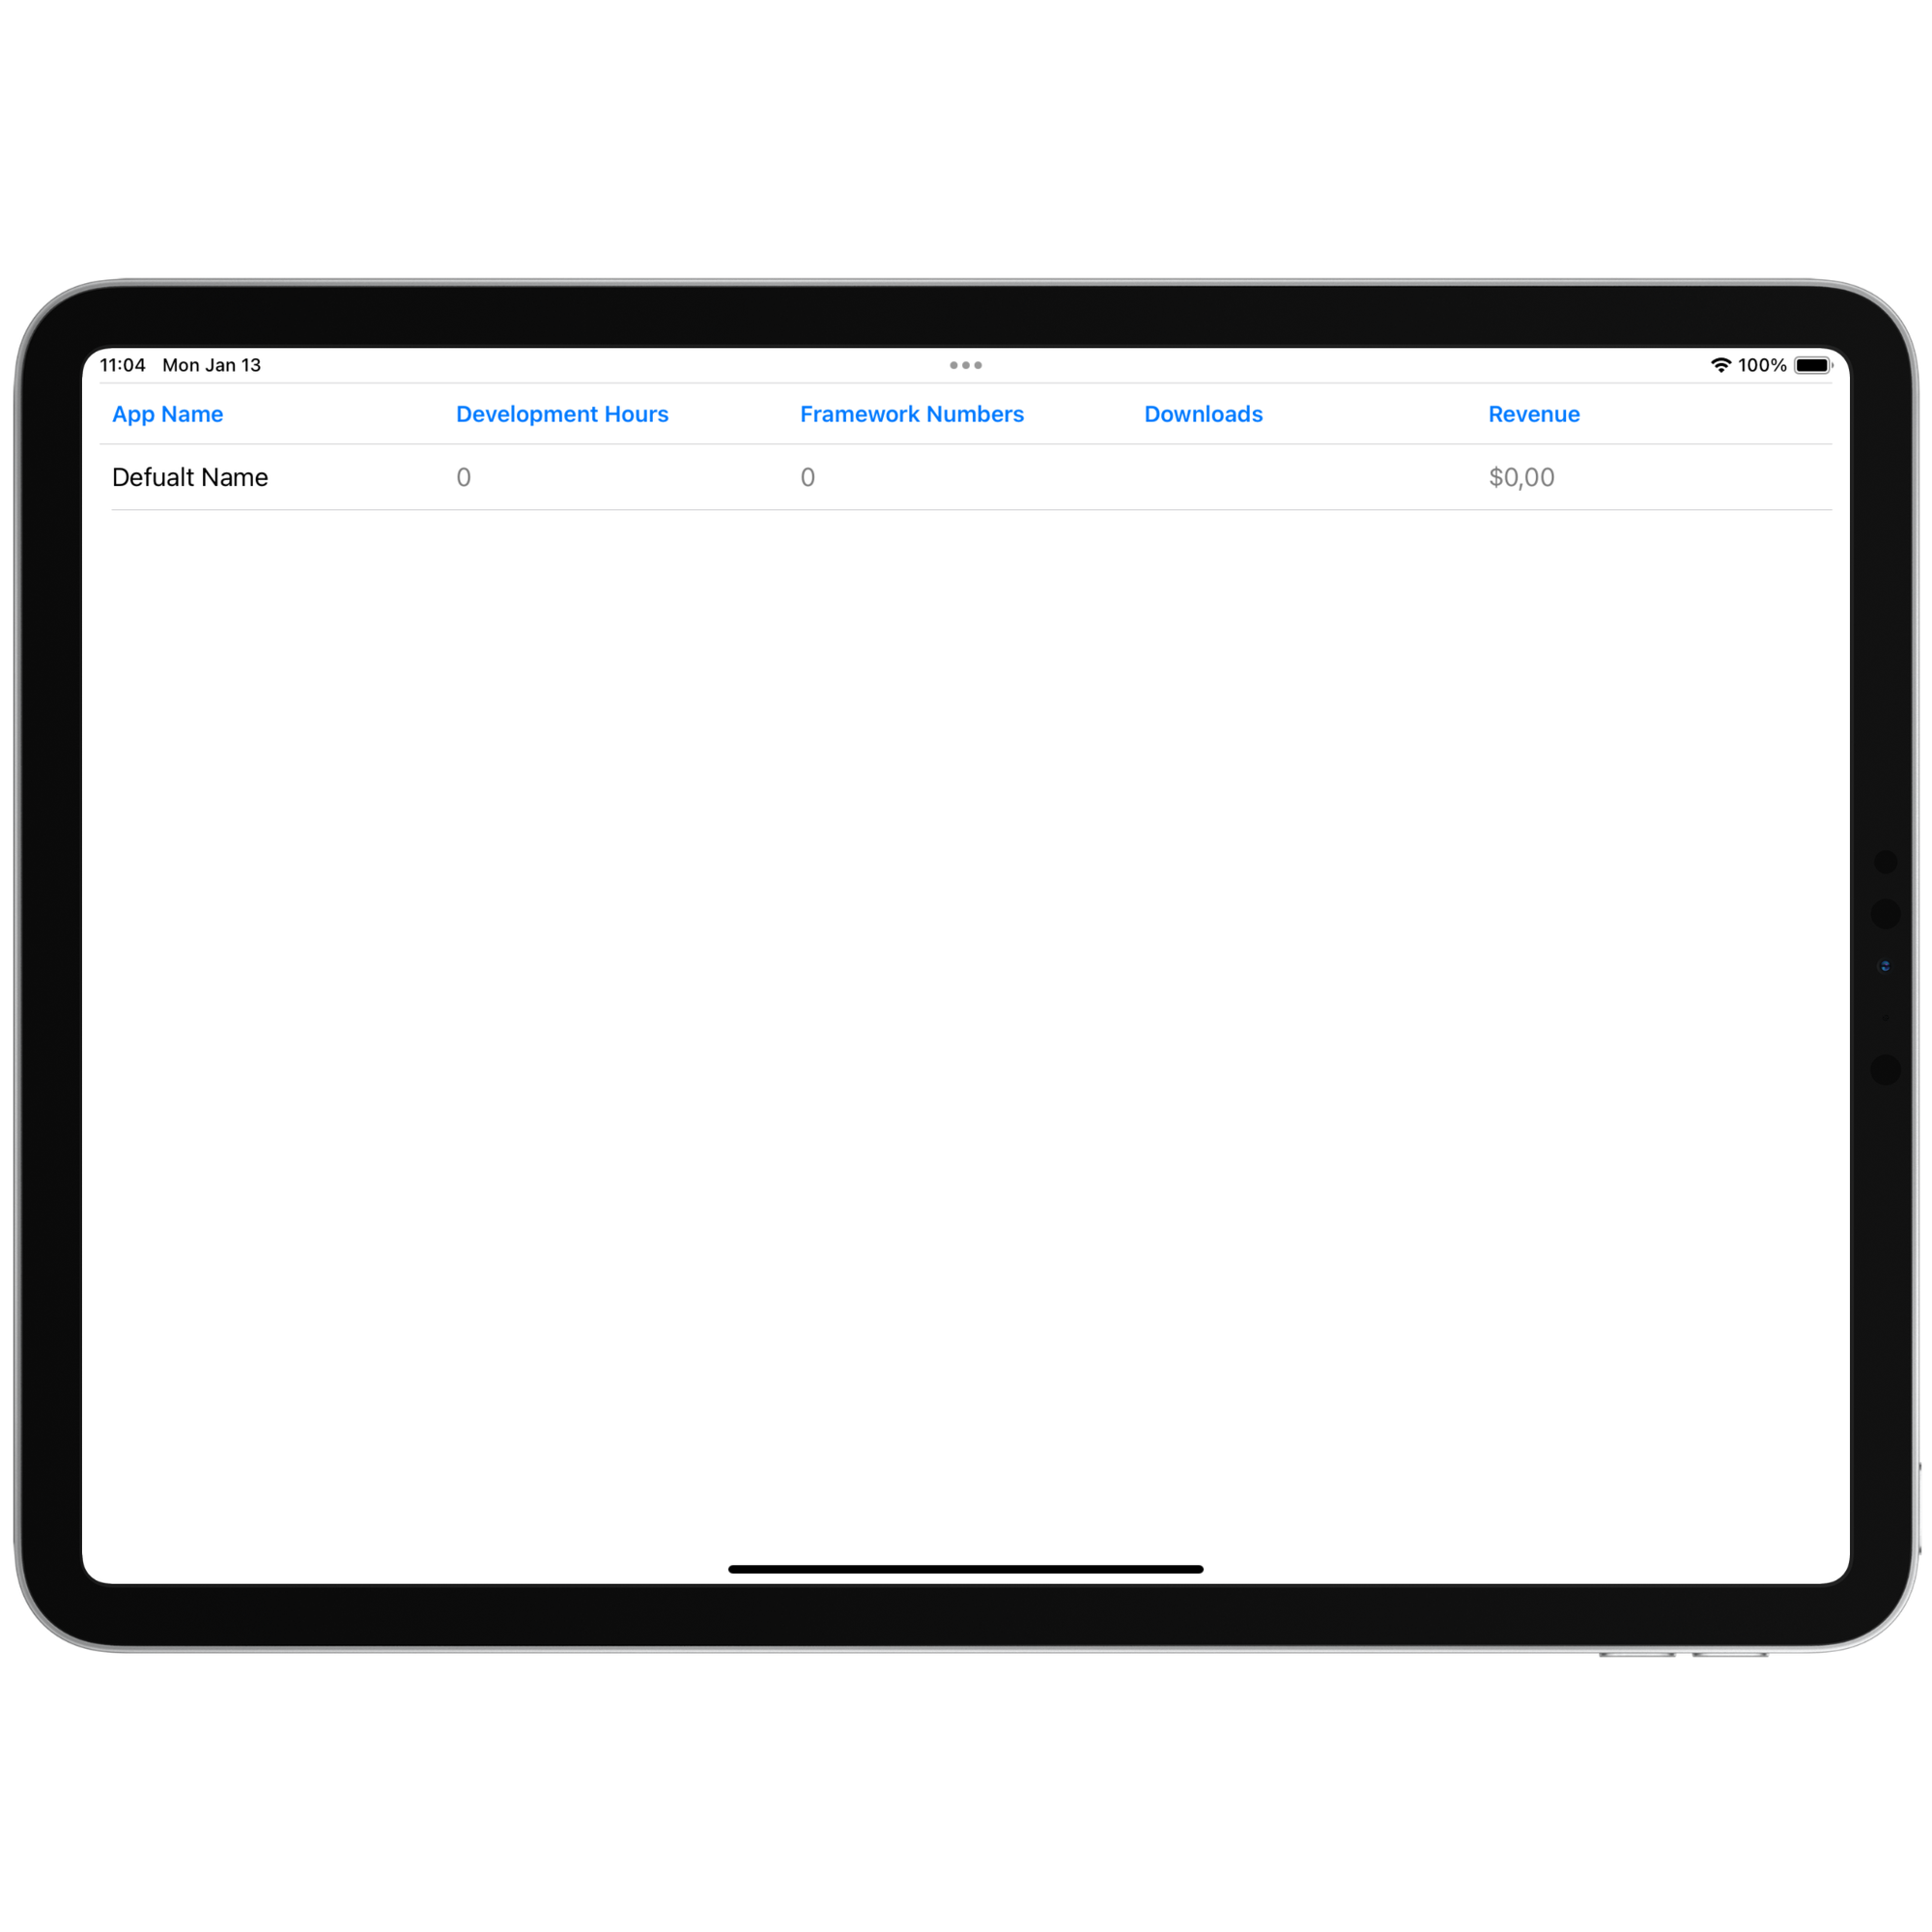
Table(of: Project.self) {
TableColumn("App Name", value: \.appName)
TableColumn("Development Hours", value: \.developmentHours) { app in
Text("\(app.developmentHours)")
}
TableColumn("Framework Numbers", value: \.frameworkNumbers) { app in
Text("\(app.frameworkNumbers)")
}
TableColumn("Downloads", value: \.downloads) { app in
Text("\(app.downloads)")
}
TableColumn("Revenue", value: \.revenue) { app in
Text("$\(app.revenue, specifier: "%.2f")")
}
} rows: {
TableRow(Project(appName: "Defualt Name", developmentHours: 0, frameworkNumbers: "0", downloads: "", revenue: 0))
}
}
}
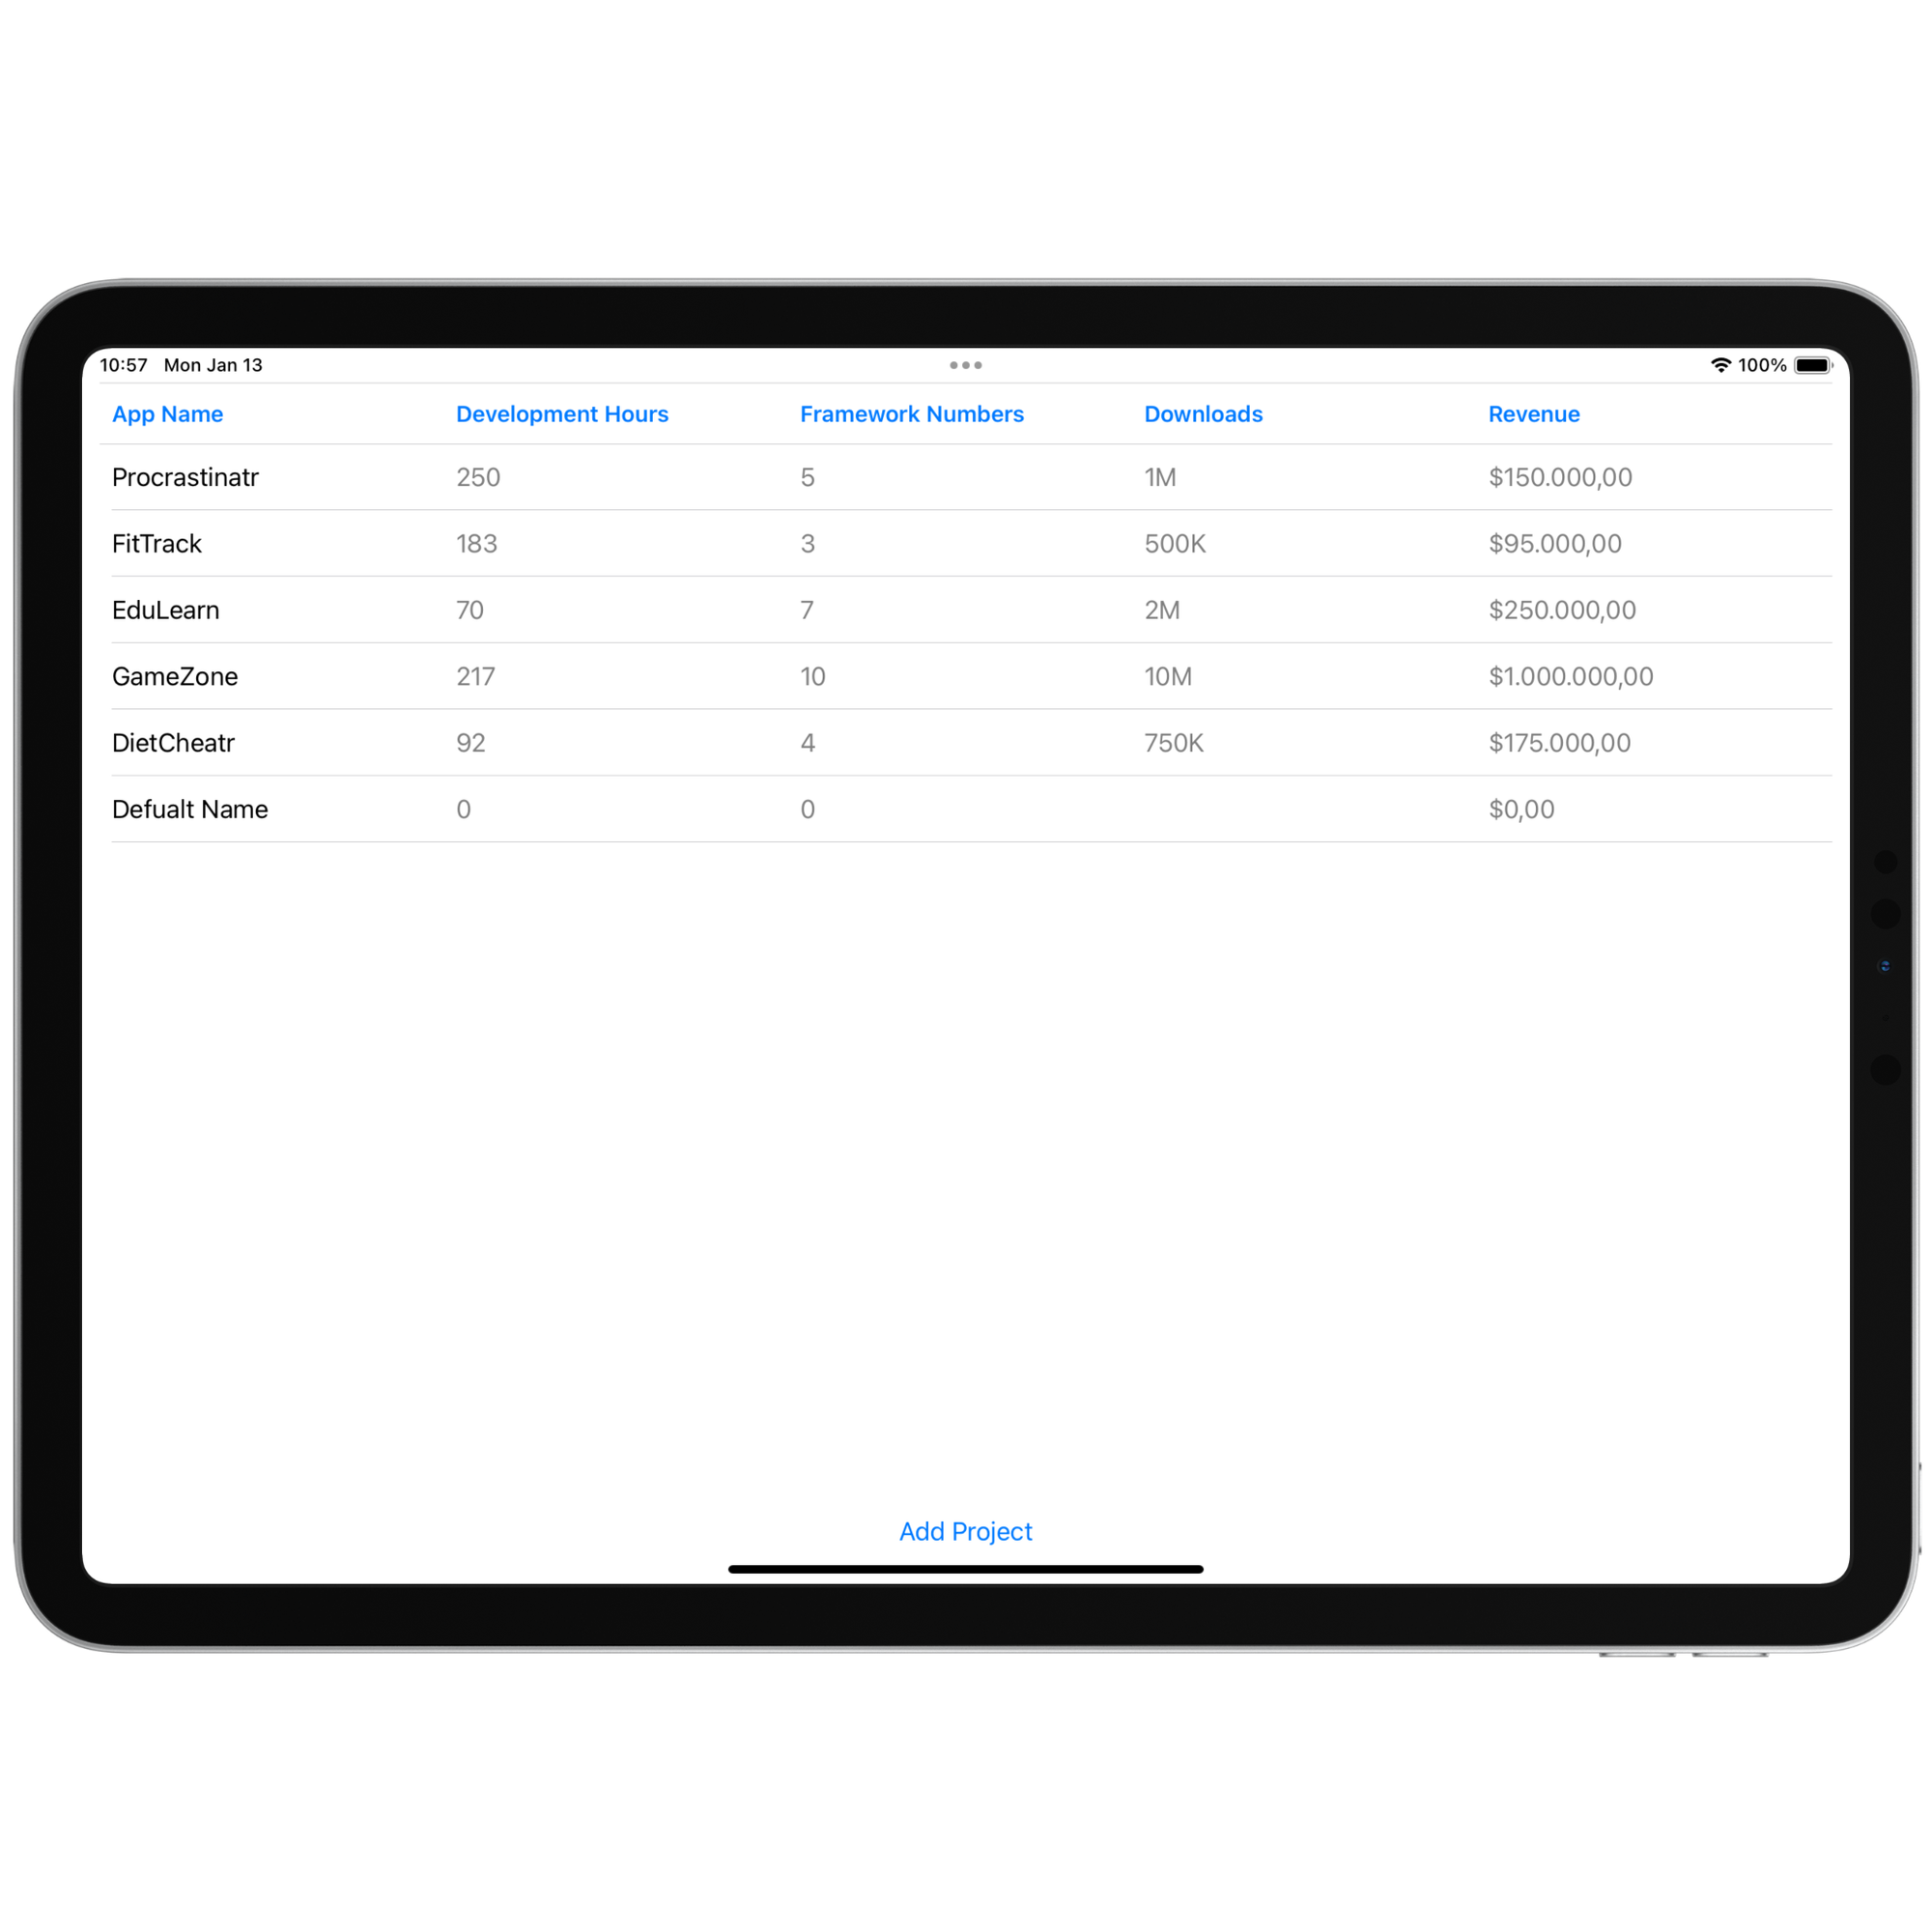
If we need to display dynamic data we can include a ForEeach block in the rows closure that will dynamically create rows based on the current item.
import SwiftUI

struct ContentView: View {

    @State var projects: [Project] = [ ... ]

    var body: some View {
        VStack {
            Table(of: Project.self) {
                TableColumn("App Name", value: \.appName)

                TableColumn("Development Hours", value: \.developmentHours) { app in
                    Text("\(app.developmentHours)")
                }

                TableColumn("Framework Numbers", value: \.frameworkNumbers) { app in
                    Text("\(app.frameworkNumbers)")
                }

                TableColumn("Downloads", value: \.downloads) { app in
                    Text("\(app.downloads)")
                }

                TableColumn("Revenue", value: \.revenue) { app in
                    Text("$\(app.revenue, specifier: "%.2f")")
                }
            } rows: {
                ForEach(projects) { project in
                    TableRow(project)
                }

                TableRow(Project(appName: "Defualt Name", developmentHours: 0, frameworkNumbers: "0", downloads: "", revenue: 0))
            }
        }

        Button("Add Project") {
            projects = [
                Project(appName: "Procrastinatr", developmentHours: 250, frameworkNumbers: "5", downloads: "1M", revenue: 150000.0),
                Project(appName: "FitTrack", developmentHours: 183, frameworkNumbers: "3", downloads: "500K", revenue: 95000.0),
                Project(appName: "EduLearn", developmentHours: 70, frameworkNumbers: "7", downloads: "2M", revenue: 250000.0),
                Project(appName: "GameZone", developmentHours: 217, frameworkNumbers: "10", downloads: "10M", revenue: 1000000.0),
                Project(appName: "DietCheatr", developmentHours: 92, frameworkNumbers: "4", downloads: "750K", revenue: 175000.0)
            ]
        }
    }
}
Sorting items
One of the advantages of displaying data using tables is the possibility of easily ordering items based on columns. To sort data within a Table view we need to define a sortOrder property that will be included into the Table(_:selection:sortOrder:columns:) initializer:
struct ContentView: View {

    @State var projects = [ ... ]
    @State var selectionData : Project.ID? = nil
    @State private var sortOrder = [KeyPathComparator(\Project.downloads)]

    var body: some View {

        Table(projects, selection: $selectionData, sortOrder: $sortOrder) {
            // Table content here
        }
        .onChange(of: sortOrder) { _, sortOrder in
            projects.sort(using: sortOrder)
        }

    }
}
In the example above we check every time that the sortOrder update its value with the "on change" modifier sorting the elements according to the sortOrder property.