Identify individual sounds in a live audio buffer
Learn how to create a SwiftUI app that uses the Sound Analysis framework to identify sounds with an audio buffer.

The Sound Analysis framework helps developers create intelligent and responsive applications that interact with their environment, providing enhanced user experiences through sound recognition capabilities.
Sound Analysis opens up exciting possibilities across various fields:
- It empowers us to control technology through voice commands, enhancing accessibility and convenience;
- By detecting environmental sounds, it can safeguard our homes and respond to emergencies;
- In health, it can monitor conditions like snoring, offering new ways to track wellness;
- For musicians, it brings precision to tuning and instrument recognition;
- In education, it creates engaging, interactive learning experiences.
The potential to transform our world with sound is truly inspiring.
Sound Analysis leverages machine learning models to identify and classify sounds from live or recorded audio. The framework, indeed, supports real-time audio stream analysis, making it suitable for applications requiring immediate feedback based on audio input. In this way, developers are given the chance to integrate sophisticated sound recognition features into their apps with minimal effort, whether by using pre-trained models or custom models created with Create ML.
This tutorial will guide you through capturing live audio and identifying individual sounds in the audio buffer. We'll leverage the capabilities of the Sound Analysis framework to process audio data and recognize specific sounds.
By the end of this tutorial, you'll have a basic understanding of setting up sound recognition in a live audio context and the tools necessary to expand this functionality for more complex applications.
Before we start
To follow along with this tutorial, ensure you're comfortable with basic Swift syntax, and SwiftUI's interface building and have some familiarity with Combine.
The tutorial uses Combine's PassthroughSubject and AnyCancellable for handling and subscribing to sound classification results asynchronously. These will empower you to explore sound analysis even more effectively.
Before we delve into the tutorial, make sure you have created a new Xcode project already and added the Privacy - Microphone Usage Description target property with its value in your project's Info.plist file to access the device's microphone in iOS.
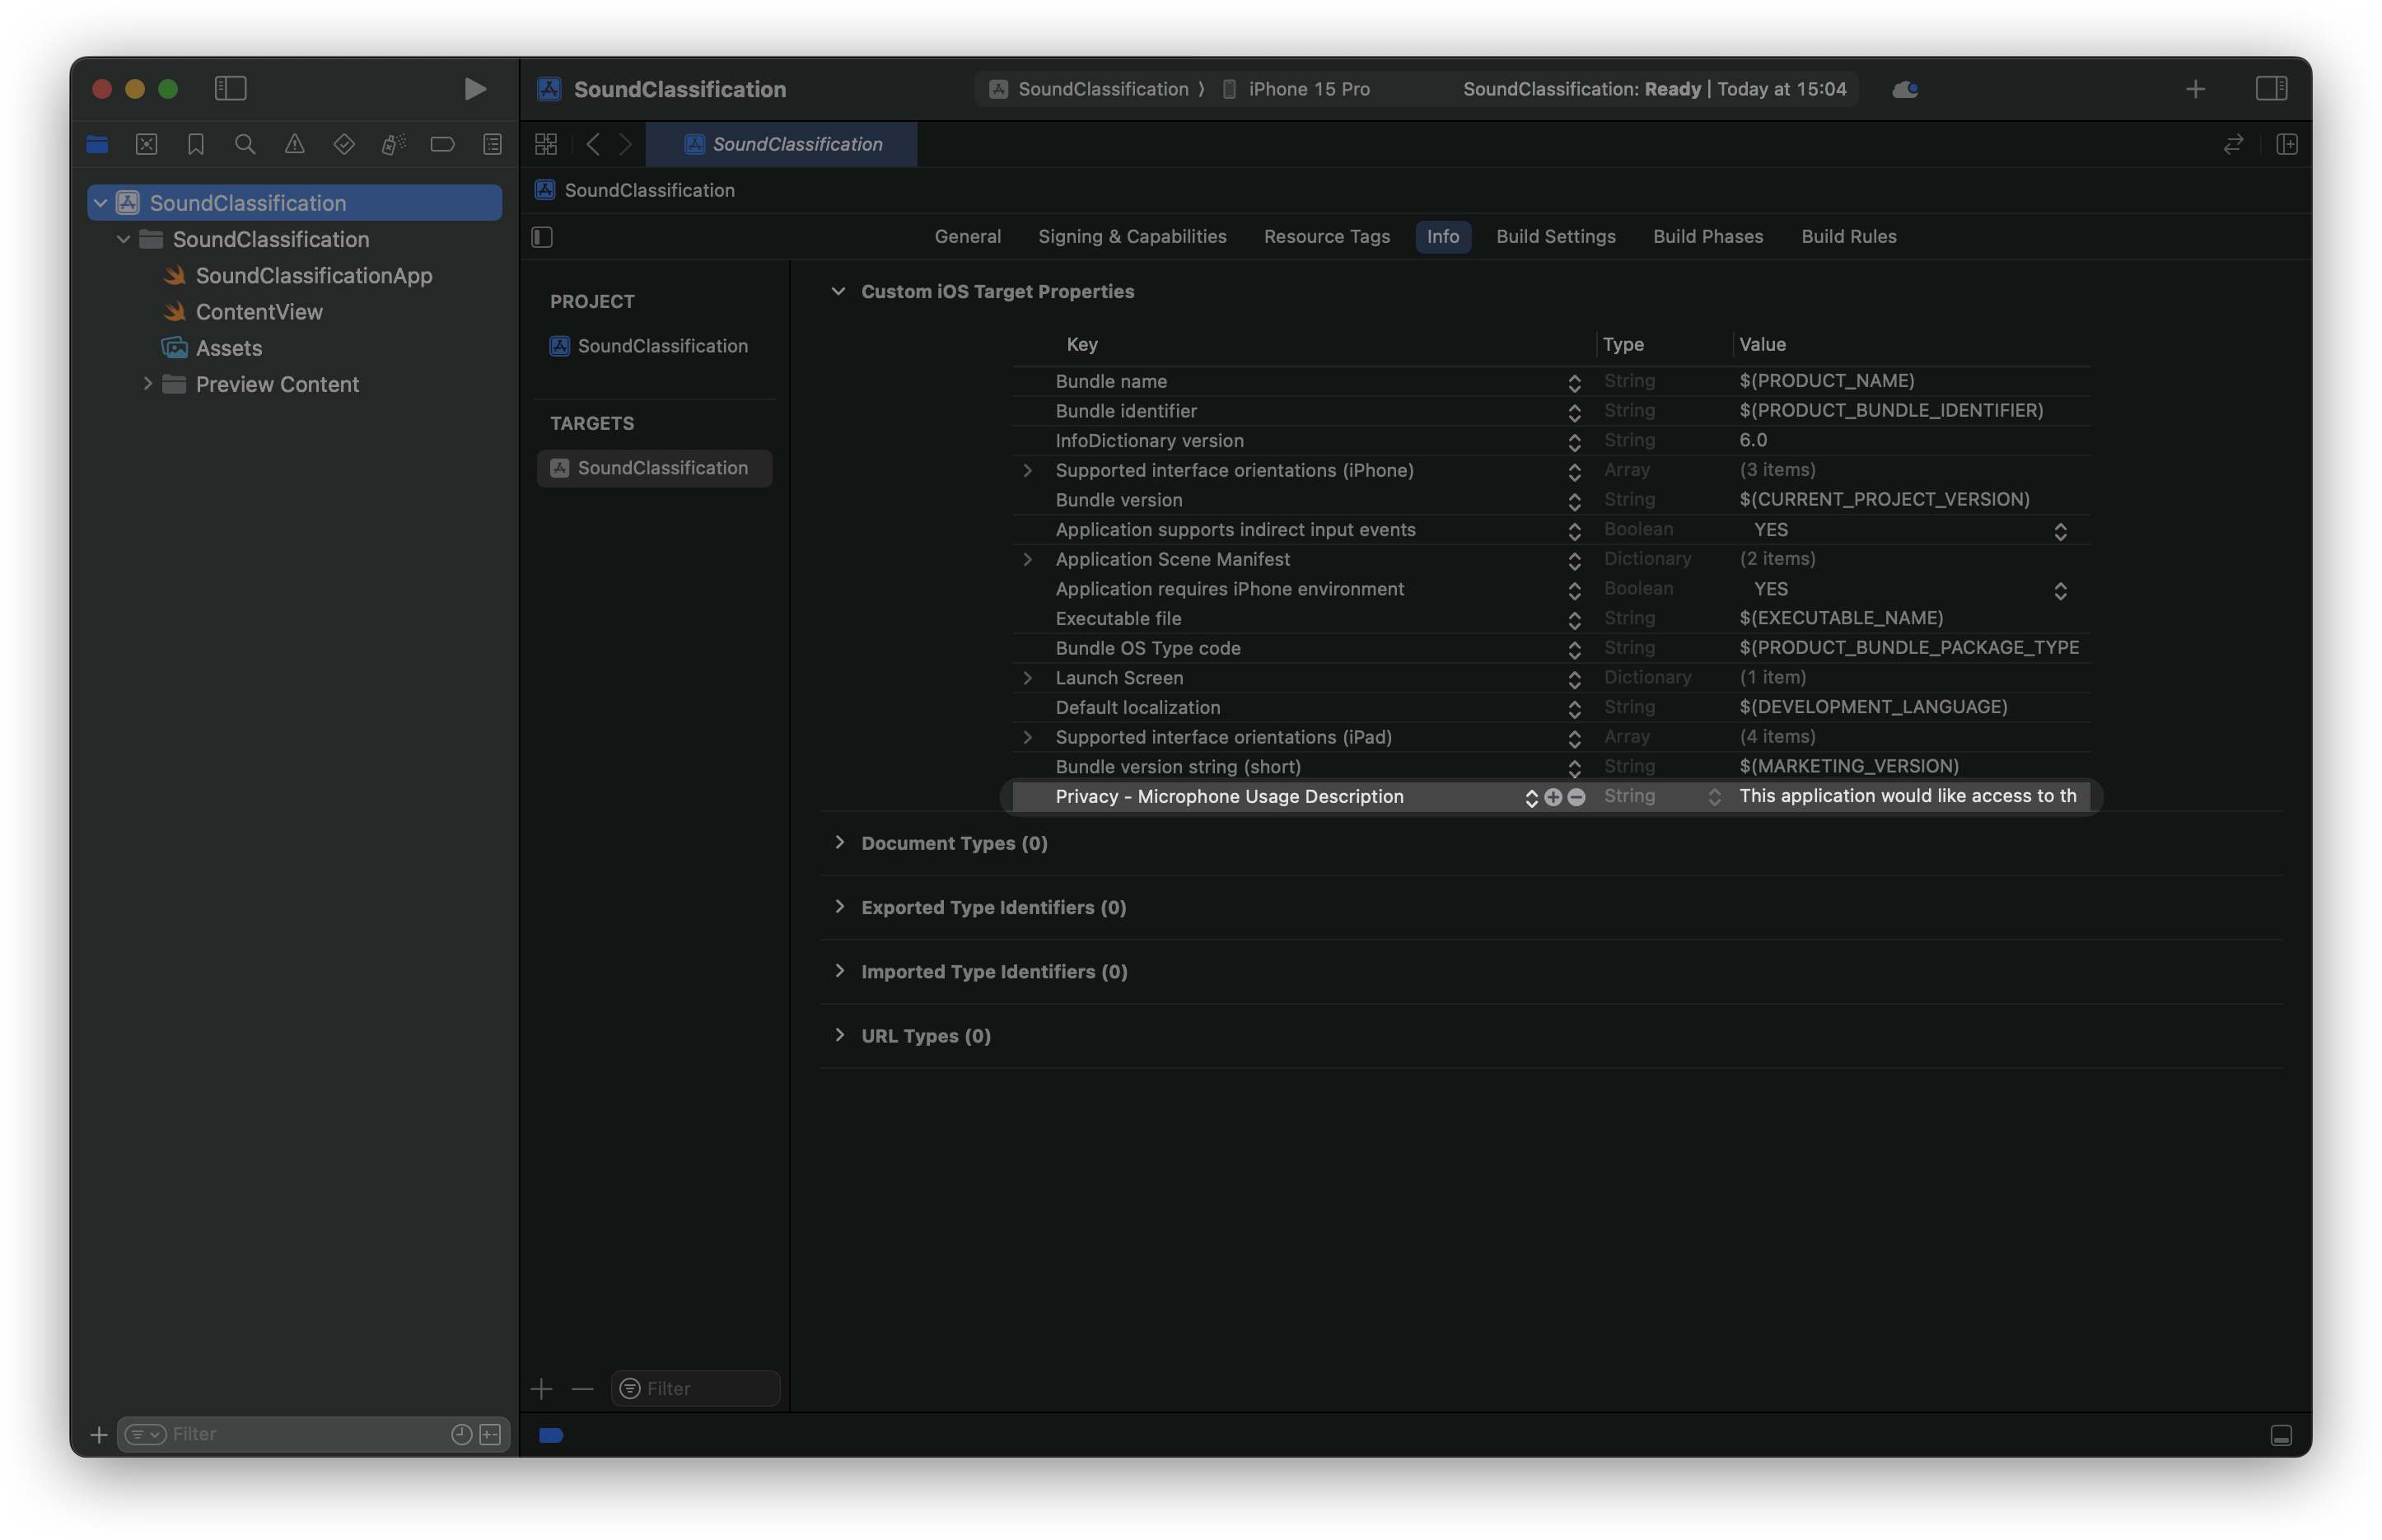
If you skip this step, the app will crash as soon as you launch it!
Step 1: Define the results observer
Create a file in our Xcode project where to declare the ResultsObserver class. It will be responsible for observing sound analysis results that will be published to subscribers via a PassthroughSubject.
ResultsObserver acts as a bridge between the Sound Analysis framework and the Combine framework. We define this class in this way to allow for the decoupling of the results’ presentation logic, whose responsible will be a view model object that we will declare later on.
Furthermore, this class handles successful results, errors, and completion events, making it easier to integrate sound analysis with reactive programming using Combine.
import SoundAnalysis
import Combine

// Observer object that is called as analysis results are found.
class ResultsObserver : NSObject, SNResultsObserving {

    // 1.
    private let subject: PassthroughSubject<SNClassificationResult, Error>

    init(subject: PassthroughSubject<SNClassificationResult, Error>) {
        self.subject = subject
    }

    // 2.
    func request(_ request: SNRequest, didProduce result: SNResult) {
        if let result = result as? SNClassificationResult {
            subject.send(result)
        }
    }

    // 3.
    func request(_ request: SNRequest, didFailWithError error: Error) {
        print("The analysis failed: \\(error.localizedDescription)")
        subject.send(completion: .failure(error))
    }

    // 4.
    func requestDidComplete(_ request: SNRequest) {
        print("The request completed successfully!")
        subject.send(completion: .finished)
    }
}
- The constant named
subjectof typePassthroughSubjectfrom the Combine framework publishesSNClassificationResultvalues and can also publish errors.init(subject:), on the other hand, initializes the class with aPassthroughSubject. This allows the observer to send analysis results to subscribers. - This method is called when a sound analysis request produces a result. It checks if the result is an instance of
SNClassificationResult. If so, it sends the result to thesubject, which will publish it to any subscribers. request(_:didFailWithError:)is called when the sound analysis request fails. It sends a failure completion event to thesubject, indicating that the stream has ended due to an error that can be handled by the subscribers.requestDidComplete(_:)is called when the sound analysis request is completed successfully. It sends a finished completion event to thesubject, indicating that the stream has ended successfully.
Step 2: Create the Sound Analysis Manager
First of all, create a new Swift file called SoundAnalysisManager.swift and define the SoundAnalysisManager class, responsible for getting the live audio buffer from the device’s microphone and analyzing it.
import SoundAnalysis
import Combine

final class SoundAnalysisManager: NSObject {

    // 1.
    private let bufferSize = 8192

    private var audioEngine: AVAudioEngine?
    private var inputBus: AVAudioNodeBus?
    private var inputFormat: AVAudioFormat?

    private var streamAnalyzer: SNAudioStreamAnalyzer?

    private let analysisQueue = DispatchQueue(label: "com.createwithswift.AnalysisQueue")

    private var retainedObserver: SNResultsObserving?
    private var subject: PassthroughSubject<SNClassificationResult, Error>?

    static let shared = SoundAnalysisManager()

    private override init() {}
}
- In this block we declare the following properties and the initializer:
bufferSize: Sets the audio buffer size for efficient processing.audioEngine,inputBus, andinputFormatare used for setting up the audio input.streamAnalyzer: Handles sound analysis using the audio format.analysisQueue: Runs analysis tasks asynchronously to avoid blocking the main thread.retainedObserver: Keeps the observer in memory during analysis.subject: APassthroughSubjectfor publishing results or errors.shared: Ensures only one instance of theSoundAnalysisManageris instantiated.- Private initializer: Restricts access to the class initializer.
final class SoundAnalysisManager: NSObject {

    // 1. Properties and initializer

    ...

    // 2.
    private func setupAudioEngine() {
        audioEngine = AVAudioEngine()
        let inputBus = AVAudioNodeBus(0)
        self.inputBus = inputBus
        inputFormat = audioEngine?.inputNode.inputFormat(forBus: inputBus)
    }
}
- We define a function to set up the audio engine. The audio engine is initialized to manage audio processing. The first input bus is selected for audio input, and the input format is retrieved to configure the stream analyzer.
final class SoundAnalysisManager: NSObject {

    // 1. Properties and initializer

    ...

    // 2.
    private func setupAudioEngine() { ... }

    // 3.
    private func startAnalysis(_ requestAndObserver: (request: SNRequest, observer: SNResultsObserving)) throws {
        // a.
        setupAudioEngine()

        // b.
        guard let audioEngine = audioEngine,
              let inputBus = inputBus,
              let inputFormat = inputFormat else { return }

        // c.
        let streamAnalyzer = SNAudioStreamAnalyzer(format: inputFormat)
        self.streamAnalyzer = streamAnalyzer
        // d.
        try streamAnalyzer.add(requestAndObserver.request, withObserver: requestAndObserver.observer)
        // e.
        retainedObserver = requestAndObserver.observer

        // f.
        self.audioEngine?.inputNode.installTap(
            onBus: inputBus,
            bufferSize: UInt32(bufferSize),
            format: inputFormat
        ) { buffer, time in
            self.analysisQueue.async {
                self.streamAnalyzer?.analyze(buffer, atAudioFramePosition: time.sampleTime)
            }
        }

        do {
            // g.
            try audioEngine.start()
        } catch {
            print("Unable to start AVAudioEngine: \(error.localizedDescription)")
        }
    }
}
- Define the
startAnalysis(_:)function to be used by passing a Classification Request and a Results Observer.- Before starting analysis, the audio engine is set up to ensure all components are initialized.
- The class properties
audioEngine,inputBus, andinputFormatare checked to prevent errors. - The
streamAnalyzeris created using the input format. - The sound analysis request and observer are added to the analyzer, specifying what to classify and how to handle results.
- The observer is retained in memory during the analysis process.
- An audio tap is installed to capture and analyze audio buffers asynchronously, avoiding main thread blockage.
- The audio engine is started to begin capturing and processing audio, with errors being handled and printed if they occur.
SNAudioStreamAnalyzer and set up a new one that matches the new format.At this point, we have to define the function responsible for creating a classification request and an observer, meant to support the function right above.
We can proceed in two ways, we can either:
- Use Sound Analysis’ built-in sound classifier or,
- Use our own Core ML Sound Classification model
Option 1: Using pre-trained sound classifiers
Apple's Sound Analysis framework includes SNClassifierIdentifier.version1 as the primary built-in classifier identifier. This classifier is designed to recognize a variety of common sounds, such as different types of human speech, environmental noises, and musical instruments. As the name suggests, Apple may introduce other versions of sound classifiers in future updates to the framework.
The following code creates a SNClassifySoundRequest with using it.
final class SoundAnalysisManager: NSObject {

    // 1.

    ...

    // 2.
    private func setupAudioEngine() { ... }

    // 3.
    private func startAnalysis(_ requestAndObserver: (request: SNRequest, observer: SNResultsObserving)) throws { ... }

    // 4.
    func startSoundClassification(subject: PassthroughSubject<SNClassificationResult, Error>,
                                  inferenceWindowSize: Double? = nil,
                                  overlapFactor: Double? = nil) {
        do {
            // a.
            let observer = ResultsObserver(subject: subject)

            // b. Request with Sound Analysis' built-in Sound Classifier.
            let version1 = SNClassifierIdentifier.version1
            let request = try SNClassifySoundRequest(classifierIdentifier: version1)

            // c.
            if let inferenceWindowSize = inferenceWindowSize {
                request.windowDuration = CMTimeMakeWithSeconds(inferenceWindowSize, preferredTimescale: 48_000)
            }
            if let overlapFactor = overlapFactor {
                request.overlapFactor = overlapFactor
            }

            self.subject = subject
            try startAnalysis((request, observer))
        } catch {
            print("Unable to prepare request with Sound Classifier: \(error.localizedDescription)")
            subject.send(completion: .failure(error))
            self.subject = nil
        }
    }
}
When startSoundClassification(subject:inferenceWindowSize:overlapFactor:) is called, a PassthroughSubject is used to publish results or errors.
- Define the
startSoundClassification(subject:inferenceWindowSize:overlapFactor:)method.- Create a
ResultsObserverto handle classification results - A
SNClassifySoundRequestis initialized to classify sounds using Apple's pre-trained model. - You can customize the request with optional parameters for
inferenceWindowSize(how long each audio segment is analyzed) andoverlapFactor(how much these segments overlap).
- Create a
Option 2: Using a custom Sound Classifier
If we already own a Core ML model for sound classification, we can bundle it in the app by dragging and dropping the model file on Xcode. As the following picture shows, the adaptation only requires you to change a few lines of code.
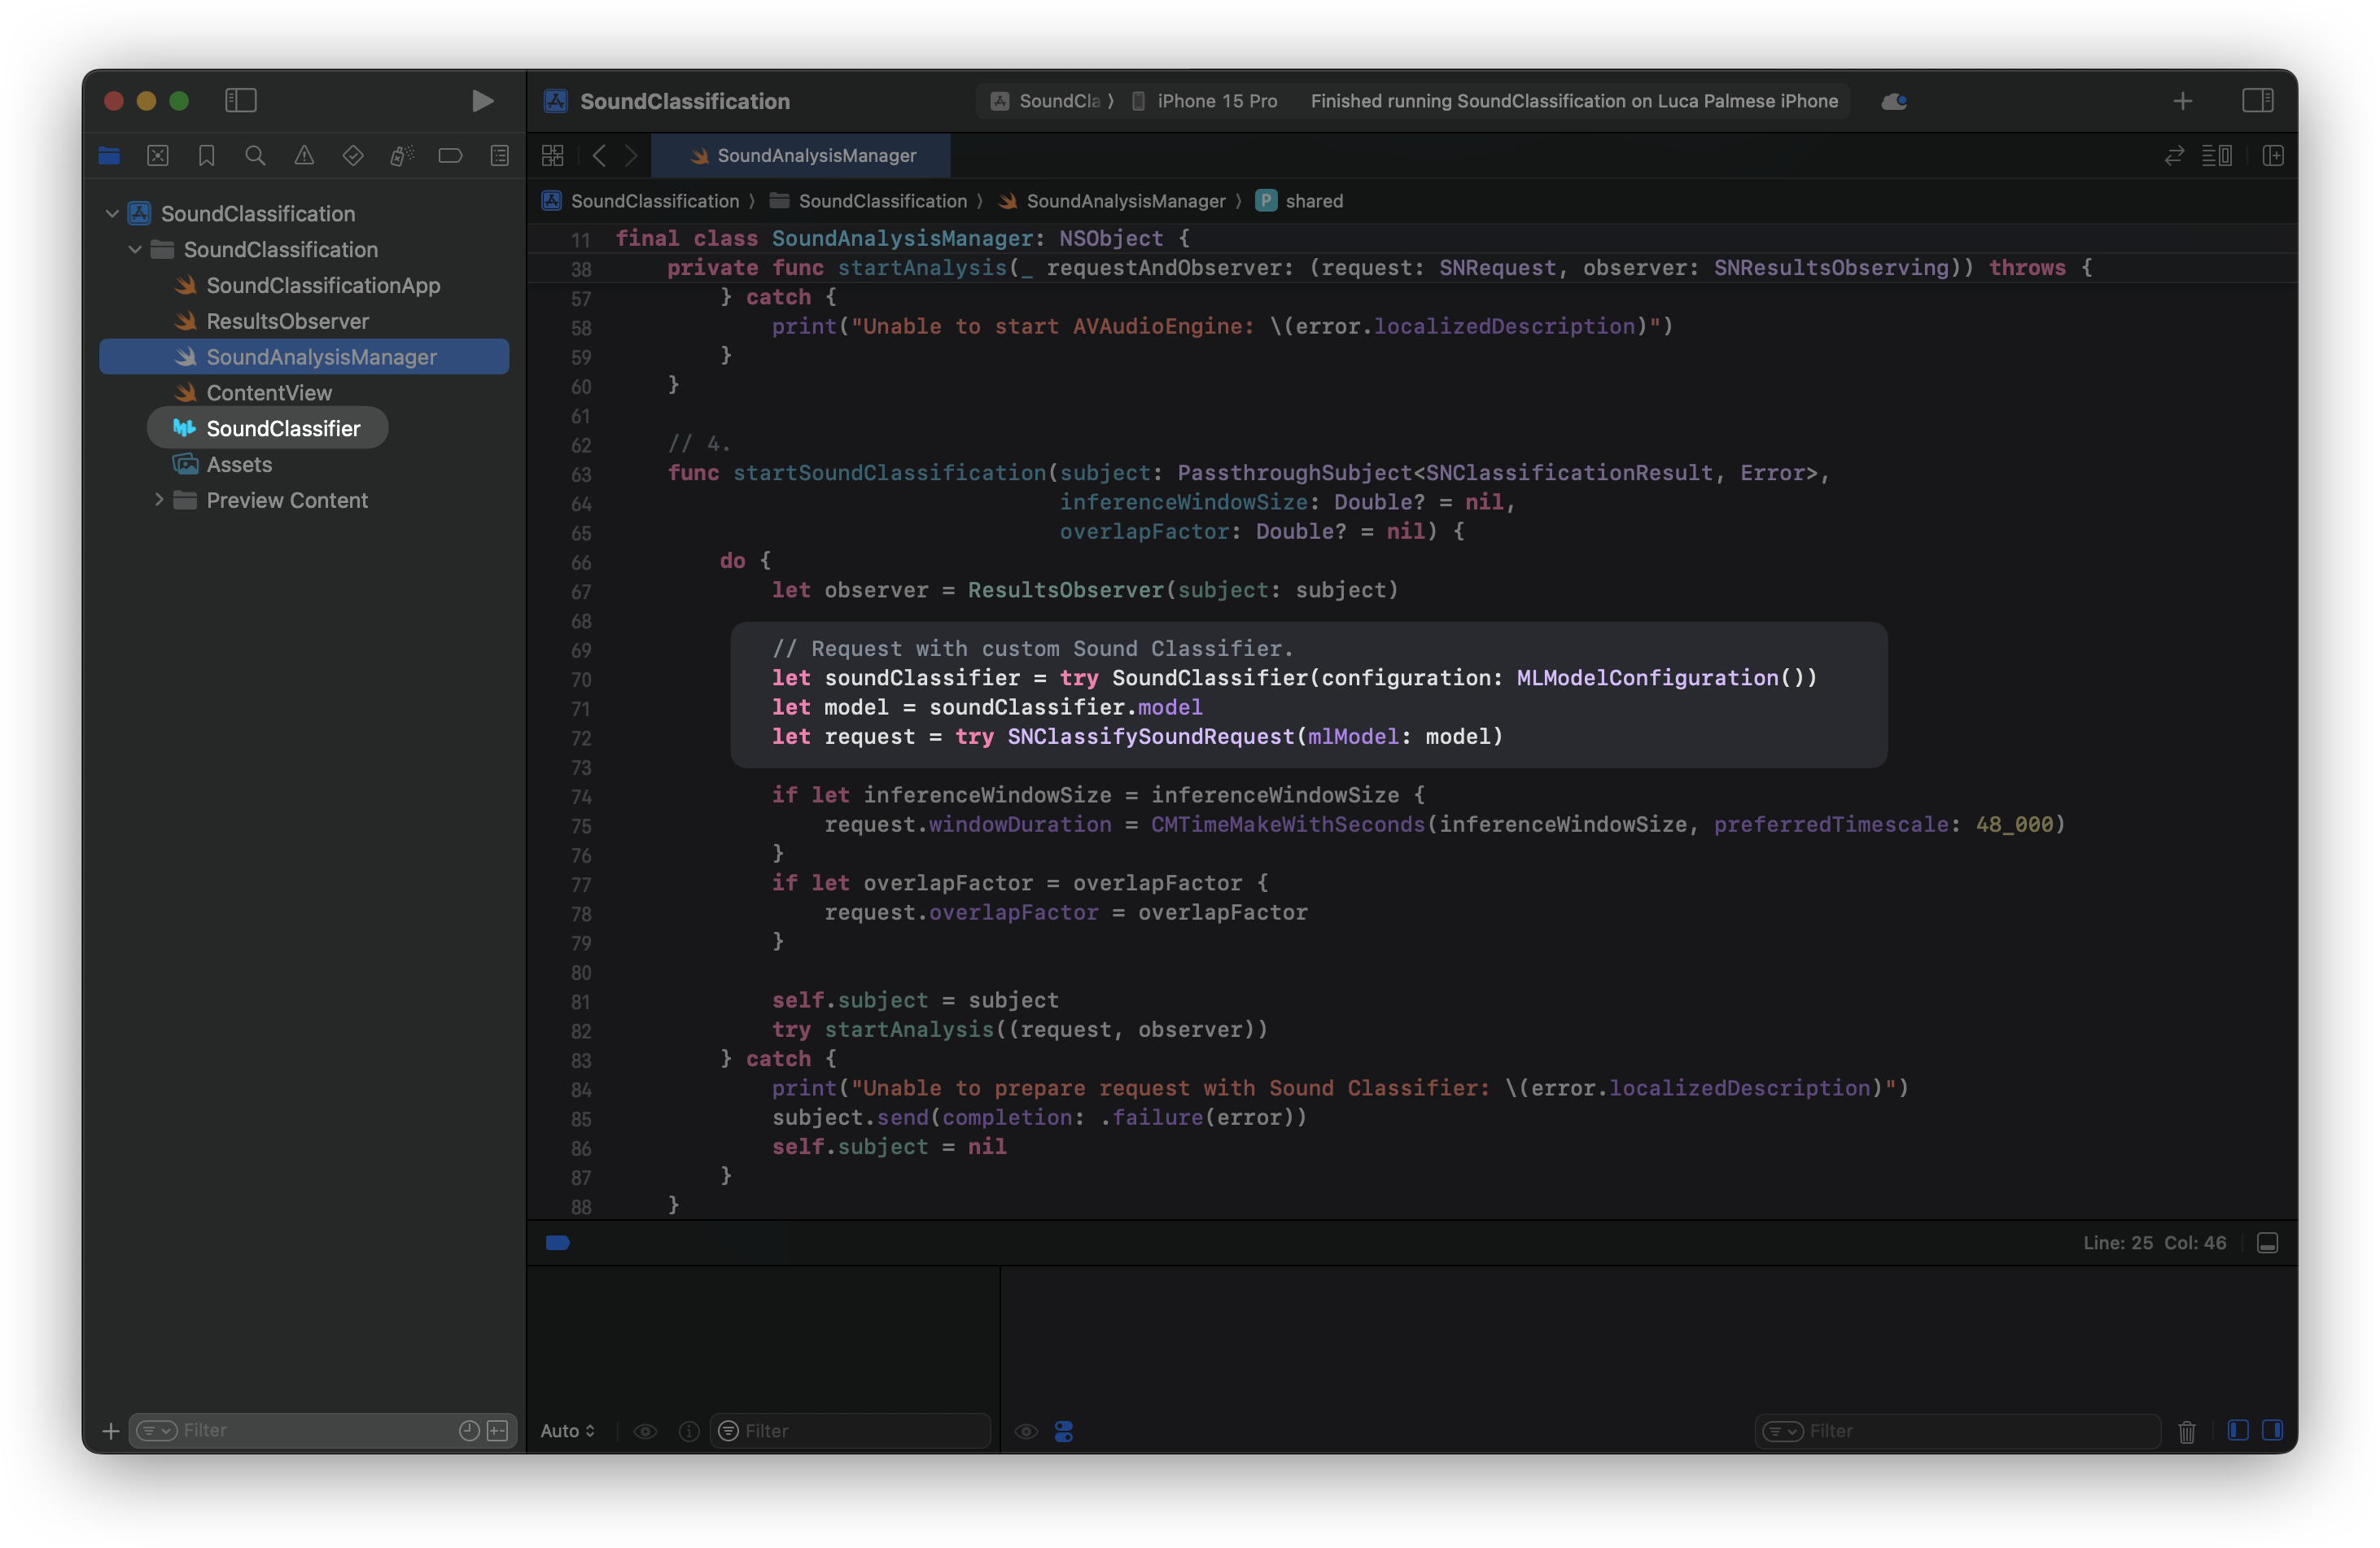
The name of the model used in this example is SoundClassifier. Remember to use your model file name when creating the soundClassifier instance.
Here is what the function should look like when integrating a custom model.
func startSoundClassification(subject: PassthroughSubject<SNClassificationResult, Error>,
                              inferenceWindowSize: Double? = nil,
                              overlapFactor: Double? = nil) {
    do {
        let observer = ResultsObserver(subject: subject)

        // -- Request with custom Sound Classifier.
        let soundClassifier = try SoundClassifier(configuration: MLModelConfiguration())
        let model = soundClassifier.model
        let request = try SNClassifySoundRequest(mlModel: model)
        // ----------------

        if let inferenceWindowSize = inferenceWindowSize {
            request.windowDuration = CMTimeMakeWithSeconds(inferenceWindowSize, preferredTimescale: 48_000)
        }
        if let overlapFactor = overlapFactor {
            request.overlapFactor = overlapFactor
        }

        self.subject = subject
        try startAnalysis((request, observer))
    } catch {
        print("Unable to prepare request with Sound Classifier: \(error.localizedDescription)")
        subject.send(completion: .failure(error))
        self.subject = nil
    }
}
The only difference from before is that the SNClassifySoundRequest is generated using our own model. The rest is identical.
The last method we need is one for stopping the sound classification and the audio engine.
final class SoundAnalysisManager: NSObject {

    // 1.

    ...

    // 2.
    private func setupAudioEngine() { ... }

    // 3.
    private func startAnalysis(_ requestAndObserver: (request: SNRequest, observer: SNResultsObserving)) throws { ... }

    // 4.
    func startSoundClassification(subject: PassthroughSubject<SNClassificationResult, Error>,
                                  inferenceWindowSize: Double? = nil,
                                  overlapFactor: Double? = nil) { ... }

    // 5.
    func stopSoundClassification() {
        // a.
        autoreleasepool {
            // b.
            if let audioEngine = audioEngine {
                audioEngine.stop()
                audioEngine.inputNode.removeTap(onBus: 0)
            }
            // c.
            if let streamAnalyzer = streamAnalyzer {
                streamAnalyzer.removeAllRequests()
            }
            // d.
            streamAnalyzer = nil
            retainedObserver = nil
            audioEngine = nil
        }
    }
}
- Declare a method called
stopSoundClassification()- To manage memory, an autorelease pool is used to release temporary objects immediately.
- The audio engine is stopped to halt audio capture and processing, and the audio tap is removed to stop data flow.
- All analysis requests are cleared from the stream analyzer.
- The
streamAnalyzer,retainedObserver, andaudioEngineare set tonilto clean up resources and prevent memory leaks.
Now that the SoundAnalysisManager is complete, it’s time to create a view model object to format the results for the user interface.
Step 3: Process and format the results in a View Model
Create a new Swift file called SoundDetectionViewModel.swift and declare a class named SoundDetectionViewModel.
import Observation
import SoundAnalysis
import Combine

@Observable
class SoundDetectionViewModel {

    // 1.
    @ObservationIgnored
    let soundAnalysisManager = SoundAnalysisManager.shared

    @ObservationIgnored
    var lastTime: Double = 0

    var detectionStarted = false
    var identifiedSound: (identifier: String, confidence: String)?
    private var detectionCancellable: AnyCancellable? = nil

    // 2.
    private func formattedDetectionResult(_ result: SNClassificationResult) -> (identifier: String, confidence: String)? {
        guard let classification = result.classifications.first else { return nil }

        if lastTime == 0 {
            lastTime = result.timeRange.start.seconds
        }

        let formattedTime = String(format: "%.2f", result.timeRange.start.seconds - lastTime)
        print("Analysis result for audio at time: \(formattedTime)")

        let displayName = classification.identifier.replacingOccurrences(of: "_", with: " ").capitalized
        let confidence = classification.confidence
        let confidencePercentString = String(format: "%.2f%%", confidence  * 100.0)
        print("\(displayName): \(confidencePercentString) confidence.\n")

        return (displayName, confidencePercentString)
    }

    // 3.
    func startDetection() {
        let classificationSubject = PassthroughSubject<SNClassificationResult, Error>()

        detectionCancellable = classificationSubject
            .receive(on: DispatchQueue.main)
            .sink(receiveCompletion: { _ in self.detectionStarted = false },
                  receiveValue: { result in
                self.identifiedSound = self.formattedDetectionResult(result)
            })

        soundAnalysisManager.startSoundClassification(subject: classificationSubject)
    }

    // 4.
    func stopDetection() {
        lastTime = 0
        identifiedSound = nil
        soundAnalysisManager.stopSoundClassification()
    }
}- The
SoundDetectionViewModelclass uses theSoundAnalysisManagerto handle sound analysis. It initializes a shared instance ofSoundAnalysisManagerand sets up properties to track the detection state (detectionStarted), the last time a sound was detected (lastTime), and the most recently identified sound (identifiedSound). It also has a property calleddetectionCancellableto manage the subscription to sound classification results. - The
formattedDetectionResult(_:)method processes the classification result. It extracts the highest confidence classification (sinceresult.classifcations.firstis the first element in an array of classifications sorted in descending confidence score order), calculates the time difference from the last detection, and prints this information. It then formats the classification identifier and confidence into a readable string and returns them. - The
startDetection()method initializes aPassthroughSubjectto publish classification results. It sets up a subscription (detectionCancellable) to handle these results on the main thread. When results are received, they are processed using theformattedDetectionResult(_:)method, and theidentifiedSoundvariable is updated. The sound analysis is started by callingstartSoundClassificationonsoundAnalysisManager. - The
stopDetection()method resets thelastTimeproperty and theidentifiedSoundproperty to their initial states and stops the sound analysis by callingstopSoundClassification()on thesoundAnalysisManagerobject. This effectively halts the detection process.
The last step is to create the user interface to display the sound classification magic.
Step 4: Display the results in a View
Create a View to display the results of our sound classification tasks. The View will be responsible for starting and stopping sound detection with a button. The interface then will show the detected sound and its confidence level, providing real-time feedback.
import SwiftUI

struct ContentView: View {

    let viewModel = SoundDetectionViewModel()

    var body: some View {
        VStack {
            Spacer()
            // 1.
            if !viewModel.detectionStarted {
                ContentUnavailableView("No Sound Detected", systemImage: "waveform.badge.magnifyingglass", description: Text("Tap the microphone to start detecting"))
            } else if let predictedSound = viewModel.identifiedSound {
                VStack(spacing: 10) {
                    Text(predictedSound.0)
                        .font(.system(size: 26))
                    Text("\\(predictedSound.1) confidence")
                        .font(.system(size: 16))
                }
                .multilineTextAlignment(.center)
                .padding()
                .foregroundStyle(.secondary)
                .background(content: {
                    RoundedRectangle(cornerRadius: 14)
                        .fill(.ultraThinMaterial)
                })
            } else {
                ProgressView("Classifying sound...")
            }

            Spacer()

            // 2.
            Button(action: {
                withAnimation {
                    viewModel.detectionStarted.toggle()
                }
                viewModel.detectionStarted ? viewModel.startDetection() : viewModel.stopDetection()
            }, label: {
                Image(systemName: viewModel.detectionStarted ? "stop.fill" : "mic.fill")
                    .font(.system(size: 50))
                    .padding(30)
                    .background(viewModel.detectionStarted ? .gray.opacity(0.7) : .blue)
                    .foregroundStyle(.white)
                    .clipShape(Circle())
                    .shadow(color: .gray, radius: 5)
                    .contentTransition(.symbolEffect(.replace))
            })
        }
        .padding()
    }
}
- The
ContentViewstruct creates a user interface for sound detection.
Inside theVStack, it checks if sound detection has started usingviewModel.detectionStarted. If detection has not started, it shows aContentUnavailableViewwith an icon and a prompt to start detection.
If detection is active and a sound is identified (viewModel.identifiedSound), it displays the identified sound and its confidence level in a styled box.
If detection is active but a sound is not yet identified, it shows a loading indicator with the message "Classifying sound...". - At the bottom of our view, we define a button to start or stop sound detection. The button toggles
viewModel.detectionStartedwith an animation.
Depending on the state, it either starts or stops the sound detection. The button's appearance changes between a microphone icon when detection is off and a stop icon when detection is on.
We are done! Now we have a fully working app that identifies individual sounds in a live audio buffer leveraging the Sound Analysis framework.
Final Result
By following this tutorial, you created a SwiftUI application that uses the Sound Analysis framework to identify sounds in a live audio buffer by using pre-trained models or by using a custom Sound Classifiers model. The app requests microphone access, captures audio, processes it, and displays the identified sound on the screen in real time.
From here you can enhance your experience however you want, from using audio files for the sound classification to rendering the microphone input using waveforms as visual feedback for the users.
Where to go next?
To expand your knowledge and enhance your app, consider exploring the following resources:
- Apple's Sound Analysis Documentation
- Create ML Explained: Apple's Toolchain to Build and Train Machine Learning Models
- Create ML - Machine Learning
- Create ML - Apple Developer Documentation
These resources will provide deeper insights and advanced techniques for sound analysis and machine learning model creation for the Apple ecosystem.