Implementing Picture-In-Picture with AVKit and SwiftUI
Learn in this tutorial to implement Picture-in-Picture (PiP) with AVKit and SwiftUI using UIViewRepresentable & UIViewControllerRepresentable.
SwiftUI and AVKit let us display media from a player using VideoPlayer. We wrote about how to use it context of HTTP Live Streaming (HLS) if you are curious. It is as simple as that.
Cool, right? But what if you want to keep watching a video while using other apps? Sadly, VideoPlayer does not support Picture in Picture (at least for now!). No need to panic! As usual, when we need specific features and behaviors that are still not supported in SwiftUI, we can use a little help from our friends UIViewRepresentable and UIViewControllerRepresentable.
So, let’s see how to create and manage an AVVideoPlayerController object that supports Picture in Picture (PiP).
Setting up the project
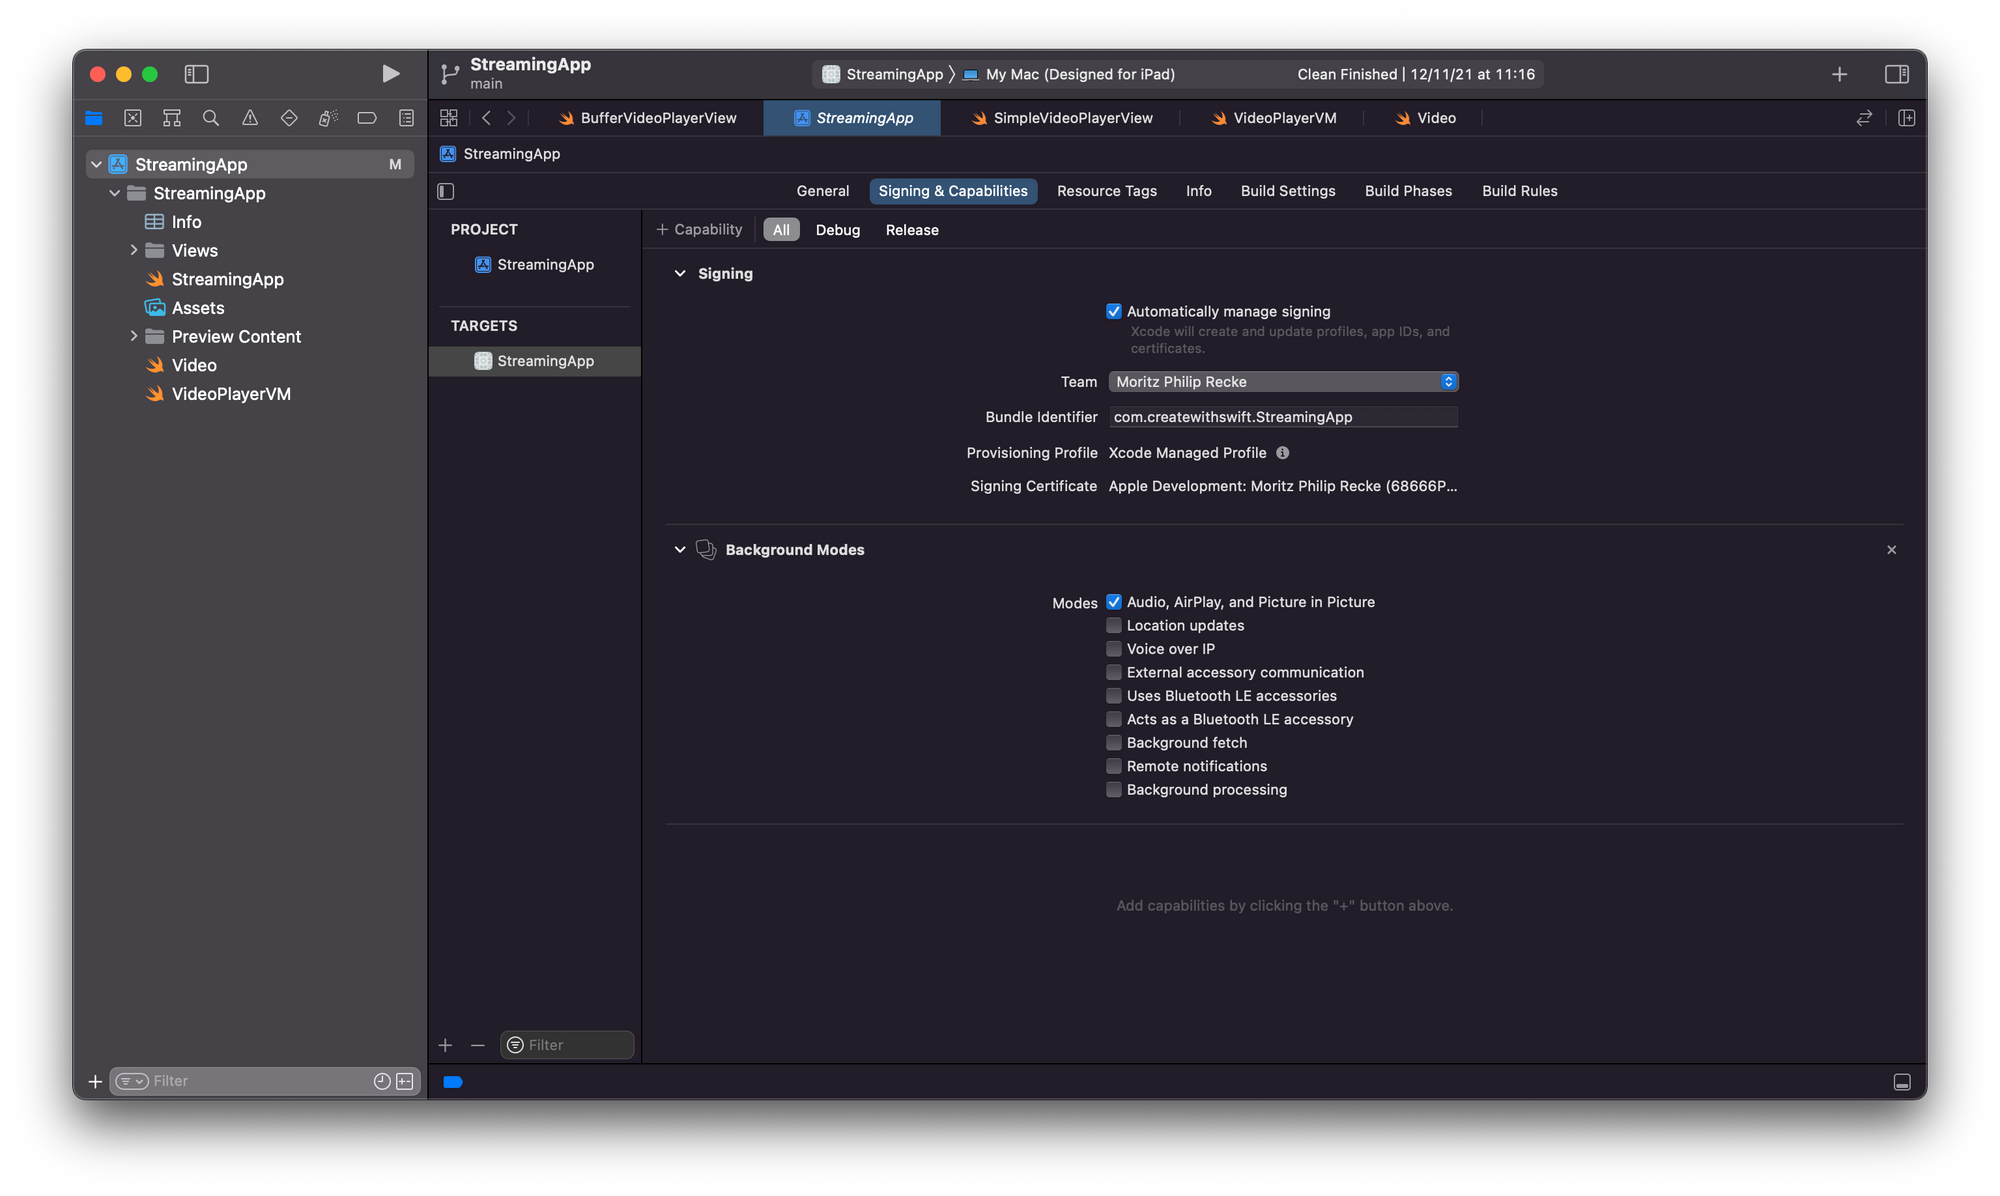
First things first, let’s create our Xcode project. To work with Picture in Picture the app has to be configured with some special capabilities.
We need to add Background Modes capability and flag Audio, AirPlay, and Picture in Picture.

In this example, we will use MVVM (Model–view–viewmodel) as the architecture pattern.
Model
We want to keep things simple, so let's create a model with just the title and the url of the media. Let's call it Media:
struct Media {
    let title: String
    let url: String
}
View model
AVPlayerViewModel is responsible for handling the player (pause, play and set the current item).
The view model's property, PipStatus, is updated by the view every time the Picture in Picture will/did start or will/did stop, soon we will explore how. PipStatus is an enum:
enum PipStatus {
    case willStart
    case didStart
    case willStop
    case didStop
}
We use Combine here so that whenever we update its Media property, the view model replaces its own player's currentItem with the one at the new media's URL. Here's the full implementation:
final class AVPlayerViewModel: ObservableObject {

    @Published var pipStatus: PipStatus = .undefined
    @Published var media: Media?

    let player = AVPlayer()
    private var cancellable: AnyCancellable?

    init() {
        setAudioSessionCategory(to: .playback)
        cancellable = $media
            .compactMap({ $0 })
            .compactMap({ URL(string: $0.url) })
            .sink(receiveValue: { [weak self] in
                guard let self = self else { return }
                self.player.replaceCurrentItem(with: AVPlayerItem(url: $0))
            })
    }

    func play() {
        player.play()
    }

    func pause() {
        player.pause()
    }

    func setAudioSessionCategory(to value: AVAudioSession.Category) {
        let audioSession = AVAudioSession.sharedInstance()
        do {
           try audioSession.setCategory(value)
        } catch {
           print("Setting category to AVAudioSessionCategoryPlayback failed.")
        }
    }
}
You might have noticed we set the AVAudioSession.sharedInstance() category to .playback. This is needed to use PiP. Apple documentation says:
Using this category, you can also play background audio if you’re using the Audio, AirPlay, and Picture in Picture background mode. For more information, see Enabling Background Audio.
We have set it in the view model init, but you can do that anywhere you want as long as it's done before the AVVideoPlayer view is instantiated (in the AppDelegate, for example).
View
Finally here is our video player view, let's call it AVVideoPlayer. It conforms to UIViewControllerRepresentable and represents an AVPlayerViewController.
struct AVVideoPlayer: UIViewControllerRepresentable {
    @ObservedObject var viewModel: AVPlayerViewModel

    func makeUIViewController(context: Context) -> AVPlayerViewController {
        let vc = AVPlayerViewController()
        vc.player = viewModel.player
        vc.canStartPictureInPictureAutomaticallyFromInline = true
        return vc
    }

    func updateUIViewController(_ uiViewController: AVPlayerViewController, context: Context) { }
}
The view's player is set as the viewModel's one. Setting canStartPictureInPictureAutomaticallyFromInline to true we are basically saying to the view to automatically start PiP when the app transitions to background.
Ok, but how do we know whether PiP is active or not? We know that AVPlayerViewControllerDelegate provides, among others, the methods we are looking for so that the view can respond to PiP status changes:
func playerViewControllerWillStartPictureInPicture(_ playerViewController: AVPlayerViewController)

func playerViewControllerDidStartPictureInPicture(_ playerViewController: AVPlayerViewController)

func playerViewControllerWillStopPictureInPicture(_ playerViewController: AVPlayerViewController)

func playerViewControllerDidStopPictureInPicture(_ playerViewController: AVPlayerViewController)
We need a way to use the delegate in our view and the way is Coordinator.
Coordinator
Every time we create a SwiftUI view with UIViewRepresentable or UIViewControllerRepresentable, we can make a custom instance of coordinator.
Coordinators can be used as delegates for the represented UIKit view/view controller. From Apple documentation:
When you want your view to coordinate with other SwiftUI views, you must provide a Coordinator instance to facilitate those interactions. For example, you use a coordinator to forward target-action and delegate messages from your view to any SwiftUI views.So let's update the view, using the Coordinator and setting it as AVPlayer's delegate:
struct AVVideoPlayer: UIViewControllerRepresentable {
    @ObservedObject var viewModel: AVPlayerViewModel

    func makeUIViewController(context: Context) -> AVPlayerViewController {
        let vc = AVPlayerViewController()
        vc.player = viewModel.player
        vc.delegate = context.coordinator
        vc.canStartPictureInPictureAutomaticallyFromInline = true
        return vc
    }

    func updateUIViewController(_ uiViewController: AVPlayerViewController, context: Context) { }

    func makeCoordinator() -> Coordinator {
        return Coordinator(self)
    }

    class Coordinator: NSObject, AVPlayerViewControllerDelegate {
        let parent: AVVideoPlayer

        init(_ parent: AVVideoPlayer) {
            self.parent = parent
        }

        func playerViewControllerWillStartPictureInPicture(_ playerViewController: AVPlayerViewController) {
            parent.viewModel.pipStatus = .willStart
        }

        func playerViewControllerDidStartPictureInPicture(_ playerViewController: AVPlayerViewController) {
            parent.viewModel.pipStatus = .didStart
        }

        func playerViewControllerWillStopPictureInPicture(_ playerViewController: AVPlayerViewController) {
            parent.viewModel.pipStatus = .willStop
        }


        func playerViewControllerDidStopPictureInPicture(_ playerViewController: AVPlayerViewController) {
            parent.viewModel.pipStatus = .didStop
        }
    }
}
The Coordinator implements the delegate methods simply by updating the viewModel's pipStatus accordingly.
Using AVVideoPlayer
Again, we want to keep things simple, so let’s just embed the view in a VStack. We can use the ContentView Xcode created for us. Let’s also add a Text, that displays the current PiP status (viewModel.pipStatus.description). We want the view to update when the published properties of the view model change, so we use the @StateObject property wrapper for AVPlayerViewModel:
struct ContentView: View {
    @StateObject private var viewModel = AVPlayerViewModel()

    var body: some View {
        VStack {
            Text(viewModel.pipStatus.description)
                .bold()
                .frame(maxWidth: .infinity)
                .background(viewModel.pipStatus.color)
            AVVideoPlayer(viewModel: viewModel)
        }
        .onAppear {
            viewModel.model = Model(title: "My video",
            url: "MY_VIDEO_URL.mp4")
        }
        .onDisappear {
            viewModel.pause()
        }
    }
}
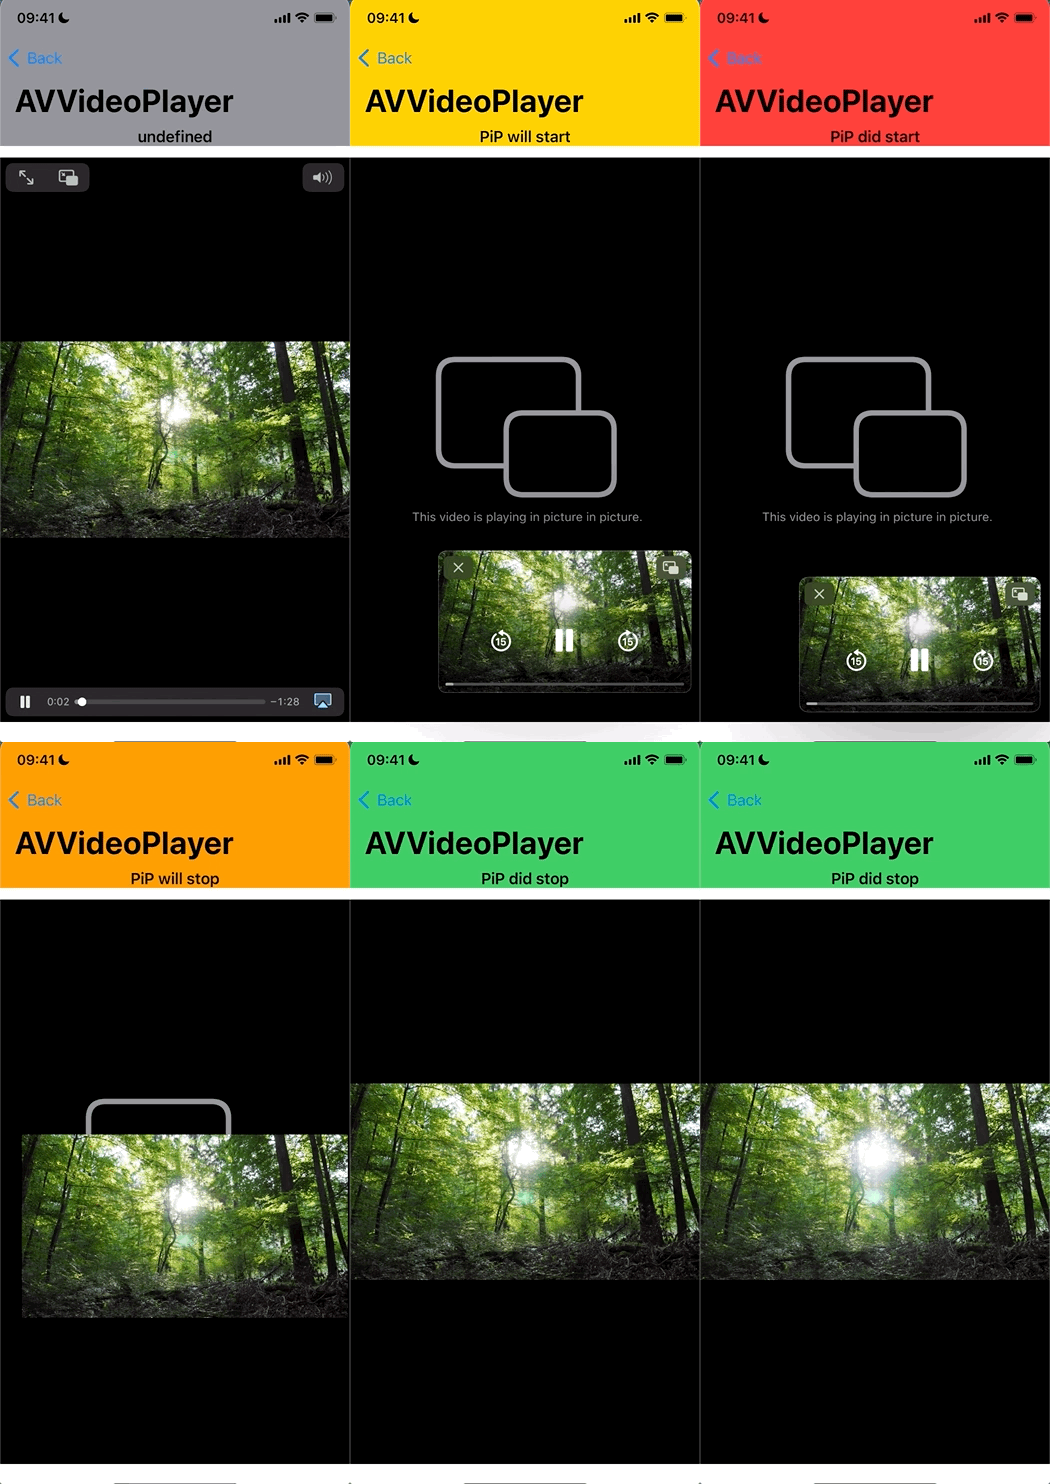
We added a different color for each case, so that is more obvious what's going on. And this is the final result:

Of course, in a real project, we might want to react to the PiP status changes with real actions (like showing a list of other media to play next) rather than just changing a string and a background color.
Conclusion
AVPlayerViewController is amazing and makes it simple to play media and support PiP, but it comes at a cost:
AVPlayerViewControllersubclassing is not supported and, most importantly, it adopts styling and features of the native system players and we cannot change that.
So, what if you want a custom player in SwiftUI and keep supporting PiP? Let's save it for another time.
If you are interested in other aspects of playing media inside your apps, check out the other articles in using the VideoPlayer in SwiftUI, for example:
- HLS Streaming with AVKit and SwiftUI
- Switching between HLS streams with AVKit
- Using HLS for live and on-demand audio and video
- Developing A Media Streaming App Using SwiftUI In 7 Days.
The implementation described in this article is also shared in a Github repository alongside other sample code to illustrate the VideoPlayer implementation and how to monitor the playback buffer to switch to lower-resolution streams based on network conditions.
This article is part of a series of articles derived from the presentation "How to create a media streaming app with SwiftUI and AWS" presented at the NSSpain 2021 conference on November 18-19, 2021.


