Reading QR codes and barcodes with the Vision framework
Learn how to read information from QR codes and barcodes using the Vision framework in a SwiftUI app.

The Vision framework offers a high degree of control over camera sessions and scanning processes. By integrating it into apps, developers have full control over how the camera feed is processed, which can be beneficial for custom or complex use cases.
Let's explore how to work with Vision to read QR codes and barcodes in a SwiftUI application. In the example, a video capture application, AVFoundation will be used to capture videos which Vision will then process as single frames for barcodes.
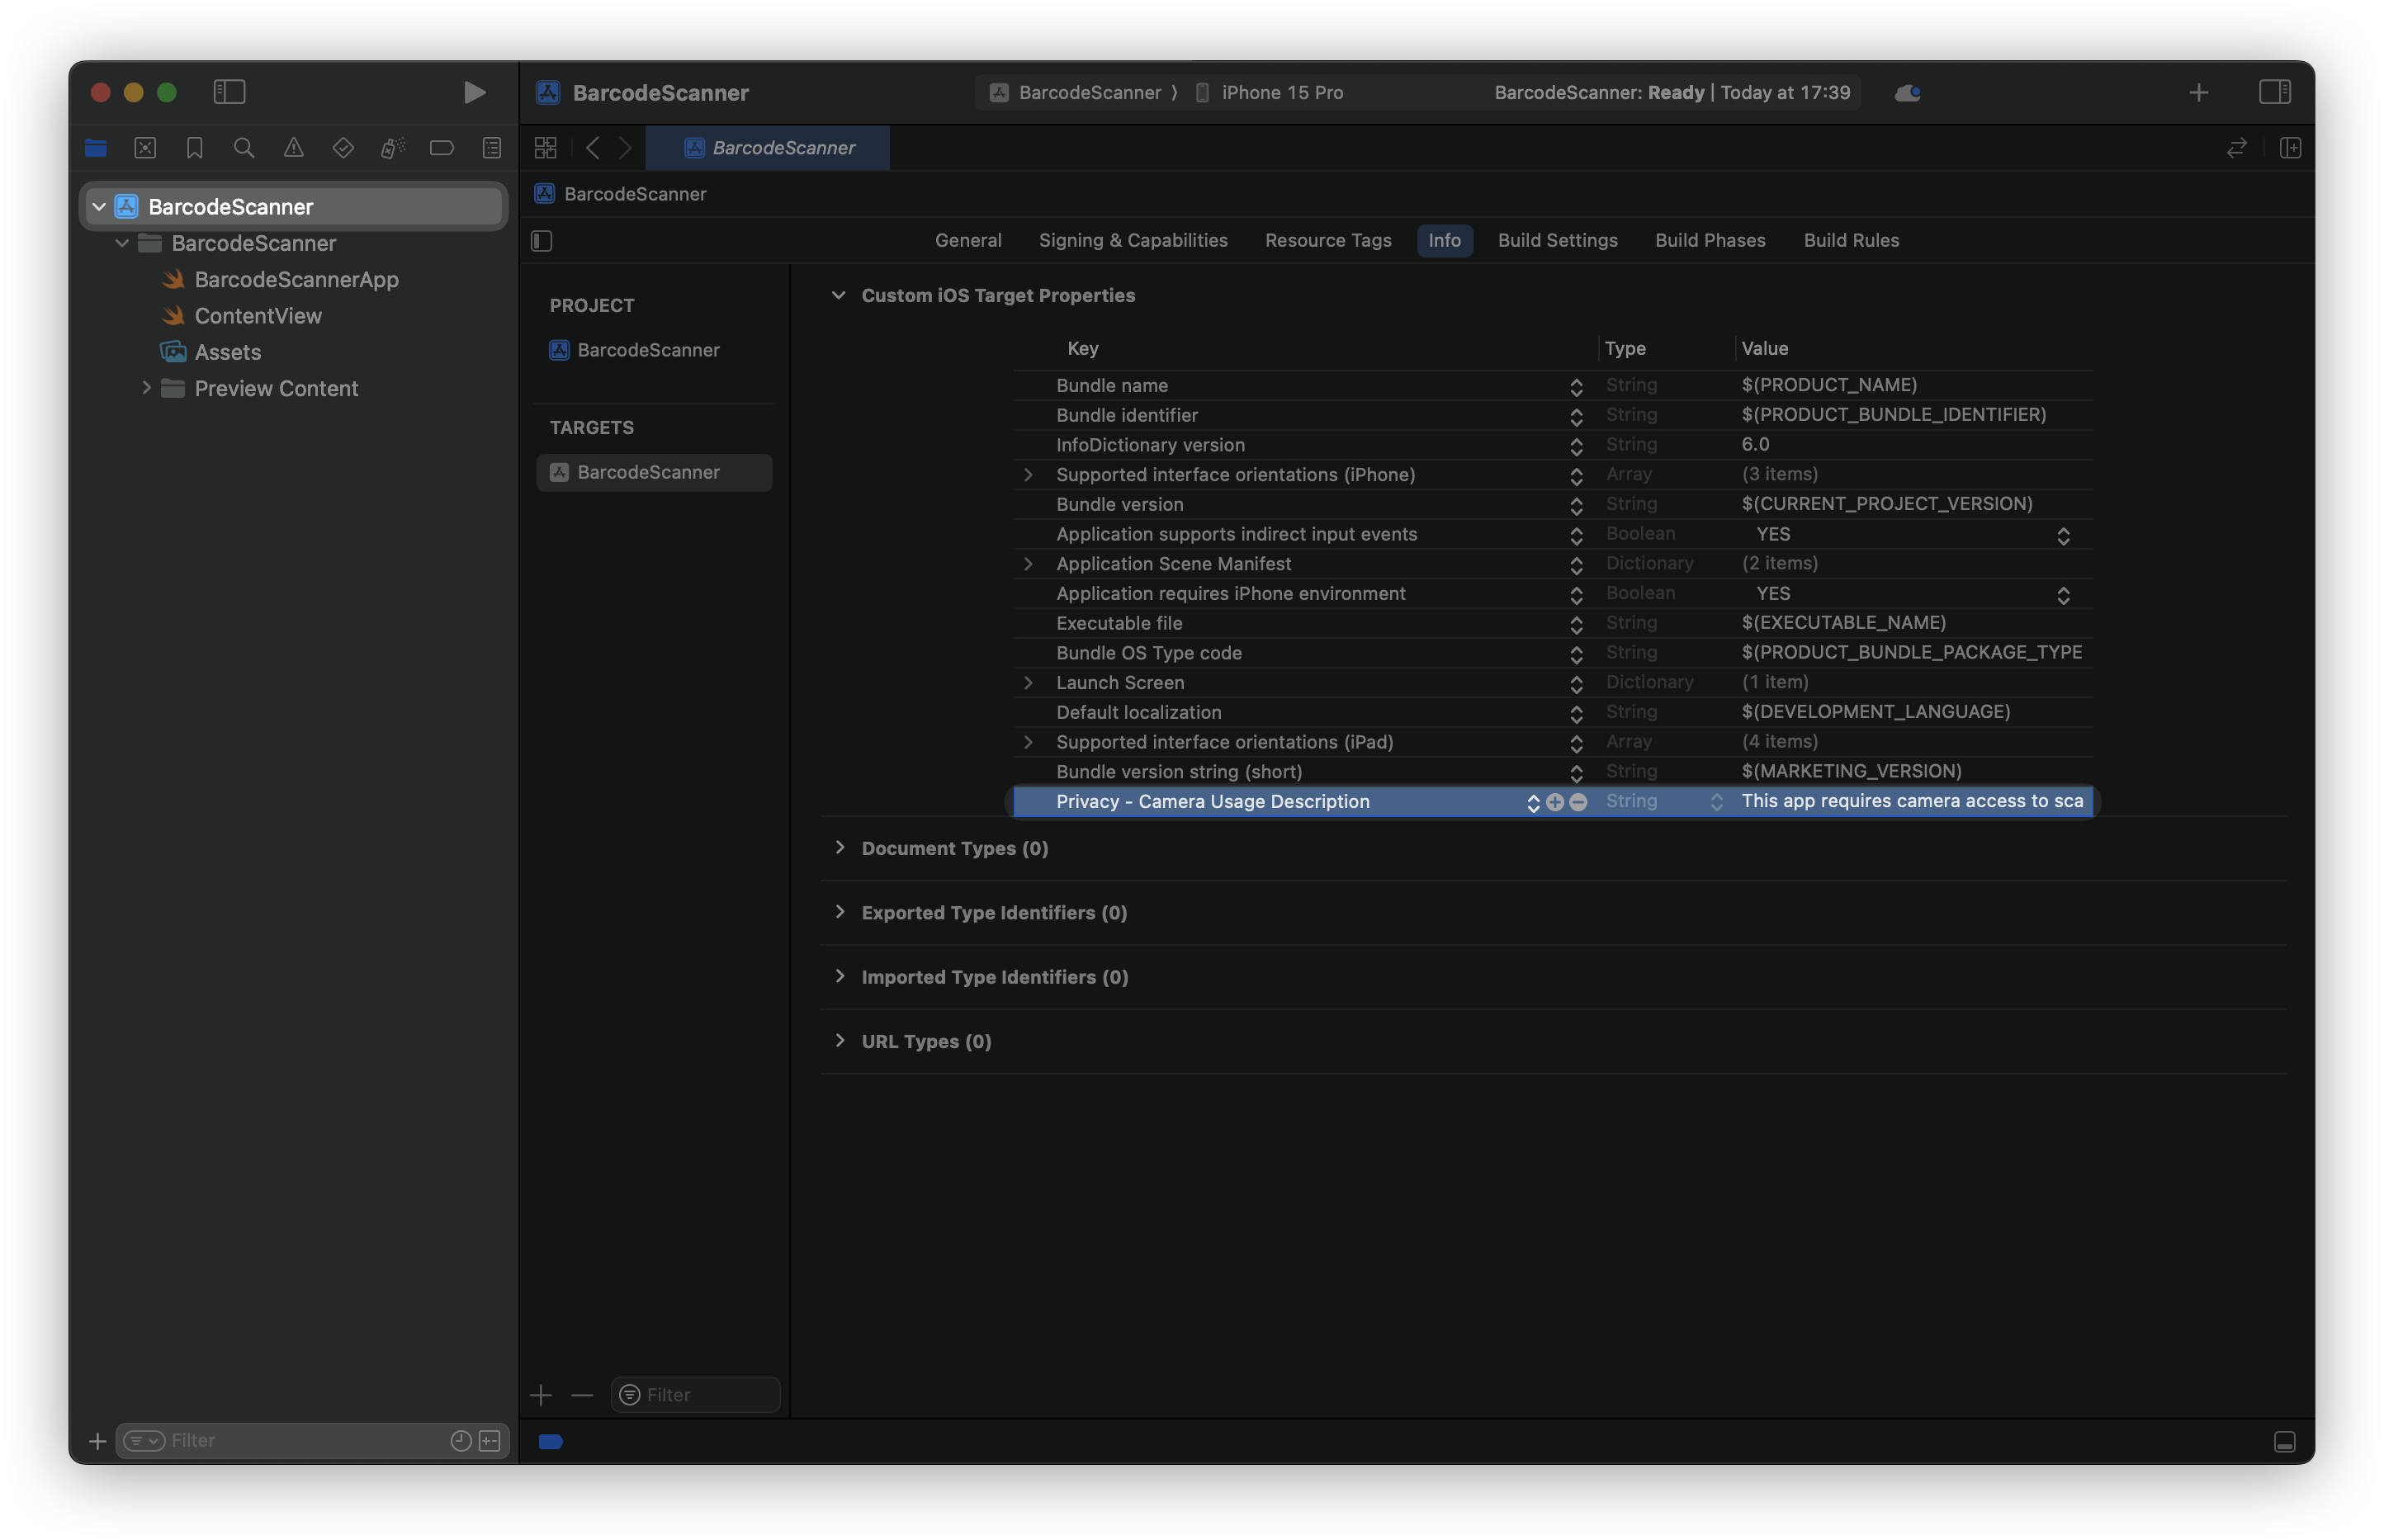
Create a new SwiftUI project in Xcode and configure the App Permissions to request user authorization to access the camera of the device.
- In the Project Navigator, select your project, then your app target.
- Go to the Info tab.
- Hover over Custom iOS Target Properties and click the + button.
- Add the key
Privacy - Camera Usage Description(NSCameraUsageDescription) with a value explaining why your app needs camera access (e.g., "This app requires camera access to scan QR codes and barcodes.").
Add the following code to your ContentView.swift file:
import SwiftUI
import AVFoundation
import Vision

// 1. Application main interface
struct ContentView: View {

    @State private var scannedString: String = "Scan a QR code or barcode"

    var body: some View {

        ZStack(alignment: .bottom) {
            ScannerView(scannedString: $scannedString)
                .edgesIgnoringSafeArea(.all)

            Text(scannedString)
                .padding()
                .background(.ultraThinMaterial)
                .clipShape(RoundedRectangle(cornerRadius: 10))
                .padding()
        }

    }
}
Creating the ContentView:
ContentViewis where the camera feed is displayed and scanned code information is given.ScannerViewis included within theZStackcontainer, and the user can see the scanned barcode or QR code in aTextview.
Now create the ScannerView:
import SwiftUI
import AVFoundation
import Vision

// 1. Application main interface
struct ContentView: View { ... }

// 2. Implementing the view responsible for scanning the data
struct ScannerView: UIViewControllerRepresentable {

    @Binding var scannedString: String

    let captureSession = AVCaptureSession()

    func makeUIViewController(context: Context) -> UIViewController {
        let viewController = UIViewController()

        guard let videoCaptureDevice = AVCaptureDevice.default(for: .video),
              let videoInput = try? AVCaptureDeviceInput(device: videoCaptureDevice),
              captureSession.canAddInput(videoInput) else { return viewController }

        captureSession.addInput(videoInput)

        let videoOutput = AVCaptureVideoDataOutput()

        if captureSession.canAddOutput(videoOutput) {
            videoOutput.setSampleBufferDelegate(context.coordinator, queue: DispatchQueue(label: "videoQueue"))
            captureSession.addOutput(videoOutput)
        }

        let previewLayer = AVCaptureVideoPreviewLayer(session: captureSession)
        previewLayer.frame = viewController.view.bounds
        previewLayer.videoGravity = .resizeAspectFill
        viewController.view.layer.addSublayer(previewLayer)

        captureSession.startRunning()

        return viewController
    }

    func updateUIViewController(_ uiViewController: UIViewController, context: Context) {}

    func makeCoordinator() -> Coordinator {
        Coordinator(self)
    }

    class Coordinator: NSObject, AVCaptureVideoDataOutputSampleBufferDelegate { }
}
ScannerViewconforms to theUIViewControllerRepresentableprotocol, enabling us to use the UIKit components with SwiftUI.makeUIViewController(context:)is the setup point for theAVCaptureSessionto enable video input produced by the camera.- The
AVCaptureVideoDataOutputis used to capture each video frame, and theCoordinatorwill play as the delegate to manipulate the frames.
import SwiftUI
import AVFoundation
import Vision

// 1. Application main interface
struct ContentView: View { ... }

// 2. Implementing the view responsible for scanning the data
struct ScannerView: UIViewControllerRepresentable {

    ...

    // 3. Implementing the Coordinator class
    class Coordinator: NSObject, AVCaptureVideoDataOutputSampleBufferDelegate {
        var parent: ScannerView

        init(_ parent: ScannerView) {
            self.parent = parent
        }

        func captureOutput(_ output: AVCaptureOutput, didOutput sampleBuffer: CMSampleBuffer, from connection: AVCaptureConnection) {
            guard let pixelBuffer = CMSampleBufferGetImageBuffer(sampleBuffer) else { return }
            self.detectBarcode(in: pixelBuffer)
        }

        func detectBarcode(in pixelBuffer: CVPixelBuffer) {
            let request = VNDetectBarcodesRequest()
            let handler = VNImageRequestHandler(cvPixelBuffer: pixelBuffer, orientation: .up, options: [:])

            do {
                try handler.perform([request])
                if let results = request.results, let payload = results.first?.payloadStringValue {
                    Task {
                        AudioServicesPlaySystemSound(SystemSoundID(kSystemSoundID_Vibrate))
                        self.parent.scannedString = payload
                    }
                    // Optionally, stop scanning after first detection
                    // self.parent.captureSession.stopRunning()
                }
            } catch {
                print("Barcode detection failed: \\(error)")
            }
        }
    }

}- The
Coordinatorclass is the implementation of what theAVCaptureVideoDataOutputSampleBufferDelegatedoes and its main task is handling the video frames obtained from the camera. - To extract the
CVPixelBuffer,captureOutput(_:didOutput:from:)is called for each video frame. detectBarcode(in:)uses the Vision framework'sVNDetectBarcodesRequestto analyze the frame for barcodes or QR codes. This provides extensive control over camera sessions and barcode scanning, allowing for full customization and integration with other Vision tasks like object detection. It's ideal for apps needing a tailored scanning experience, custom UI, or integrating barcode detection into an existing camera setup.- In case a barcode is detected, it is parsed and its payload string (e.g., the barcode or QR code data) is assigned to the variable named
scannedStringthat we use to show the result in theContentView. In the end, we may optionally want to stop the scanning session by callingself.parent.captureSession.stopRunning().
Logging Error: Failed to initialize logging system. Log messages may be missing. If this issue persists, try setting IDEPreferLogStreaming=YES in the active scheme actions environment variables.
These features can only be tested on a device, as the camera won't work on the Simulator or Xcode Preview.
Here is the final result:
You can enhance this example by adding more features, such as limiting barcode types by configuring the VNDetectBarcodesRequest to detect specific symbologies.
When initializing the VNDetectBarcodesRequest, set the symbologies property to an array of VNBarcodeSymbology values representing the barcode types you want to detect.
let request = VNDetectBarcodesRequest()
request.symbologies = [.qr, .ean13, .code128]
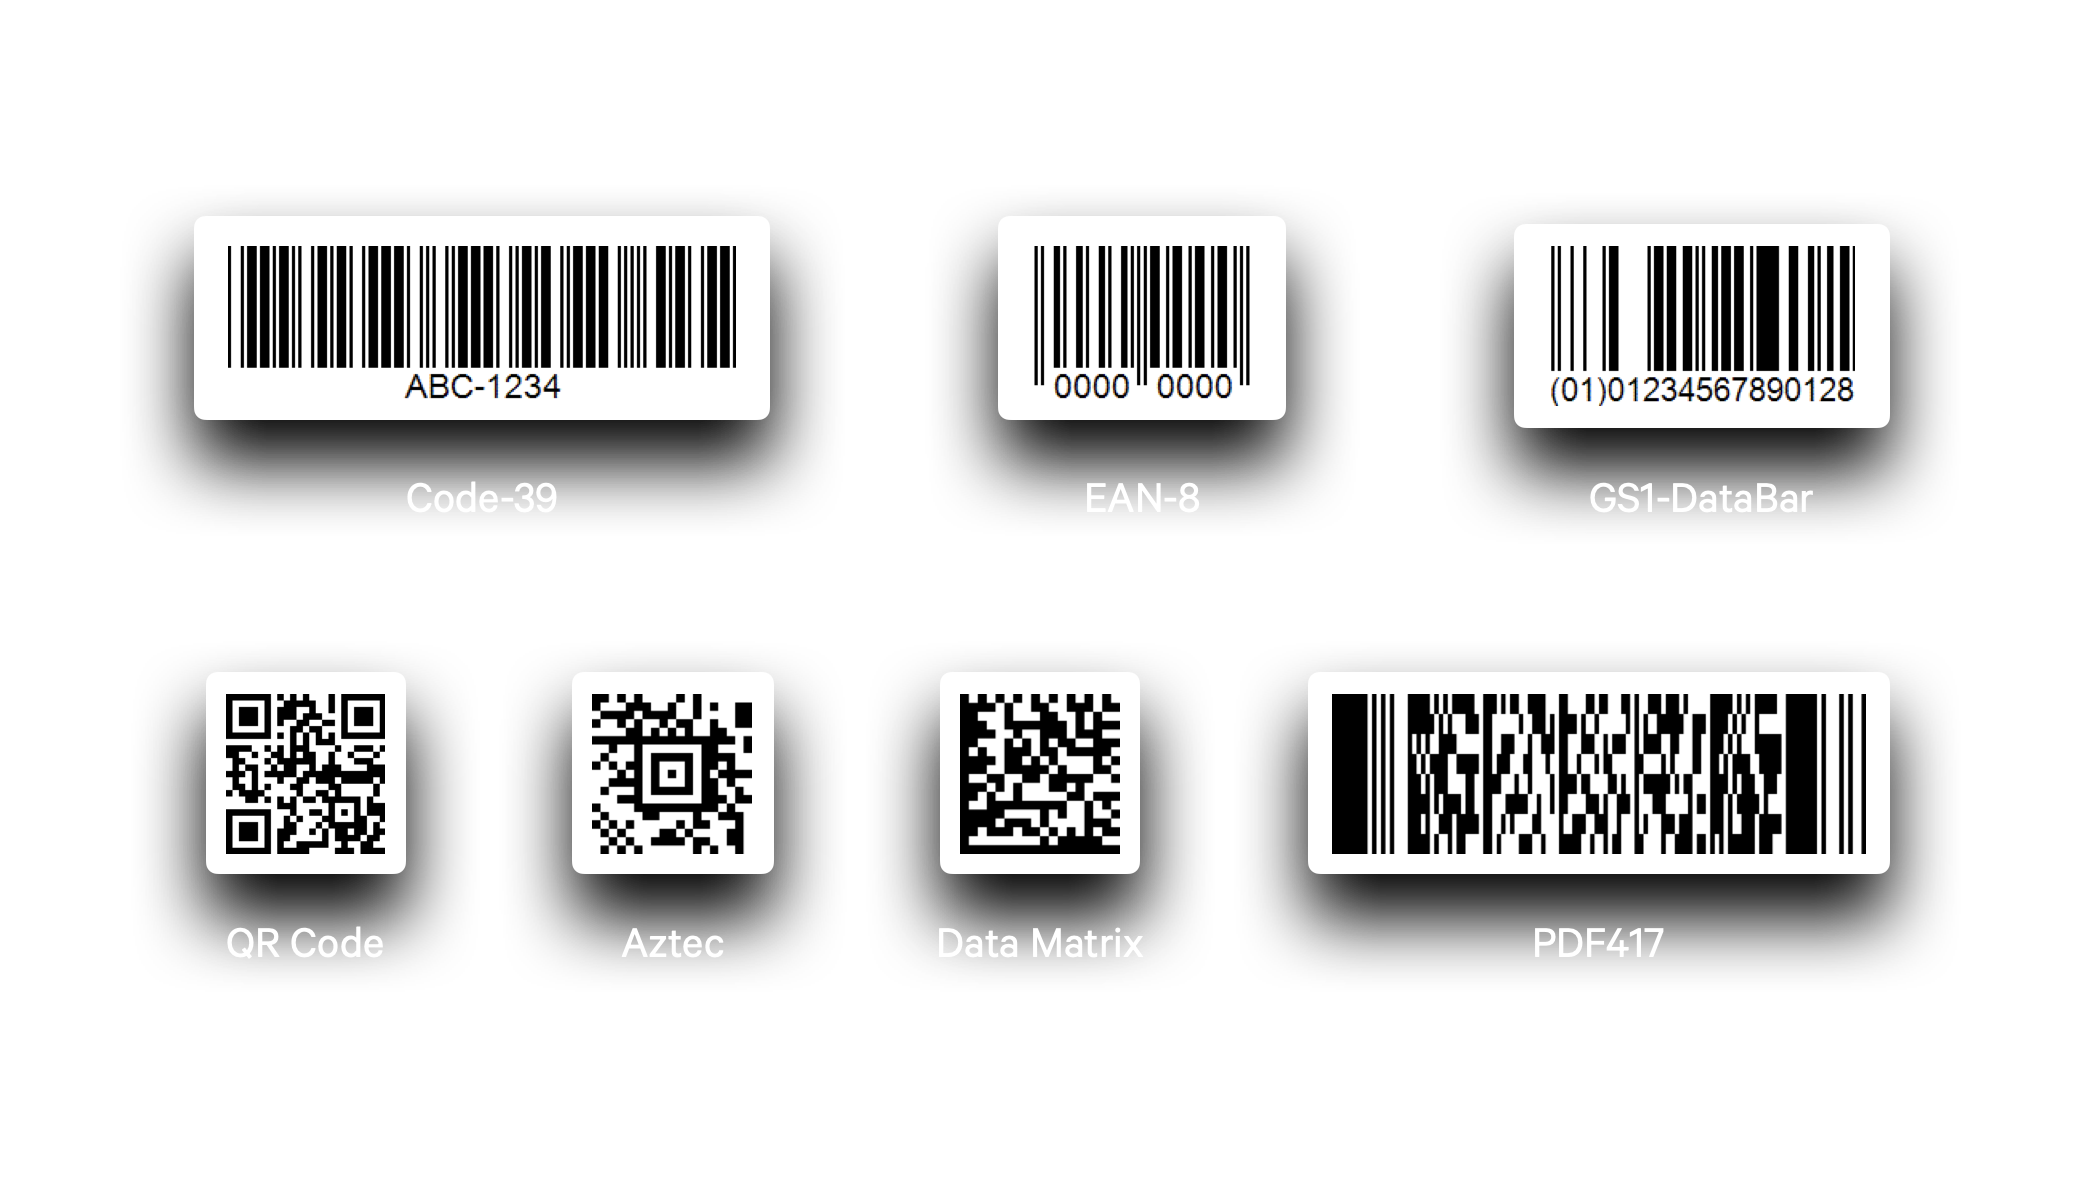
Here are all of the symbologies supported by Vision in iOS 17.4 that you can use with VNDetectBarcodesRequest:
- 1D Barcodes:
codabar,code128,code39,code39CheckSum,code39FullASCII,code39FullASCIIChecksum,code93,code93i,i2of5,i2of5Checksum,msiPlessey,upce
- 2D Barcodes:
aztec,dataMatrix,microPDF417,microQR,pdf417,qr
- Product Codes:
ean13,ean8,gs1DataBar,gs1DataBarExpanded,gs1DataBarLimited,itf14
By limiting the barcode types to detect, you ensure that your app only processes the barcode types relevant to your use case, which can also improve performance by reducing unnecessary detections.
You can also think of implementing error handling for scenarios where camera access is denied or the barcode detection fails.
You can use the VNDetectBarcodesRequest(completionHandler: ) initializer and the completion handler will provide the VNRequest object and the error object if there are any. Here is and example:
struct ScannerView: UIViewControllerRepresentable {

    ...

    // 3.
    class Coordinator: NSObject, AVCaptureVideoDataOutputSampleBufferDelegate {
        var parent: ScannerView
        private var requests = [VNRequest]()

        init(_ parent: ScannerView) {
            self.parent = parent
            super.init()
            setupVision()
        }

        private func setupVision() {
            let barcodeRequest = VNDetectBarcodesRequest(completionHandler: self.handleBarcodes)

            // Specify the symbologies you want to detect
            barcodeRequest.symbologies = [.qr, .ean8, .code39, .aztec]

            self.requests = [barcodeRequest]
        }

        func captureOutput(_ output: AVCaptureOutput, didOutput sampleBuffer: CMSampleBuffer, from connection: AVCaptureConnection) {
            guard let pixelBuffer = CMSampleBufferGetImageBuffer(sampleBuffer) else { return }

            let imageRequestHandler = VNImageRequestHandler(cvPixelBuffer: pixelBuffer, orientation: .up, options: [:])
            do {
                try imageRequestHandler.perform(self.requests)
            } catch {
                print("Failed to perform barcode detection: \\(error)")
            }
        }

        private func handleBarcodes(request: VNRequest, error: Error?) {
            if let error = error {
                print("Barcode detection error: \\(error)")
                return
            }

            guard let results = request.results as? [VNBarcodeObservation] else { return }
            for barcode in results {
                if let payload = barcode.payloadStringValue {
                    Task {
                        AudioServicesPlaySystemSound(SystemSoundID(kSystemSoundID_Vibrate))
                        self.parent.scannedString = payload
                    }
                    // Optionally, stop scanning after first detection
                    // self.parent.captureSession?.stopRunning()
                }
            }
        }
    }
}
Additionally, adding UI elements to highlight the detected barcode within the camera feed would help the users enjoy a better user experience. By using Vision and AVFoundation, indeed, you have full control to customize the entire camera interface, add overlays, provide user feedback (e.g., scan animations), and handle barcode detection results in a custom way.
Alternatively, you can think of using VisionKit’s DataScannerViewController. This solution, though, gives less control over the performance optimizations of the camera session compared to a fully custom implementation using the Vision and AVFoundation frameworks.
By using VisionKit's DataScannerViewController, in fact, the users get a ready-to-use scanner with a built-in camera interface for scanning barcodes, QR codes, text, and other data types. It requires minimal code, as it already includes preset features such as scan area highlighting, feedback on detected codes, and automatic focus. Nonetheless, you may only customize it to a certain degree by specifying the data types that you want to scan for, since the UI and the user experience are already predefined to a native extent.
Last, but not least, there is the chance to scan for barcodes in images too, as the VNImageRequestHandler can conduct the detection on NSURL, NSData, CGImage, CIImage and so on. Here is an example:
// Create an image handler and use the CGImage of your UIImage instance.
guard let image = myImage.cgImage else { return }
let handler = VNImageRequestHandler(cgImage: image, options: [:])

// Perform the barcode-request. This will call the completion-handler of the barcode-request.
guard let _ = try? handler.perform([barcodeRequest]) else {
    return print("Could not perform barcode-request!")
}
Other Resources
With this guided resource you gathered the essential knowledge for integrating barcode and QR code scanning in your SwiftUI application through the Vision framework. Use it as a base to build up the code to include other additional functions and to provide the best user experience.
Detecting barcodes and QR codes is only one of the many powerful integrations the Vision framework offers.
If you want to delve into it and see how easy it is to implement such complex Machine Learning tasks with it, consider these resources: