Sign in with Apple on a SwiftUI application
Learn how to add Sign in with Apple to a SwiftUI project using the Authentication Services framework.
Sign in with Apple is an authentication service that leverages Apple ID credentials for login, eliminating the need to create and manage separate passwords. This service integrates deeply into the Apple ecosystem and offers a secure, fast, and user-friendly authentication experience. It offers a quick and private method for signing into apps and provides users with a consistent and immediate experience.
In this article, we will guide you through implementing the Sign in with Apple button in a SwiftUI app.
Before starting
Implementing Sign In with Apple requires your developer account to be part of the Apple Developer Program with a valid membership.
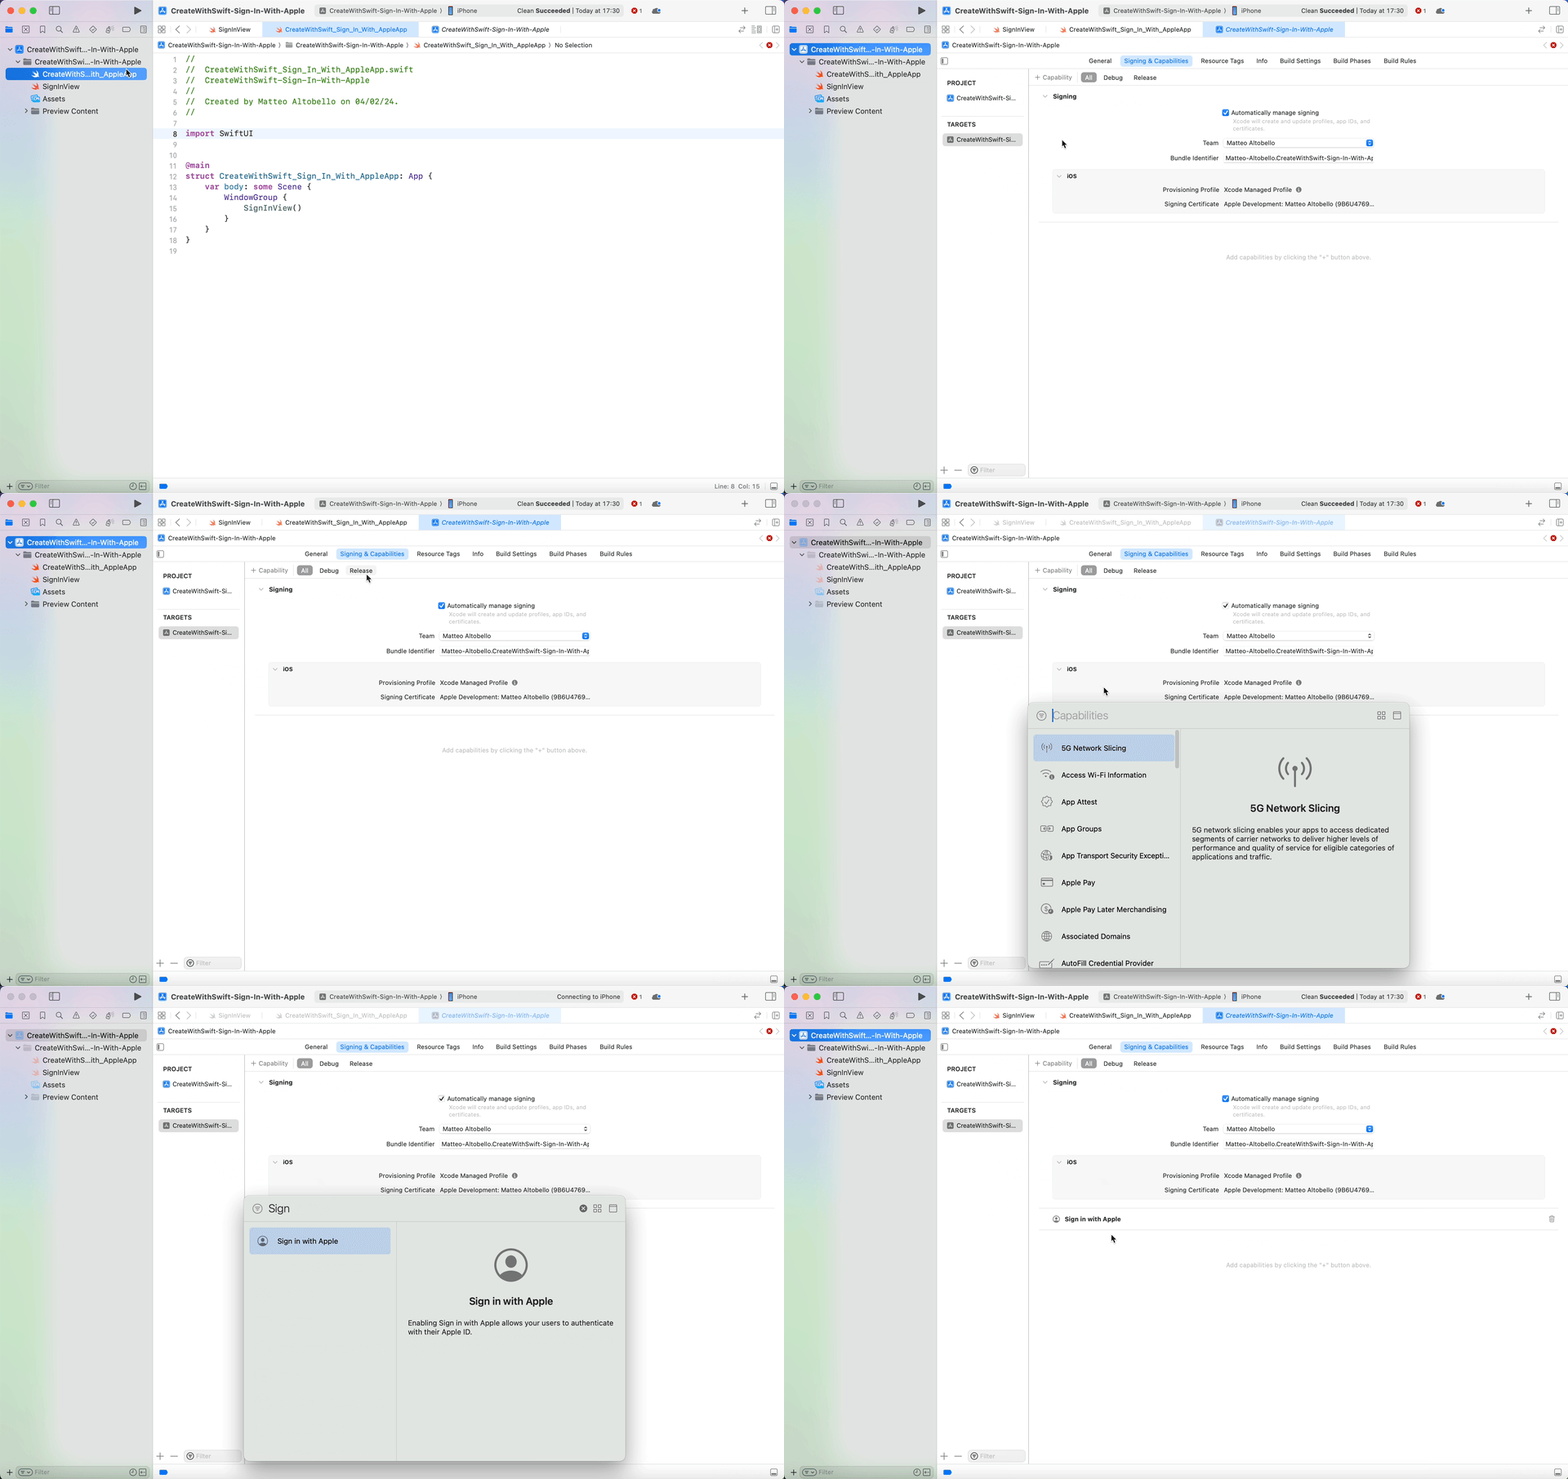
The first step is to add the Sign In With Apple capability to our Xcode project. You can do it in your project settings. Once there:
- Select the proper app target
- Go to the Signing & Capabilities tab
- Click on the + Capability button
- Select Sign In With Apple among the many options

Once that's done you can start implementing it in your project.
To begin, we need to import the AuthenticationServices framework. It’s the framework that will provide you with the available tools to handle logging in to apps and services.
import SwiftUI
import AuthenticationServices

struct SignInView: View { ... }
Importing the AuthenticationServices framework
To provide a login experience using Sign in with Apple we will use the SigInWithAppleButton component. It provides you with the look and feel of the button and three parameters:
- The label that the button should present:
signIn,signUporcontinue - A closure to be called when the request is made
- A closure to be called when the request is completed
SignInWithAppleButton(.signUp) { request in
    // authorization request for an Apple ID
} onCompletion: { result in
    // completion handler that is called when the sign-in completes
}
The request object is of the type ASAuthorizationOpenIDRequest and allows us to set up the contact information to be requested when authenticating the user by setting up the requested scope.
SignInWithAppleButton(.signUp) { request in
    request.requestedScopes = [.fullName, .email]
} onCompletion: { result in
    // ...
}
The closure called upon completion of the authentication request provides a result object that can communicate the success or the failure of the authentication process. Upon success, you will have access to the credentials of the user.
By typecasting it to ASAuthorizationAppleIDCredential you can have access, for example, to the user identity and contact information.
switch result {
case .success(let authorization):
    if let userCredential = authorization.credential as? ASAuthorizationAppleIDCredential {
        print(userCredential.user)

        if userCredential.authorizedScopes.contains(.fullName) {
            print(userCredential.fullName)
        }

        if userCredential.authorizedScopes.contains(.email) {
            print(userCredential.email)
        }
    }
case .failure(let error):
    print("Could not authenticate: \\(error.localizedDescription)")
}
Sign in with Apple ensures that user details are not transmitted over the network after registering successfully. Next time the user logs in, Apple won’t provide the user details, like email and name, because it is expected that you already possess them.
import SwiftUI
import AuthenticationServices

struct SignInView: View {

    var body: some View {

        SignInWithAppleButton(.signUp) { request in
            request.requestedScopes = [.fullName, .email]
        } onCompletion: { result in
            switch result {
            case .success(let authorization):
                handleSuccessfulLogin(with: authorization)
            case .failure(let error):
                handleLoginError(with: error)
            }
        }
        .frame(height: 50)
        .padding()

    }

    private func handleSuccessfulLogin(with authorization: ASAuthorization) {
        if let userCredential = authorization.credential as? ASAuthorizationAppleIDCredential {
            print(userCredential.user)

            if userCredential.authorizedScopes.contains(.fullName) {
                print(userCredential.fullName?.givenName ?? "No given name")
            }

            if userCredential.authorizedScopes.contains(.email) {
                print(userCredential.email ?? "No email")
            }
        }
    }

    private func handleLoginError(with error: Error) {
        print("Could not authenticate: \\(error.localizedDescription)")
    }
}
Customizing the button
To better match your user interface layout you might need to customize the default appearance of the button. To better understand which type of customizations are recommended take a look at what Apple has to say in their dedicated Human Interface Guidelines page.


