Track the horizon angle in an image with the Vision framework
Learn how to detect the horizon angle using machine learning within a SwiftUI app.

Tracking the angle of the horizon portrayed in a picture is one of those tasks that can be accomplish by leveraging the Vision framework’s image analysis.
This request is particularly useful when needing to straighten a photo in order to improve its aesthetics and realism, especially when capturing landscapes or architectural scenes, where a level horizon is crucial for the visual appeal.
import VisionTo start implement the request, import the Vision framework.
Then, create a function that takes as parameter a UIImage and returns an HorizonObservation .
func detectHorizon(uiImage: UIImage) async throws -> HorizonObservation? {
    // 1. The image to process
    guard let ciImage = CIImage(image: uiImage) else { return nil }
    do{
        // 2. The request
        let request = DetectHorizonRequest()
        // 3. The result coming from performing the analysis
        let result = try await request.perform(on: ciImage, orientation: .up)
        // 4. The observation
        return result
    } catch {
        print("Error detecting the horizon line: \(error)")
    }
    return nil
}
detectHorizon(uiImage:) works as follows:
- It converts the
UIImageparameter into aCIImage. - It sets the
DetectHorizonRequest. - It stores the
HorizonObservationcoming from the processed image byperform(on:orientation:)method. - It returns the result.
The HorizonObservation returns:
- the
angleproperty of the observed horizon in radians; - the
transform: aCGAffineTransformto apply to the detected horizon.
DetectHorizonRequest returns an optional HorizonObservation . This project has been tested with 39 different photos, and only detected the horizon on the 47% of them, mainly returning nil on photos with horizon angle equal to 0. Integration in SwiftUI
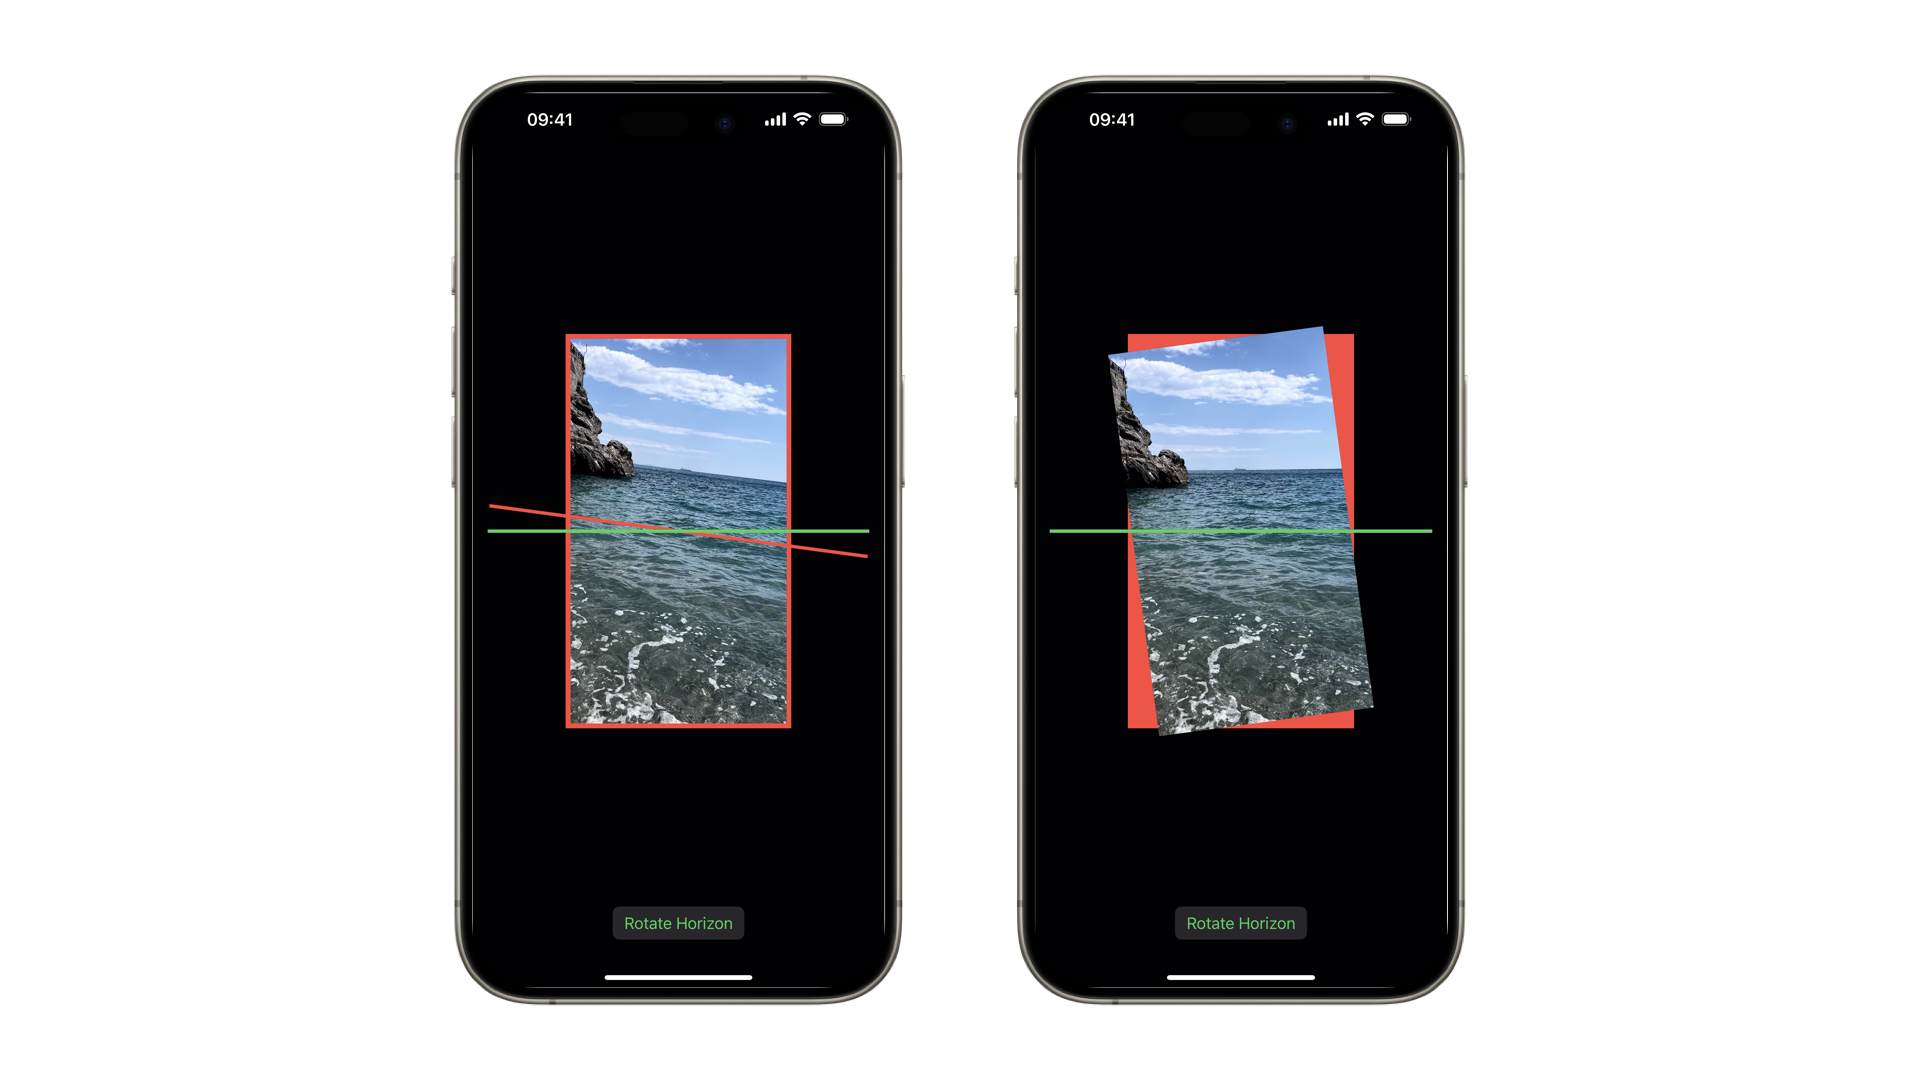
What we are going to implement is a view displaying an image that will rotate based on the horizon angle value detected by Vision in order to straighten it. The photo will be layered in between a red rectangle on the back highlighting the rotation, and a green line on the front underling the ideal horizon level.
First, let’s create the view.
import SwiftUI
import Vision

struct HorizonLineView: View {

    @State private var observation: HorizonObservation? = nil
    @State private var imageSize: CGSize = .zero

    var body: some View {
        VStack(alignment: .center){
            ZStack{

                // The guideline rectangle
                Rectangle()
                    .frame(width: imageSize.width + 10, height: imageSize.height + 10)
                    .foregroundStyle(.red)

                    // The picture to detect
                    Image("picture")
                        .resizable()
                        .scaledToFit()
                        .background(GeometryReader { proxy in
                            Color.clear.onAppear {
                                self.imageSize = proxy.size
                            }
                        })
                        .frame(height: 400)
            }

            Button("Rotate Horizon") {
		            rotateThePicture()
            }.buttonStyle(.bordered)
                .foregroundStyle(.green)

        }.padding()
    }

    // Triggers the detection
    func rotateThePicture() {
        Task{
            guard let image = UIImage(named: "picture") else { return }
            self.observation = try await self.detectHorizon(uiImage: image)
        }
    }

    func detectHorizon(uiImage: UIImage) async throws -> HorizonObservation? {...}
}
HorizonLineView is a view displaying a red rectangle right behind the image portraying the horizon, and a button that enables its detection; it uses the GeometryReader to get the image size and apply it increased by 10 to the red rectangle - so that it’s visible behind the photo.
rotateThePicture() triggered by the button is the function performing the detection of the horizon.
When the detection is performed, we want the horizon to be overlayed by 2 different lines:
- a green one, working as guideline to understand which should be the ideal level;
- a red one, coming from and appearing right after the horizon detection, highlighting the level of the horizon in the picture.
To achieve such a result, we are creating a custom Shape that will draw the lines.
struct HorizonLineShape: Shape {
    // The detected horizon angle in radians
    let angle: Double

    func path(in rect: CGRect) -> Path {
        var path = Path()

        // 1. Get the center of the drawing rectangle
        let centerX = rect.midX
        let centerY = rect.midY

        // 2. Set the total length of the horizon line to the width of the rect
        let lineLength = rect.width
        let halfLength = lineLength / 2

        // 3. Declare variables for horizontal and vertical offsets
        let dx: CGFloat
        let dy: CGFloat

        // 4. Calculate the horizontal and vertical offsets
        if angle != 0 {
            // Compute based on the angle
            dx = cos(angle) * halfLength
            dy = sin(angle) * halfLength

        } else {
            // If the angle is zero, the line is horizontal
            dx = halfLength
            dy = 0
        }

        // 5. Determine the start and end points of the horizon line
        let start = CGPoint(x: centerX - dx, y: centerY - dy)
        let end = CGPoint(x: centerX + dx, y: centerY + dy)

        // 6. Move to the start point and add a line to the end point
        path.move(to: start)
        path.addLine(to: end)

        return path
    }
}
HorizonLineShape takes a Double as parameter, representing the detected horizon angle out of which it creates a line whose inclination is based on.
It draws the line accordingly to the following logic:
- Get the center of the drawing rectangle, which is where the line will be anchored.
- It calculates the half-length width of the rectangle, which is used to extend the line equally in both directions from the center.
- It declares the variables for horizontal and vertical offsets.
dxanddytell us how far to move from the center of the view to draw the line’s endpoints. Think of it like this: if you have a ruler centered in your drawing area, these offsets tell you how much to slide the ends left/right (dx) and up/down (dy) based on the angle of the horizon. They ensure that no matter how tilted the line is, it stays centered and its endpoints are positioned correctly according to the detected angle. - It calculates them:
- when the angle is not equal to zero, they are calculated using the cosine - to tell how far left or right to move - and sine - how far up or down to move - of the detected angle;
- if the angle is zero, it simply assigns
dxto be half the length anddyas zero, resulting in a perfectly horizontal line, which is the case needed to draw the line working as guideline.
- It determine the start and end points of the horizon line: the starting point of the line is set to
(centerX - dx, centerY - dy)- moving left - and the ending point to(centerX + dx, centerY + dy)- moving right - This ensures that the line is centered in the view and rotated correctly according to the detected horizon angle. - It moves to the start point and add a line to the end point to finally draw the line.

Let’s integrate the lines in the view.
import SwiftUI
import Vision

struct HorizonLineView: View {
    ...
    var body: some View {

        ...
        Image("picture")
        ...

        // The detected horizon line
        if let horizon = observation{
            HorizonLineShape(angle: horizon.angle.value)
                .stroke(Color.red, lineWidth: 3.5)
                .animation(.linear(duration: 5), value: horizon)
        }

        // The horizon guideline
        HorizonLineShape(angle: 0.0)
            .stroke(.green, lineWidth: 3.5)
    }

    Button("Rotate Horizon") {
    ..
    }
        ...
    }
}
Create 2 instances of the HorizonLineShape to place in between the Image ad the Button:
- the first, a red one will appear and represent the detected horizon line right after the analysis performed by Vision in the photo;
- the second, a green one will be the guideline to highlight the difference in between the one detected and the ideal horizon level.
Now that we can see the ideal level of the horizon and the detected one, we can try to use the angle value to rotate the picture and its horizon line to make them align with the guideline.
struct HorizonLineView: View {
    ...
    // 1. The State variable storing the inverted angle value
    @State var radians: Double = 0.0

    var body: some View {
        ...
    }

    func rotateThePicture() {
        Task{
            ...
            if let obs = observation {
                // 2. Assigning the inverted angle value
                self.radians = -1 * obs.angle.value
            }
        }
    }
    ...
}
To rotate both the detected horizon line and the image to the ideal horizon level, we need to invert the observed angle value and apply it in a rotation effect.
We can now use this value to rotate the image.
import SwiftUI
import Vision

struct HorizonLineView: View {
    ...
    var body: some View {
        ...
        Image("picture")
            ...
            .rotationEffect(Angle(radians: radians)).animation(.linear(duration: 2).delay(2), value: observation)
        ...
}
And, in order to apply the same rotation effect on the red line too only after it has already entered the view hierarchy, we create a custom transition.
struct CustomTransition: Transition{
    // The angle value to rotate
    let radians: Double
    func body(content: Content, phase: TransitionPhase) -> some View {
        // Rotate the content only when the view is already in the hierarchy
        content.rotationEffect(Angle(radians: phase.isIdentity ? radians : 0.0))
    }
}
CustomTransition conforms to Transition protocol, producing a rotation only when the red line is fully visible in the view, leveraging the isIdentity property.
import SwiftUI
import Vision

struct HorizonLineView: View {
    ...
    var body: some View {
        ...
        if let horizon = observation{
            HorizonLineShape(angle: horizon.angle.value)
                ...
                .transition(CustomTransition(radians: radians).animation(.linear(duration: 2).delay(2)))
        }
    ...
}
Apply it to the HorizonLineShape representing the detected horizon.