
Using an Image Classification Machine Learning Model in an iOS App with SwiftUI
By the of of this tutorial you will be able to use an image classification Core ML model in an iOS App with SwiftUI

This Tutorial will take you through the steps of using a Core ML image classification model in Xcode for iOS using SwiftUI. The tutorial will use a machine learning model provided by Apple called MobileNetV2 which is trained to classify the dominant object in a camera frame or image.
The following steps will guide you through:
- Creating a new project in Xcode;
- Importing the Core ML model into the Project;
- Creating a basic interface using SwiftUI;
- Adding Core ML features to the ContentView.swift;
- Testing the model with sample images.
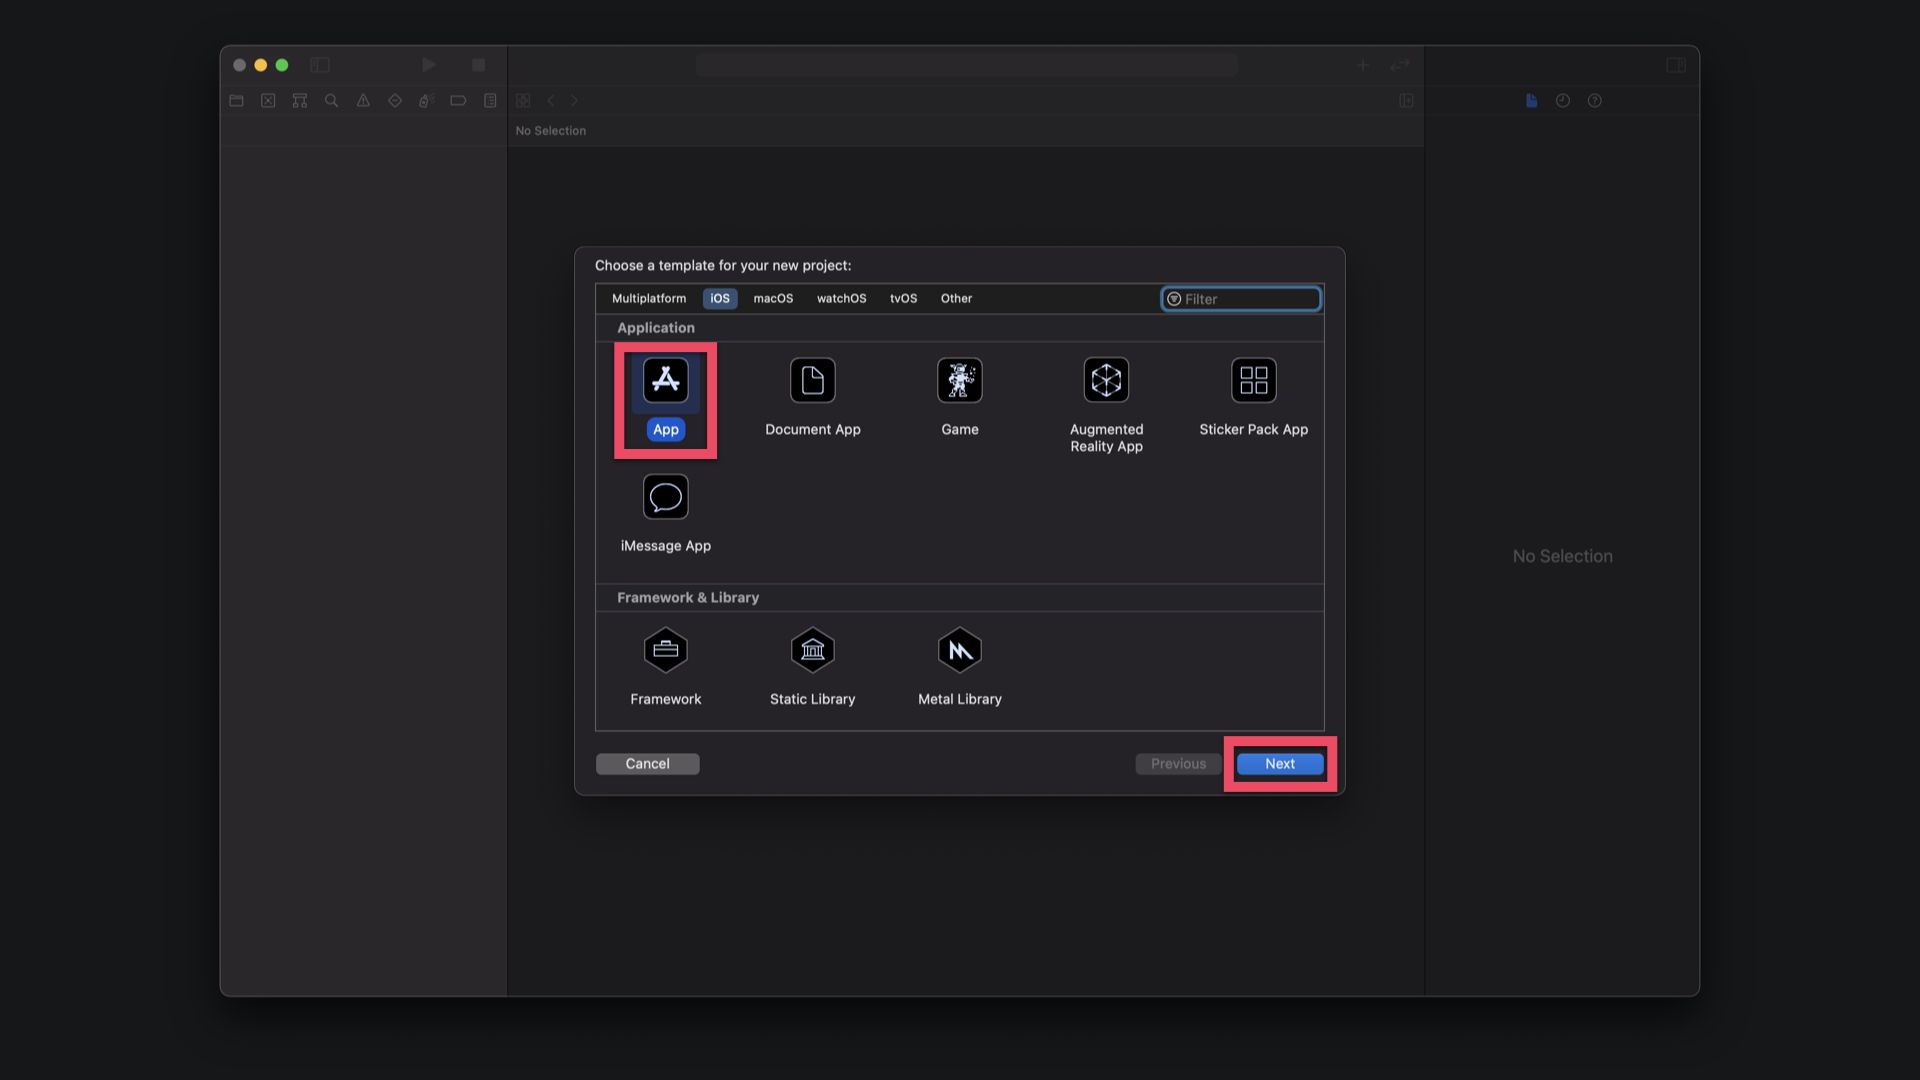
When starting Xcode, click on "Create a new Xcode project". The following setup wizard will guide you through the steps of configuring the basic settings of the project. Choose "iOS" as a platform and the select "App" template 1. Then click "Next" 2 on bottom right.
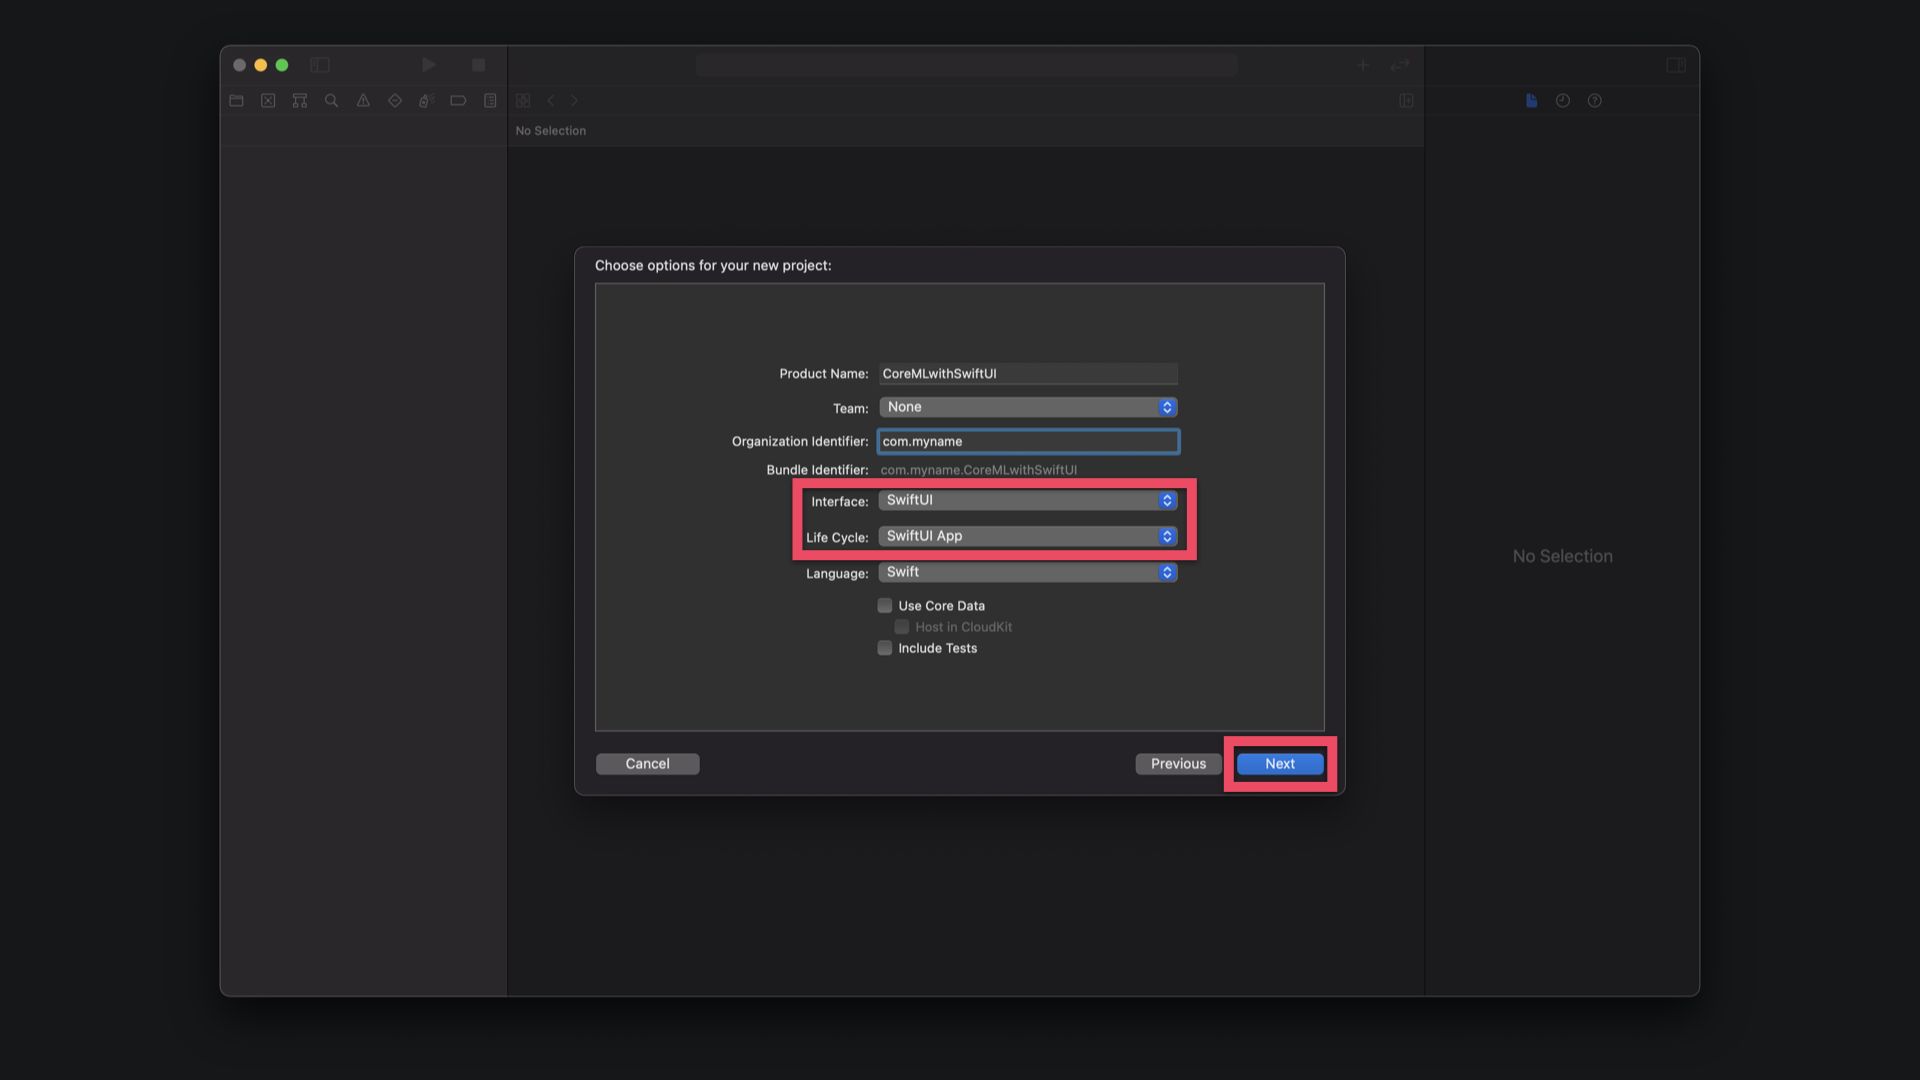
In the following window, choose a name for your app in the "Product Name" field. If you have a development team,you can select it from the menu and edit the Organisation Identifier. For the Interface we will use SwiftUI. The app's Life Cycle will be configured as a SwiftUI App. All of these are the default settings, so you can just click "Next" in the bottom right.
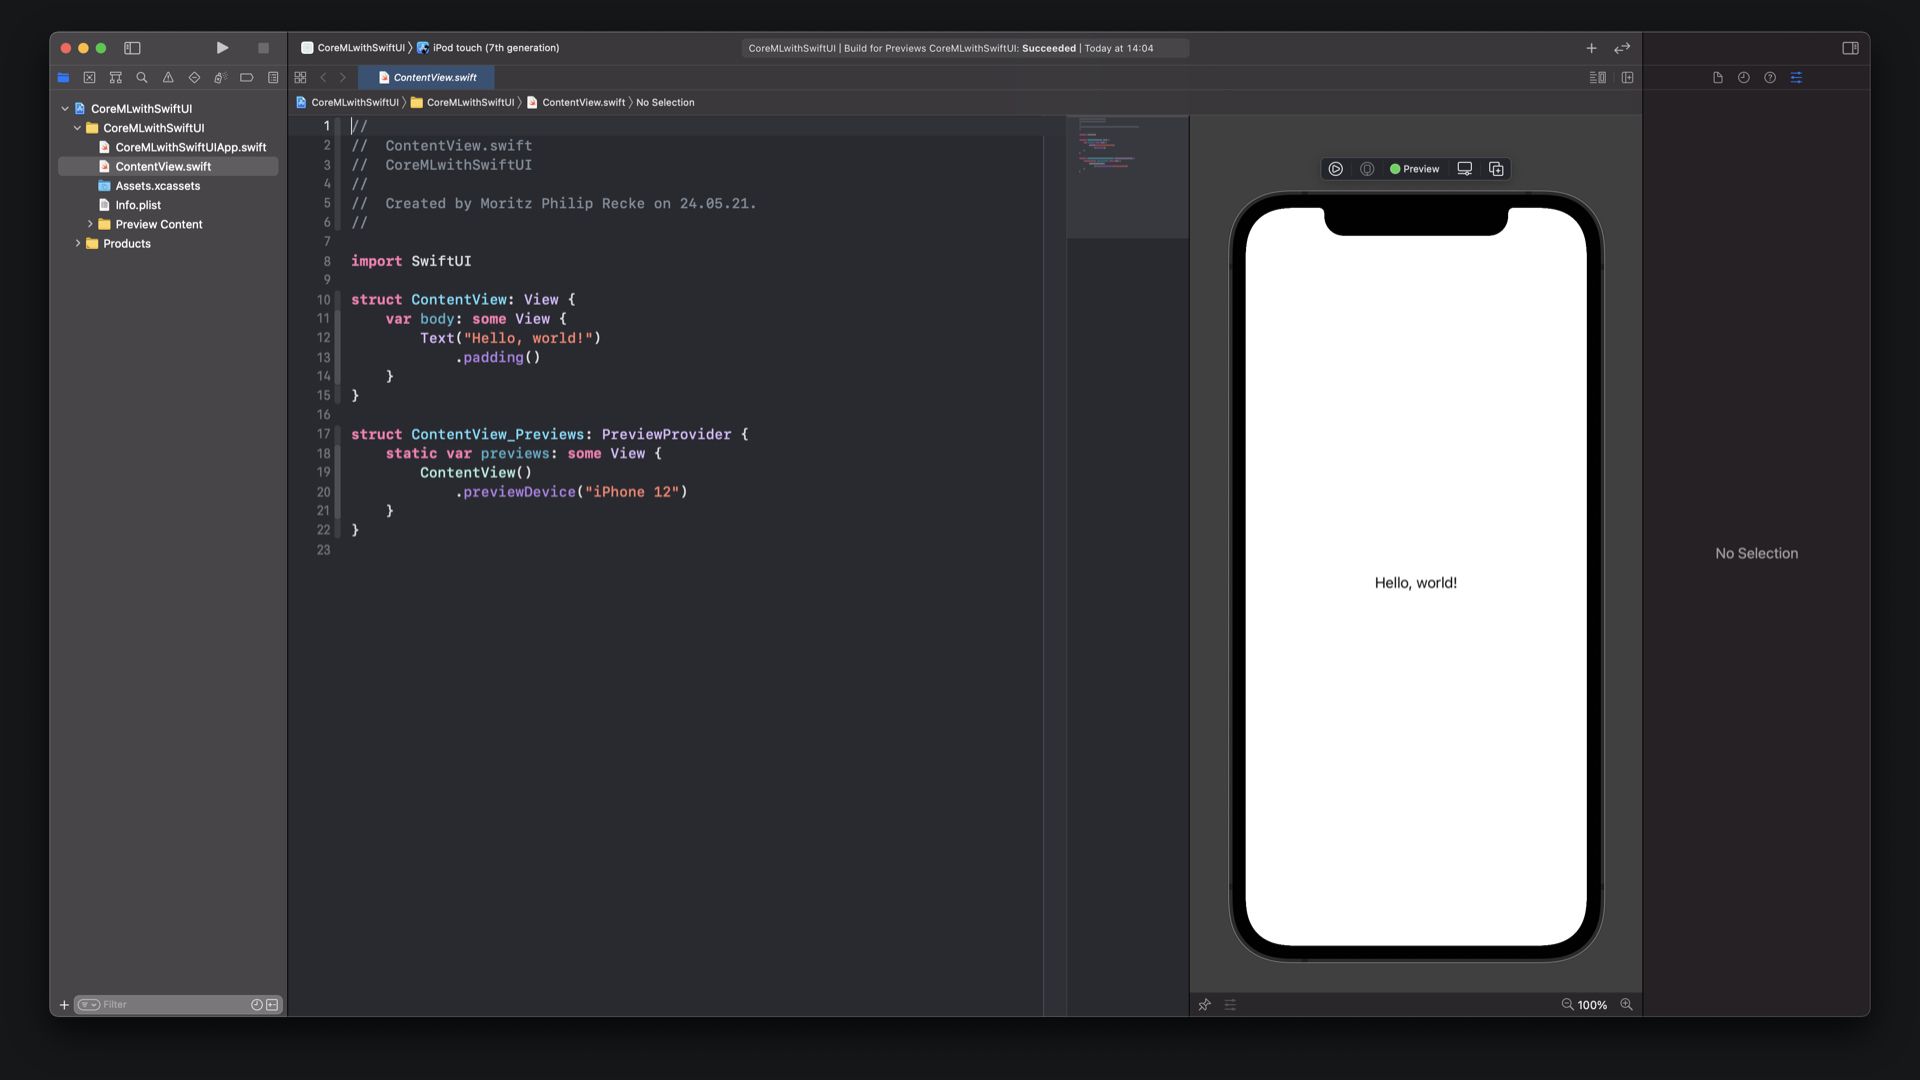
Once the setup wizard is completed, you can choose a location to save the project on you Mac and choose wether you want to use Git for the project. Afterwards, the app project will opened and you will be presented with the default Hello World ContentView.swift. This file will be the main place to work in for this project.
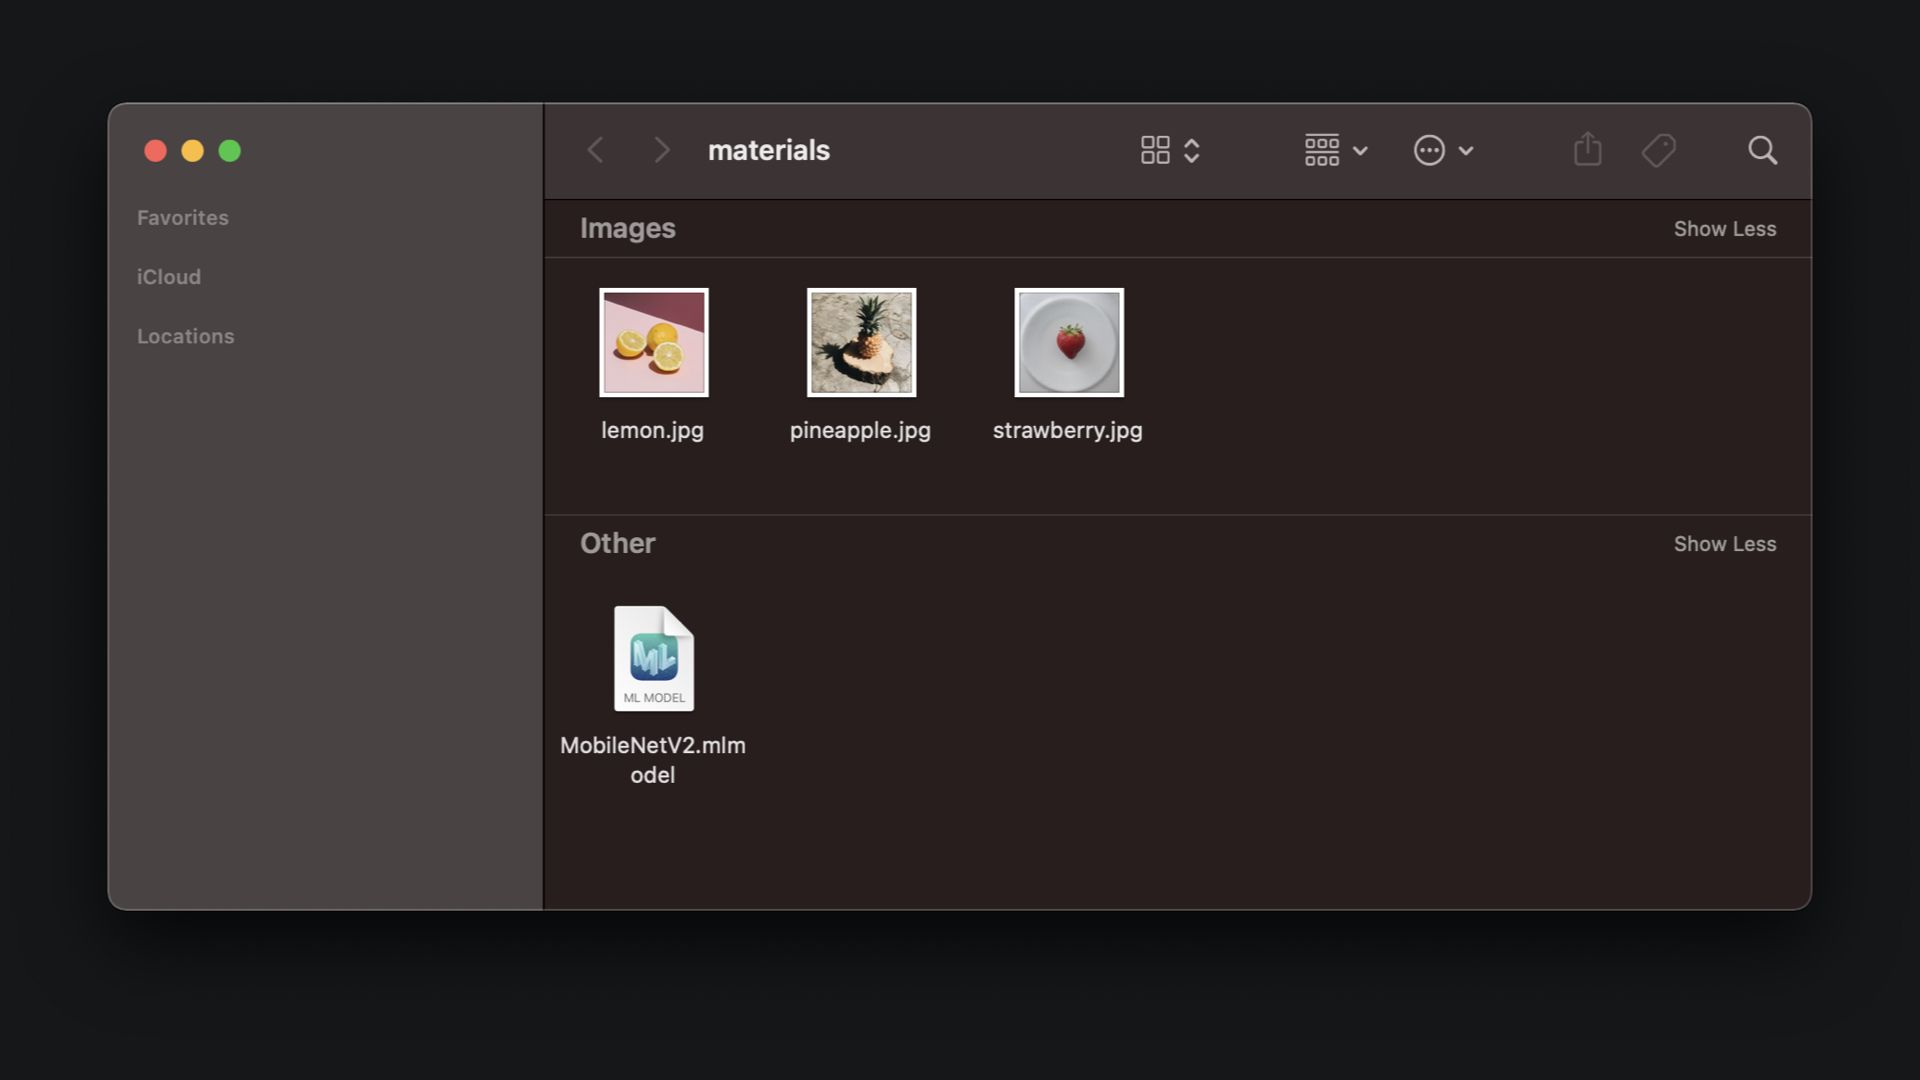
For the purpose of this tutorial, you can use the MobileNetV2 Core ML model, which is used for image classification. It can be downloaded from the Apple Core ML website. In addition there are some sample images to try the model in the SwiftUI app with different types of fruits. The materials can be downloaded here.
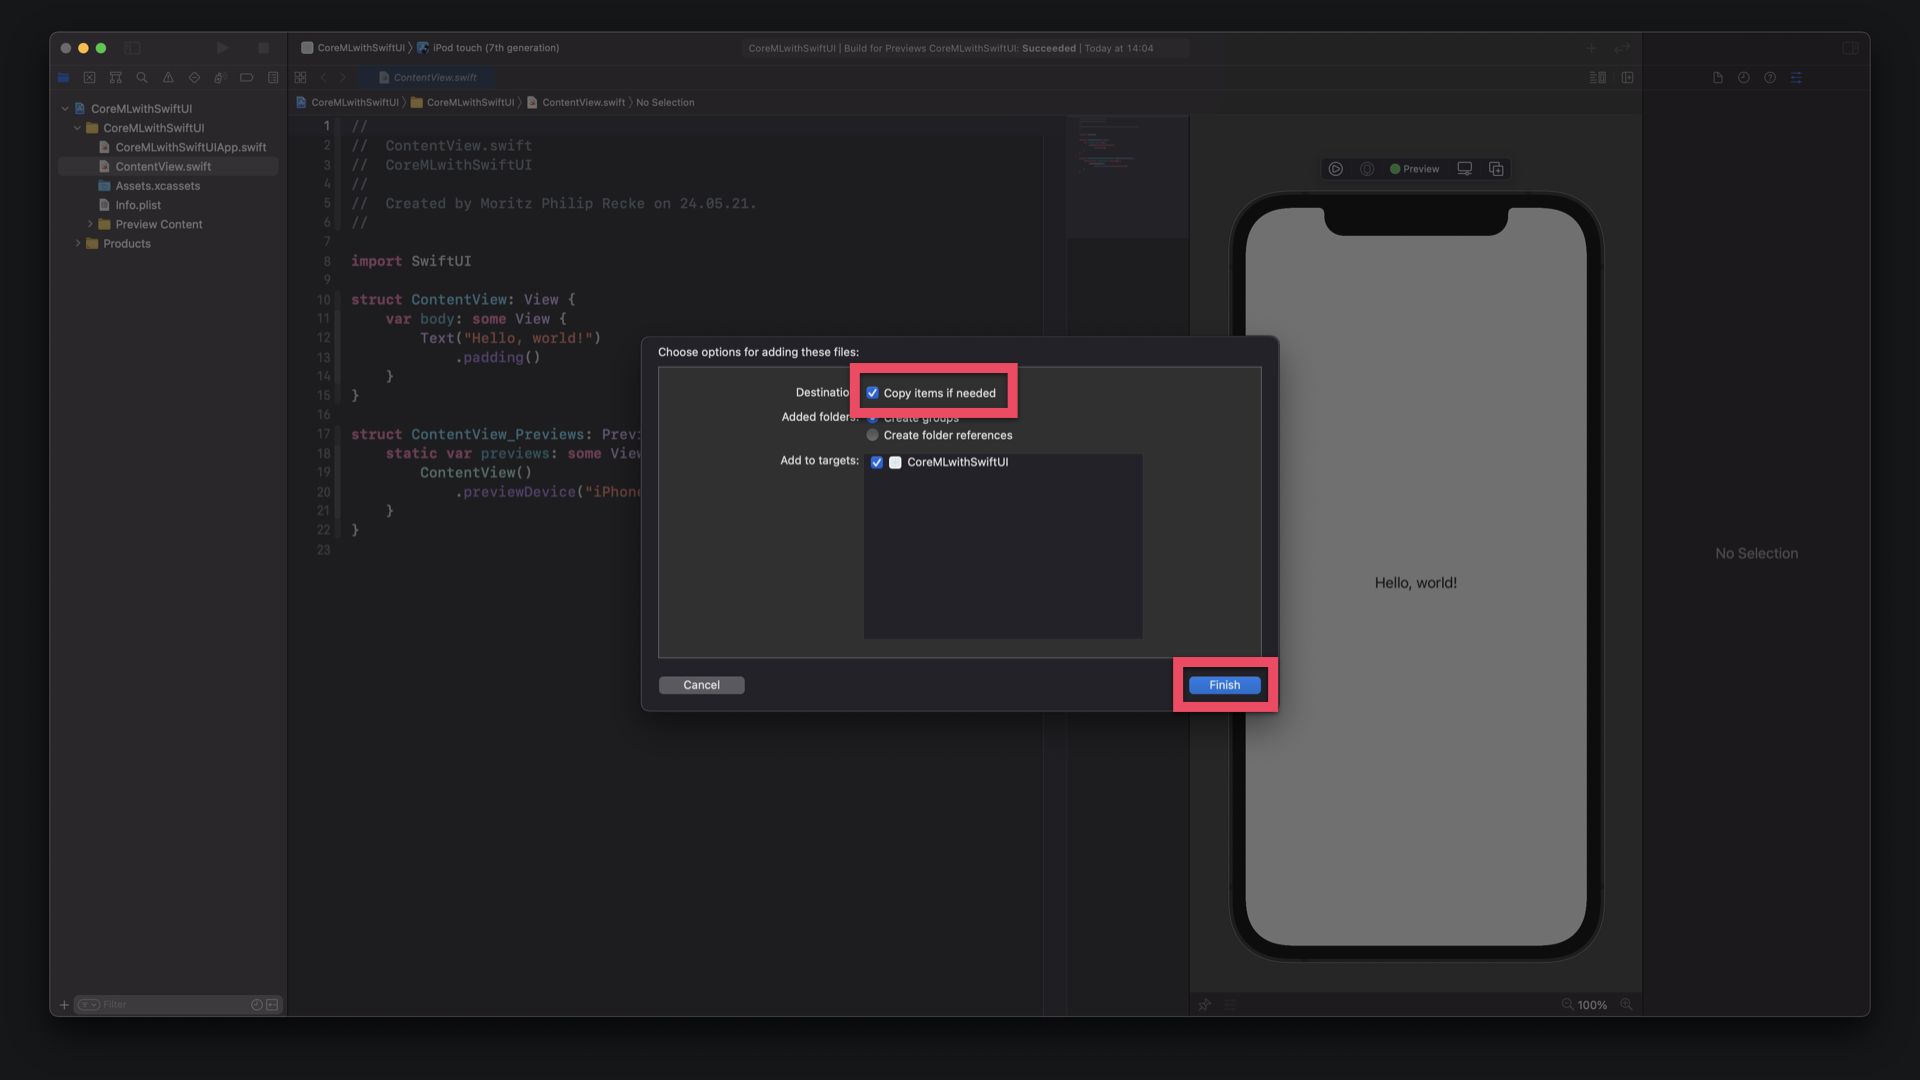
The model is a MobileNetV2.mlmodel file that can be dragged and dropped into the Xcode project Navigator. In the appearing window you can choose options for adding files to the project. Make sure to make the checkbox "Copy files if needed" and click "Finish" on the bottom right.
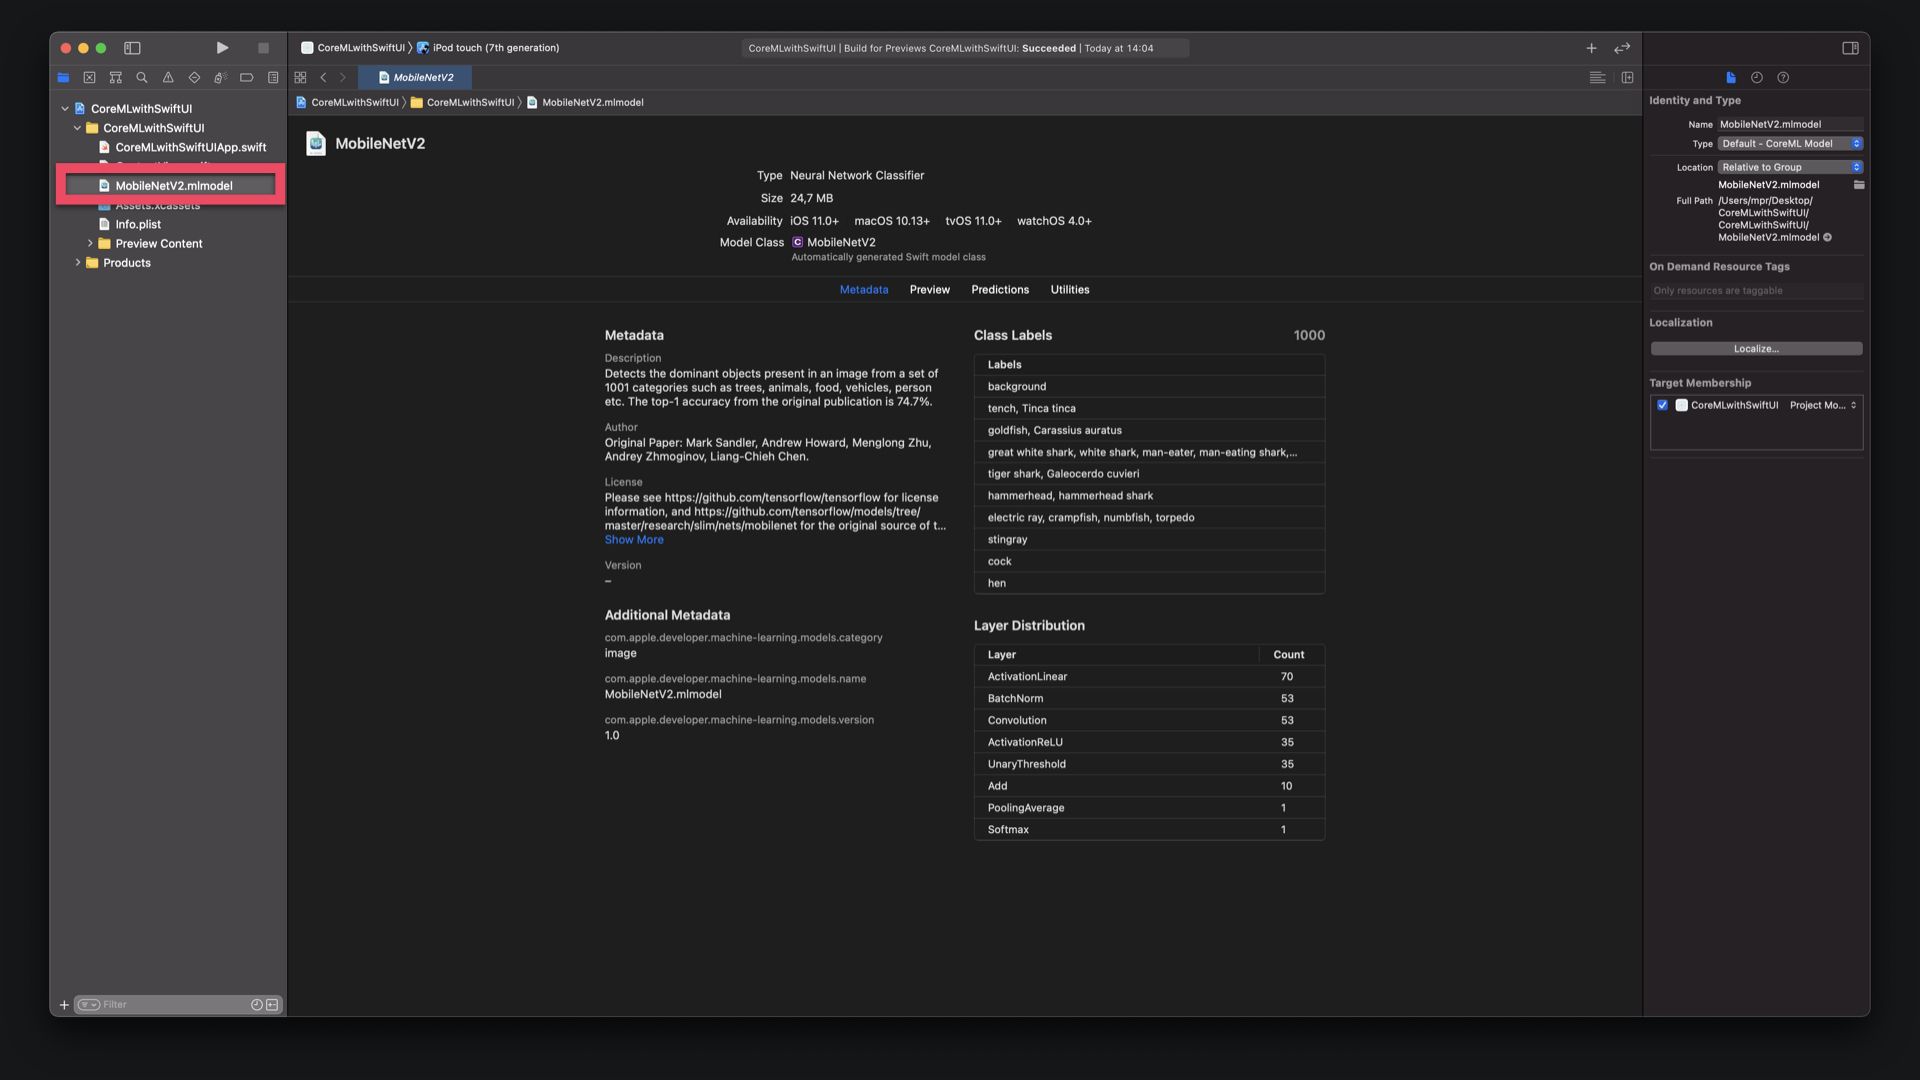
The MobileNetV2 model now appears in the Project Navigation. When clicking on it, you can see the details of the machine learning model, its metadata, size, supported OS versions and also a Model Class name - MobileNetV2 - that is used to reference the model in code. The Core ML model can also be tested in this view on the Preview tab. More details about the Classification and how they work can be found in the Predictions tab.
Since we want to test the capabilities of the image classification model in our SwiftUI app, the sample images can be added to the app project's Assets catalogue by dragging and dropping the image files into the Assets.xcassets folder, as seen on the image below.

The interface for this app will be built in the ContentView.swift file.
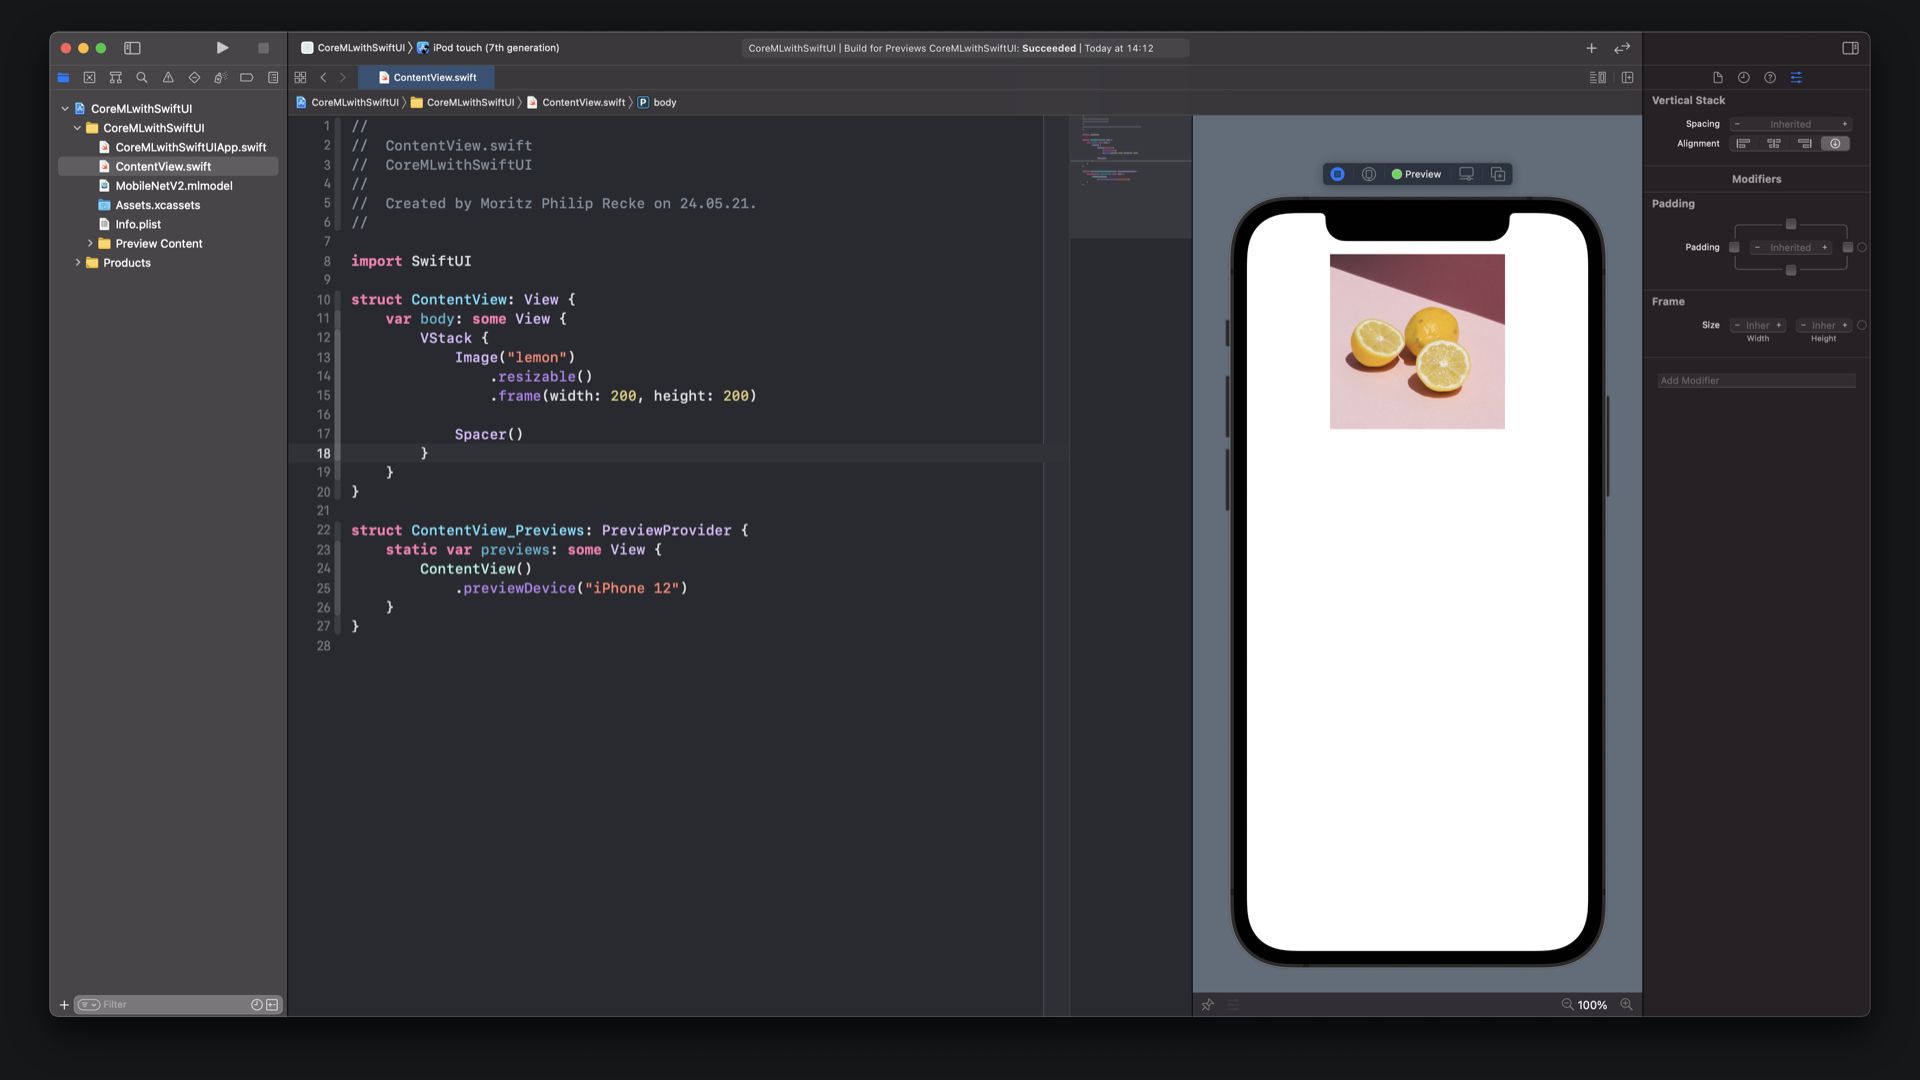
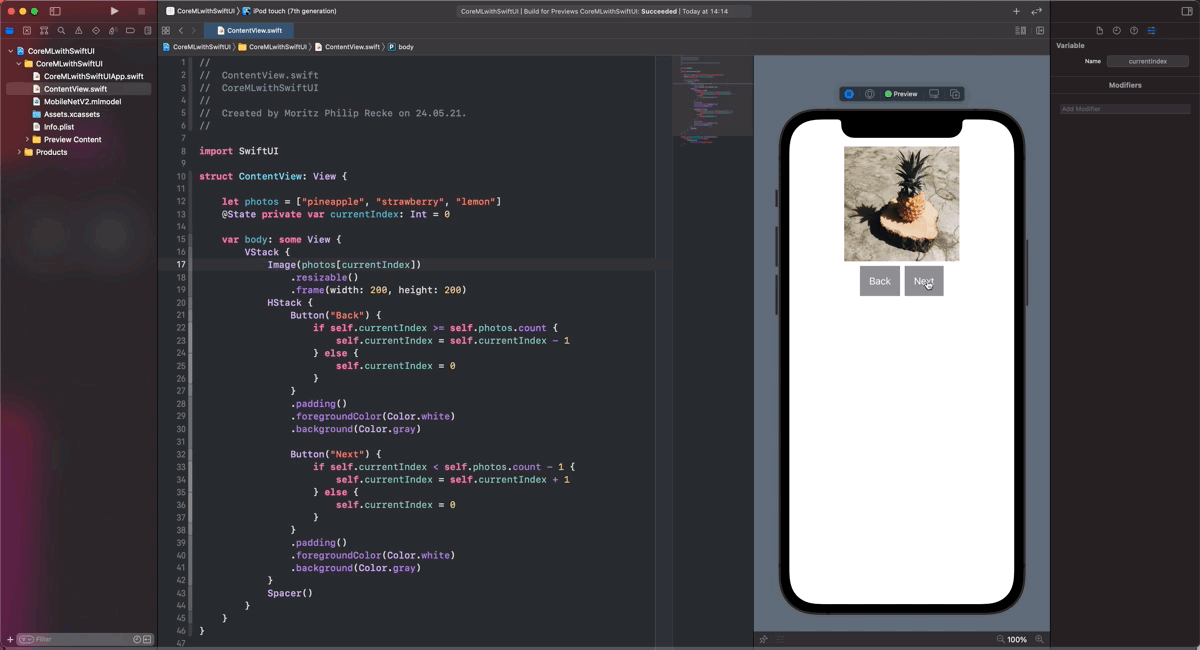
To set up the interface replace the Hello World textfield with an Image embedded in an VStack. For now, let's use the "lemon" String of the lemon image in the Assets catalog to display the image in the view. Also, by adding a Spacer, the image moves to the top of the view.
struct ContentView: View {
	var body: some View {
		Vstack {
			Image("lemon")
				.resizable()
				.frame(width: 200, height: 200)

			Spacer()
		}
	}
} 
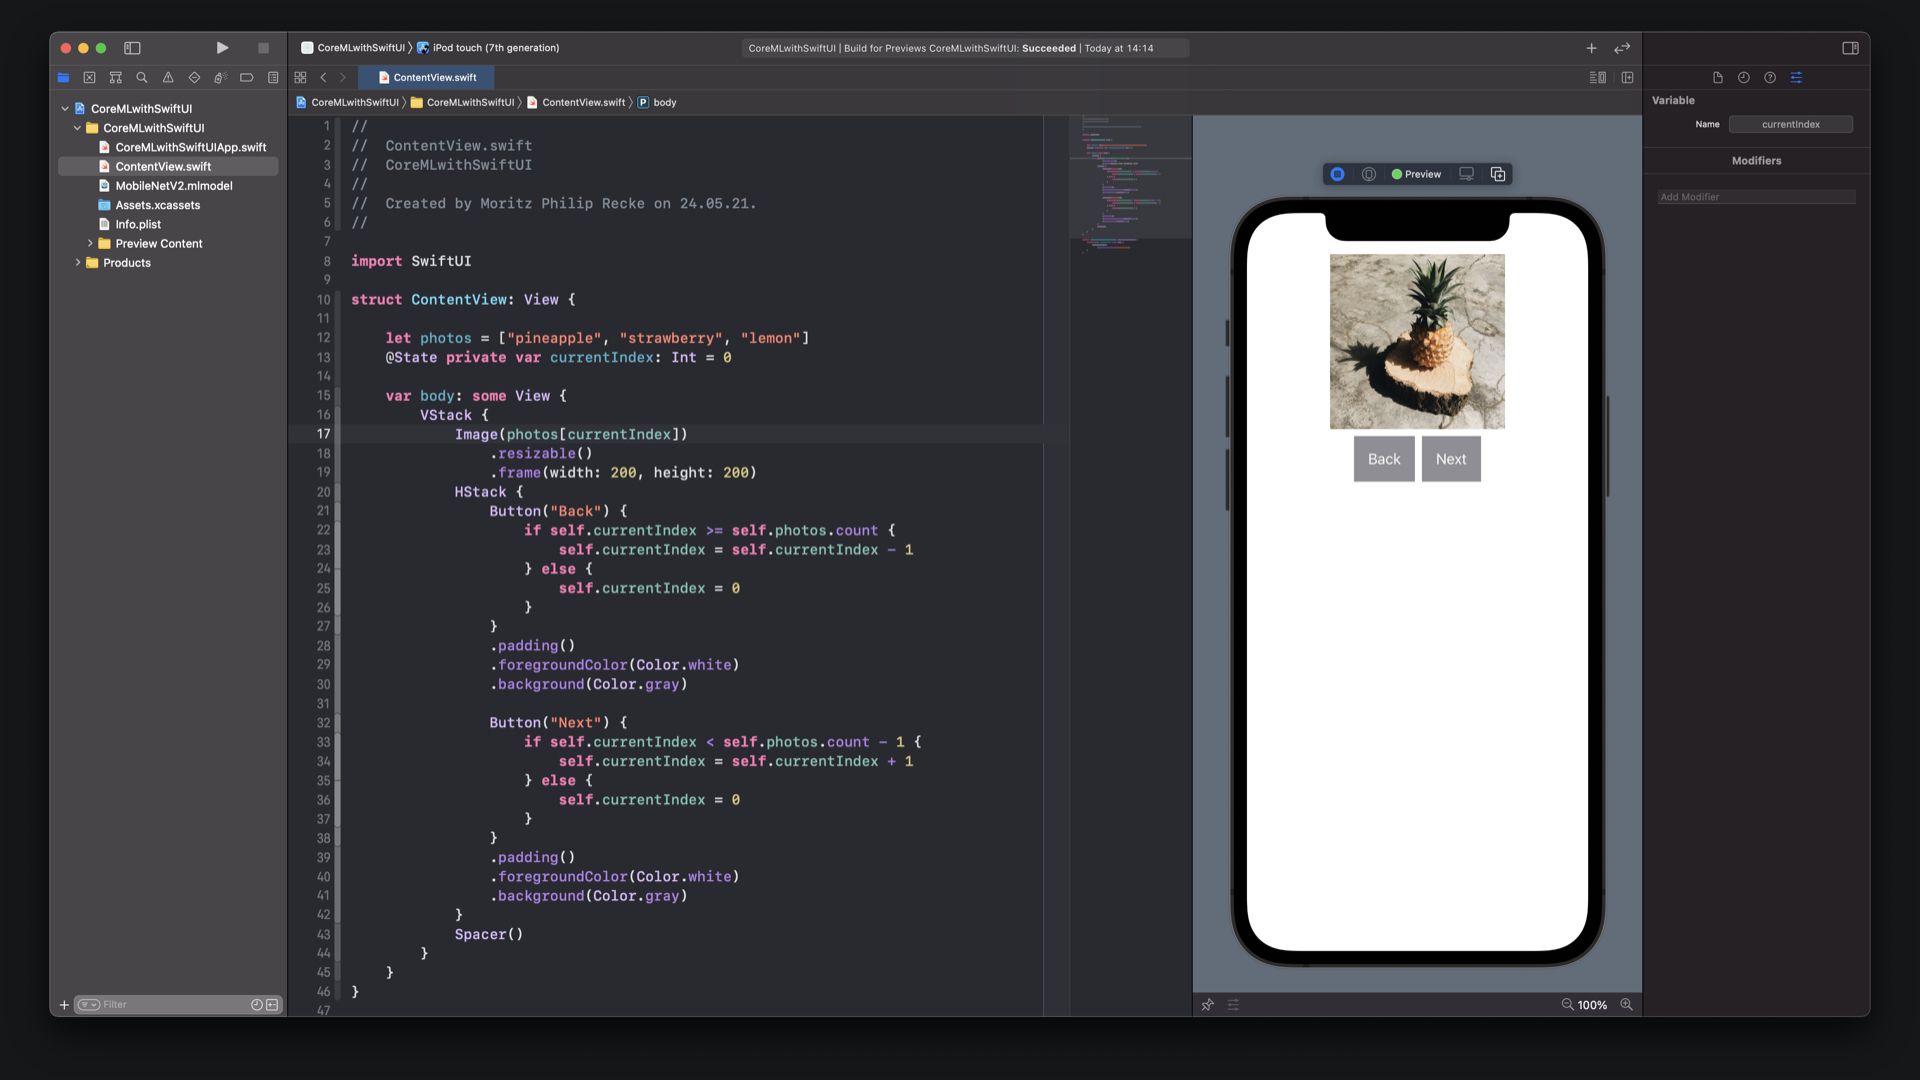
To use all the sample images in the project, a property photos can be added as an array of Strings with the names of the images in Asset catalog.
let photos = ["pineapple", "strawberry", "lemon"]
Also, a @State property named currentIndex can be added to keep track of the images as they are stepped through.
@State private var currentIndex: Int = 0
By adding an HStack under the Image in the VStack, two Buttons can be placed horizontally under the image to step through the sample images. The functionality to step "Back" or "Next" decreases or increases the currentIndex and jumps back to the beginning once the end of the array is reached. It's a very basic implementation of a stepper feature.
...

HStack {
	Button("Back") {
		if self.currentIndex >= self.photos.count {
			self.currentIndex = self.currentIndex - 1
		} else {
			self.currentIndex = 0
		}
	}
	.padding()
	.foregroundColor(Color.white)
	.background(Color.gray)

	Button("Next") {
		if self.currentIndex < self.photos.count - 1 {
			self.currentIndex = self.currentIndex + 1
		} else {
			self.currentIndex = 0
		}
	}
	.padding()
	.foregroundColor(Color.white)
	.background(Color.gray)
}

...
Without using Simulator or installing the app on your iPhone, the functionality of the user interface can be tested. By using SwiftUI and the preview canvas, the basic interactions can be used live within the editor. Just click in the Play symbol in the canvas and see the image picker in action.
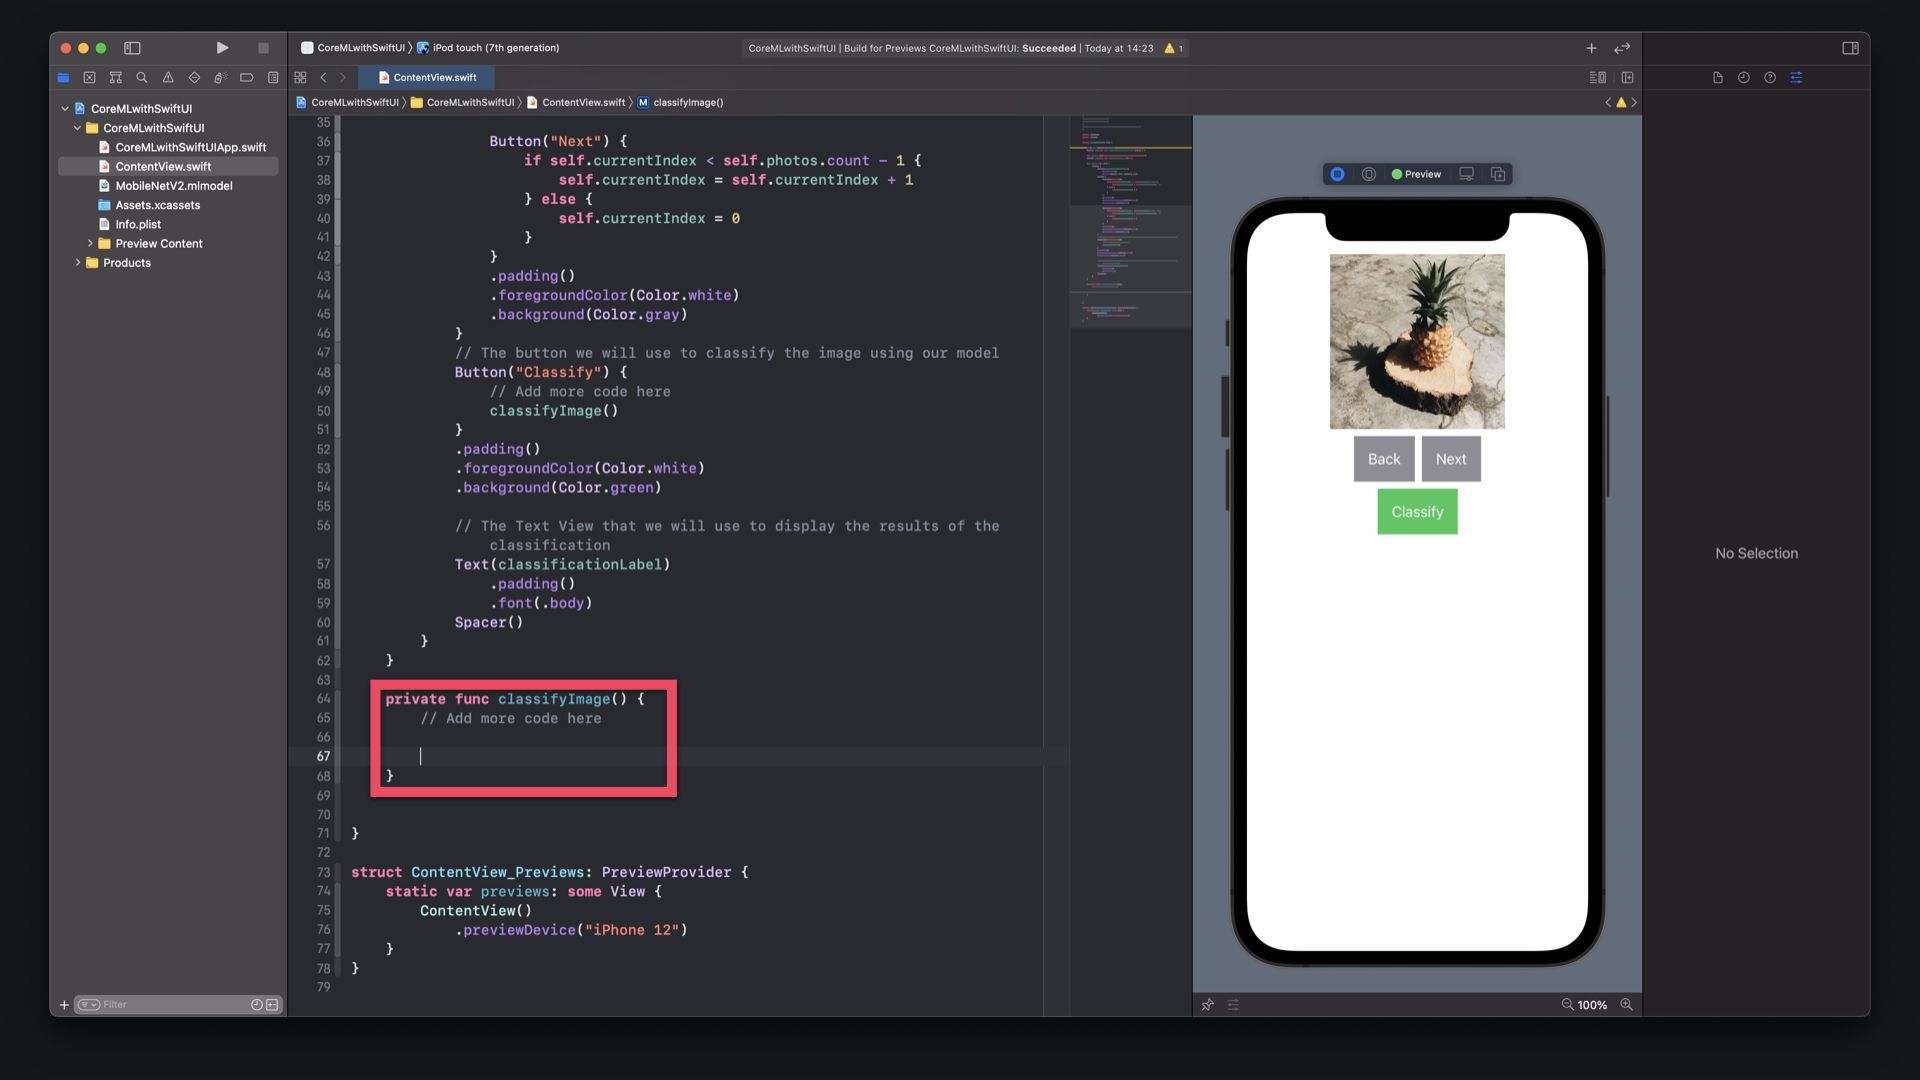
Below the HStack with the buttons "Back" and "Next" we have just created, place another Button called "Classify". This button will be used to to classify the current selected image. We will add the code for the classification later.
Lastly, add a new Text view. It will be used to display the classification result in the future. For now, let's add a placeholder text.
...
HStack { ... }

// The button we will use to classify the image using our model
Button("Classify") {
	// Add more code here
}
.padding()
.foregroundColor(Color.white)
.background(Color.green)

// The Text View that we will use to display the results of the classification
Text("This will be the classification result.")
	.padding()
	.font(.body)

...

Now we can get started with Core ML in this project.
Import the CoreML framework to the ContentView.swift file.
import SwiftUI
import CoreML
In the ContentView add a new property for the model that is initialised as the Model Class, in this case MobileNetV2().
struct ContentView: View {
	let model = MobileNetV2()

    ...
}
Add another @State property called classificationLabel. It will store the output of the model classification to be shown on the interface.
struct ContentView: View {
	let model = MobileNetV2()
	@State private var classificationLabel: String = ""

    ...
}
Create a new function in the ContentView named classifyImage(). This will be the function responsible to classify the currently displayed image.
private func classifyImage() {
	// Add more code here
}
Let's call this function when the button "Classify", that was created previously, is pressed.
Also, replace the placeholder text in the Text view with the classificationLabel property. This way, the results of the classification will be displayed properly.
HStack { ... }

Button("Classify") {
	classifyImage()
}
.padding()
.foregroundColor(Color.white)
.background(Color.green)

Text(classificationLabel)
	.padding()
	.font(.body)
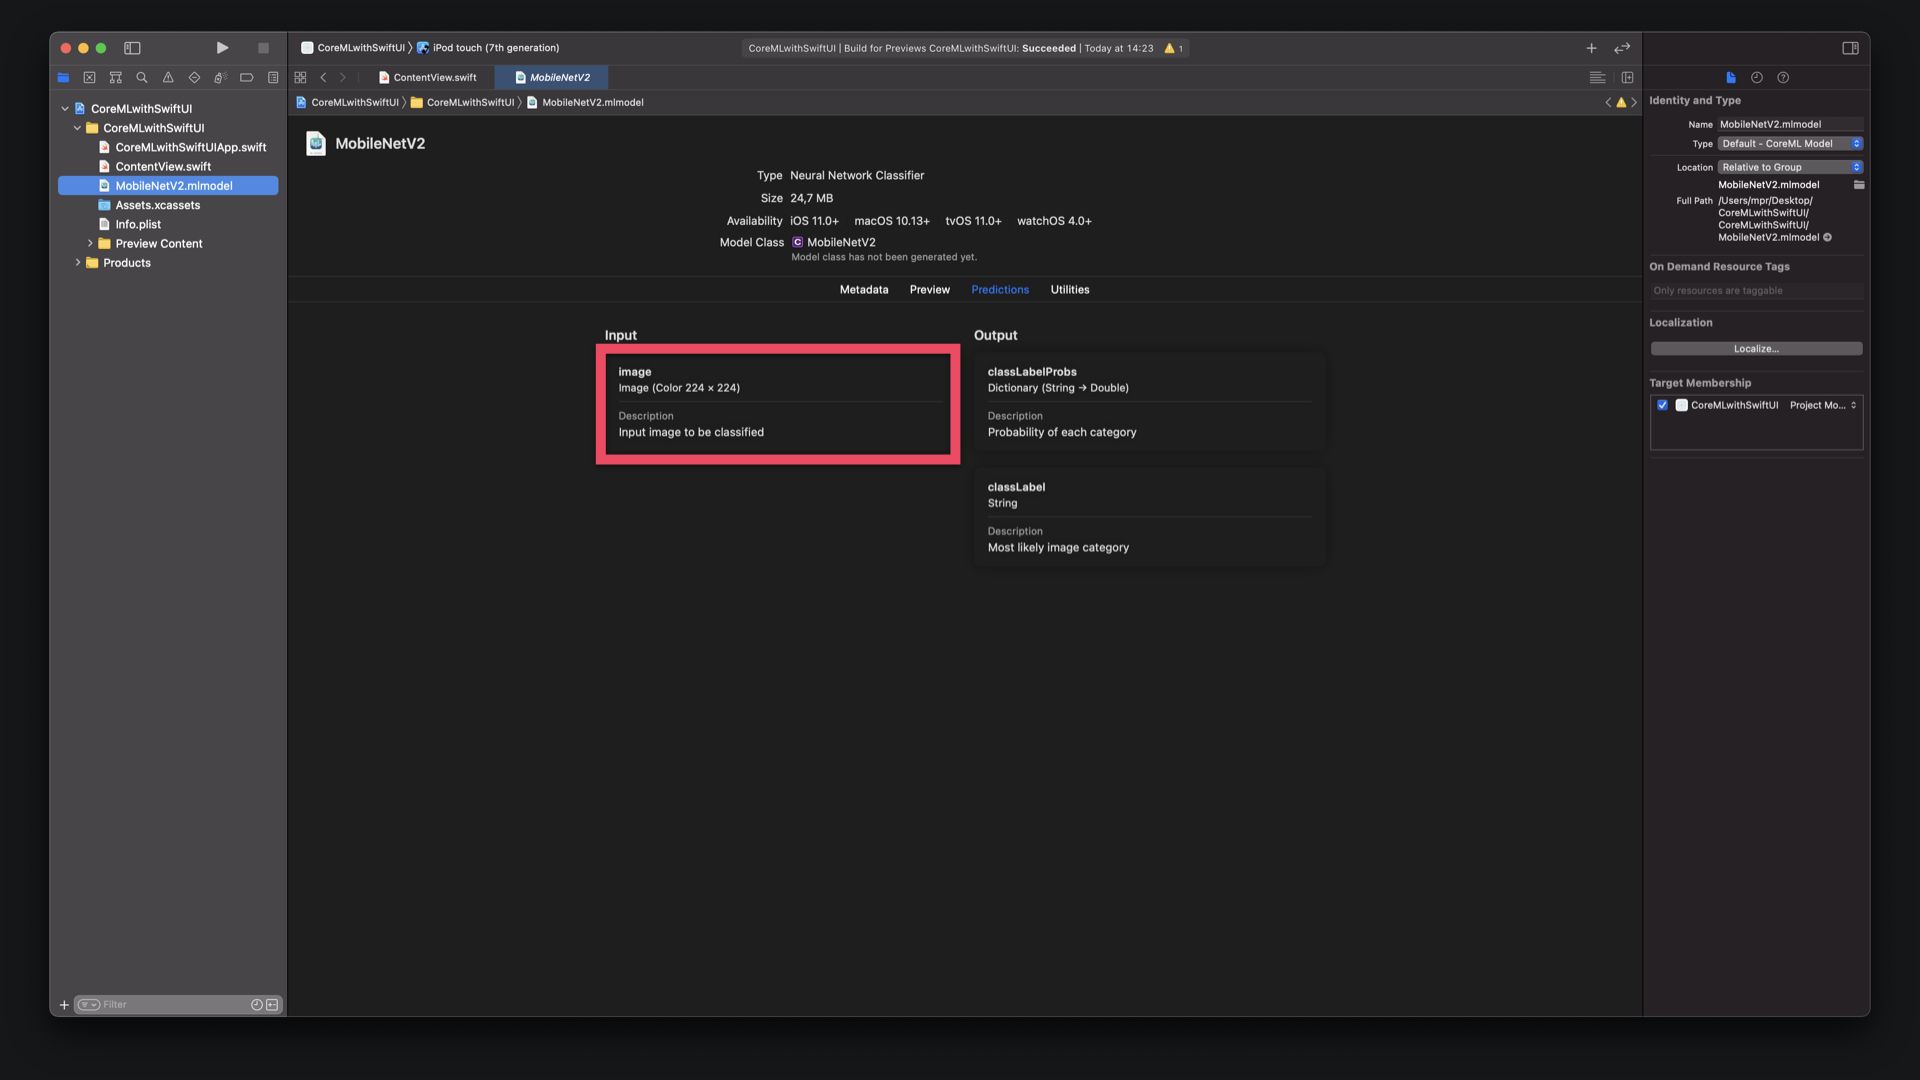
In the Predictions tab the input and output parameters for the Core ML model can be verified. In this case, the MobileNetV2 model expects squared images with dimensions of 224 x 224 to execute the classification. You can also check the output parameters for the Core ML model. In this case, the MobileNetV2 model will deliver two outputs:
- A classLabel as String with the most likely classification;
- A classLabelProbs dictionary of Strings and Doubles with the probability for each classification category.
This might come in handy in the project implementation.
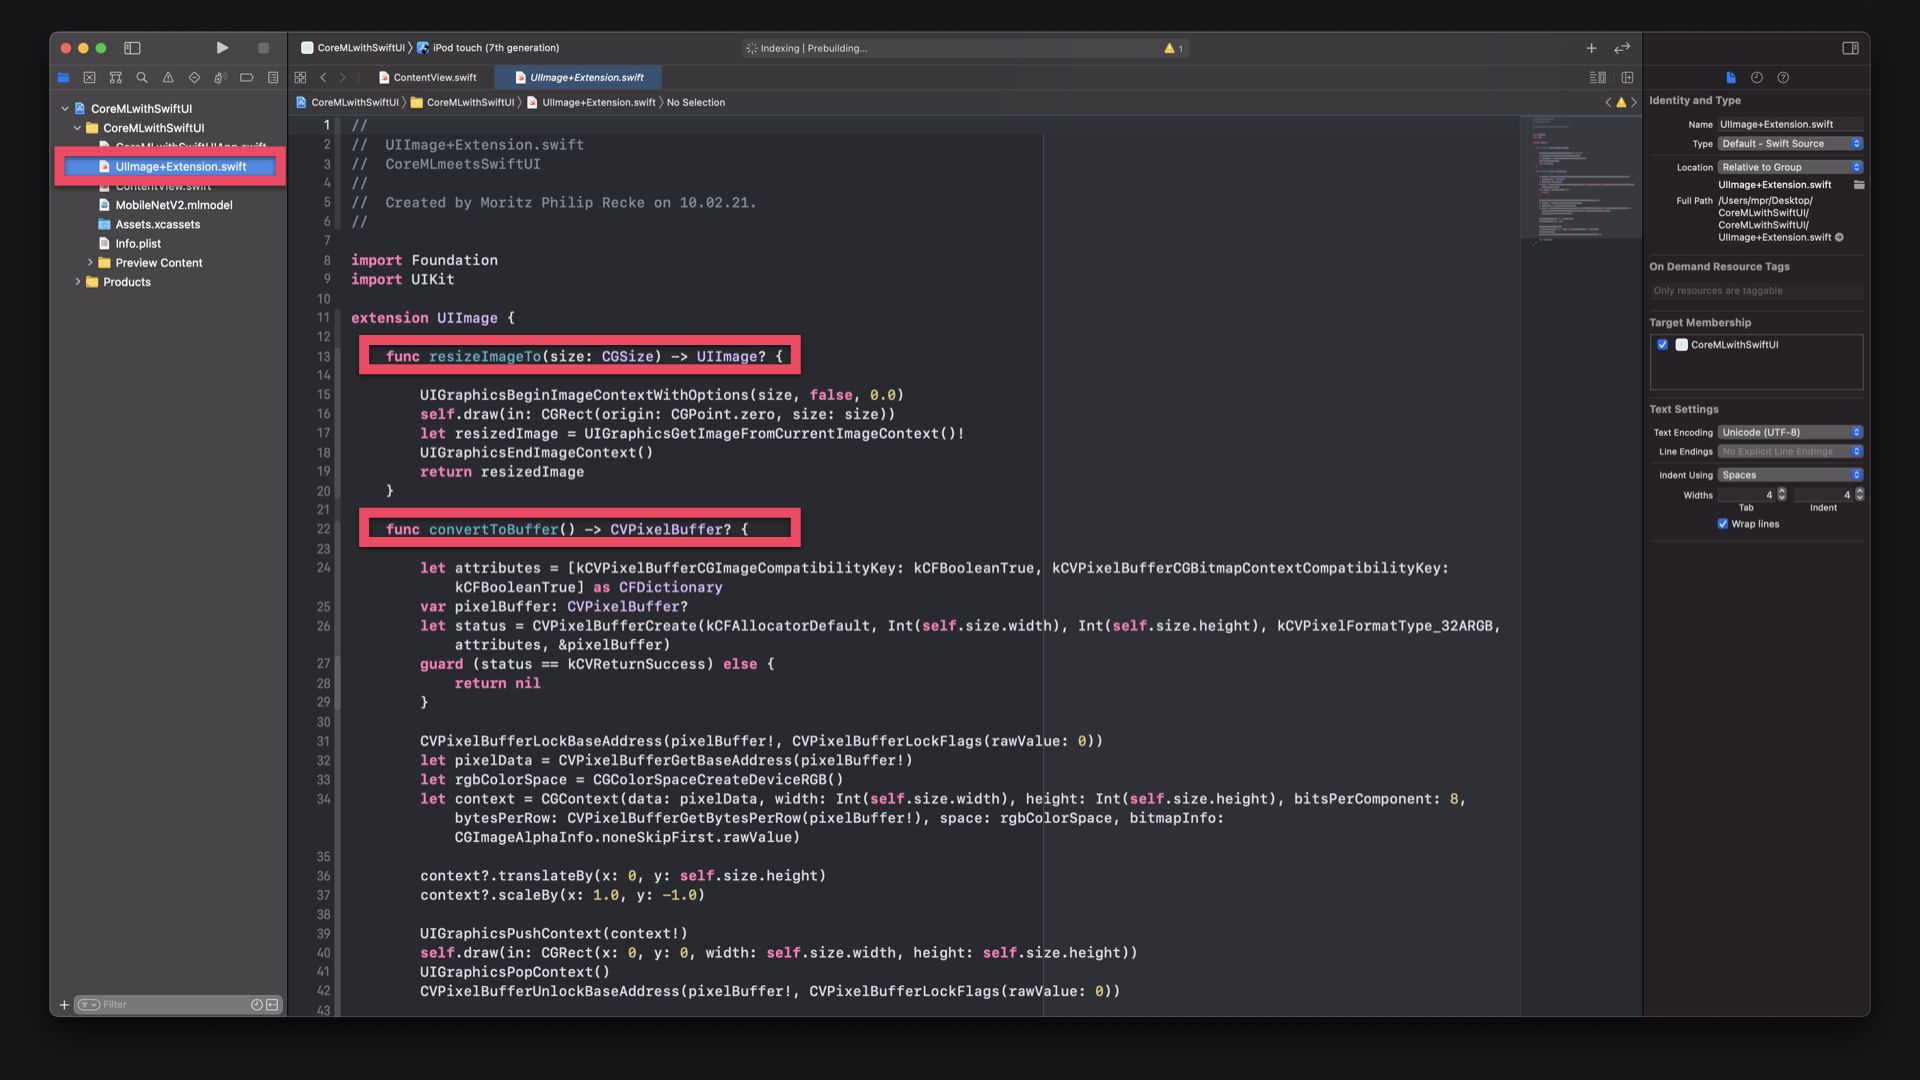
Also the Input type is not an Image or UIImage but has to be either a Core Image Image (CIImage), a Core Graphics Image (CGImage) or a Core Video PixelBuffer. To create the CVPixelBuffer, the image has to be converted, which is not s trivial task. The easiest way to achieve these goals is by adding some extensions to UIImage.
For the purpose of the tutorial, feel free to use this GitLab snippet to copy the source code for the UIImage+Extension.swift file used in this tutorial. Inside the UIImage+Extension.swift you find two additional functions to the class:
resizeImageTo(size:), which will resize the image to a provided size and return a resizedUIImage;convertToBuffer(), which will convert theUIImageto aCVPixelBuffer.
// Functions signatures

func resizeImageTo(size: CGSize) -> UIImage? { ... }

func convertToBuffer() -> CVPizelBuffer? { ... }
Back in the ContentView.swift file, return to the classifyImage() function:
- Get the name of the current selected image from the array of
photosusing thecurrentIndexproperty and store it in a new constant calledcurrentImageName. - Initialise an
UIImageusing thecurrentImageNameand store it in a constant calledimage. Then use the provided extension to resize the image and convert it to a CVPixelBuffer - Make a prediction using the model by providing the buffer as an input paramter.
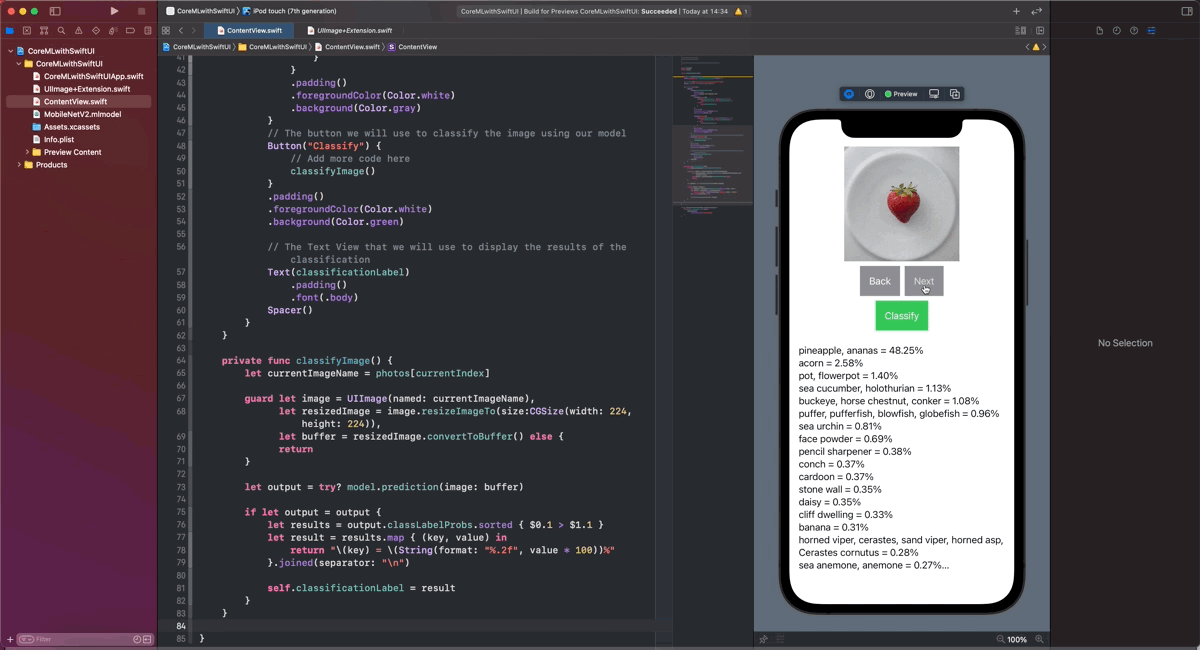
private func classifyImage() {
	// 1
	let currentImageName = photos[currentIndex]

	// 2
	guard let image = UIImage(named: currentImageName),
				let resizedImage = image.resizeImageTo(size: CGSize(width: 224, height: 224)),
				let buffer = resizedImage.convertToBuffer() else {
		return
	}

	// 3
	let output = try? model.prediction(image: buffer)
}
In the classifyImage() function we can use the model's prediction output to update the user interface. As seen before, the model delivers, a classLabel as String with the most likely classification and a classLabelProbsdictionary of Strings and Doubles with the probability for each classification category. For the purpose of this tutorial, use the dictionary to better understand the results.
- Create a
resultsArray, sorted by probability - Then a
resultString that maps the array, with each element starting on a new line and the probability showing 2 digits after the separator. - Lastly, assign the
resultto theclassificationLabel. Since this is a@Stateproperty, it will result in updating the user interface every time the value changes.
private func classifyImage() {
	...

	if let output = output {
		// 1
		let results = output.classLabelProbs.sorted { $0.1 > $1.1 }

		// 2
		let result = results.map { (key, value) in
			return "\\(key) = \\(String(format: "%.2f", value * 100))%"
		}.joined(separator: "\\n")

		// 3
		self.classificationLabel = result
	}

}
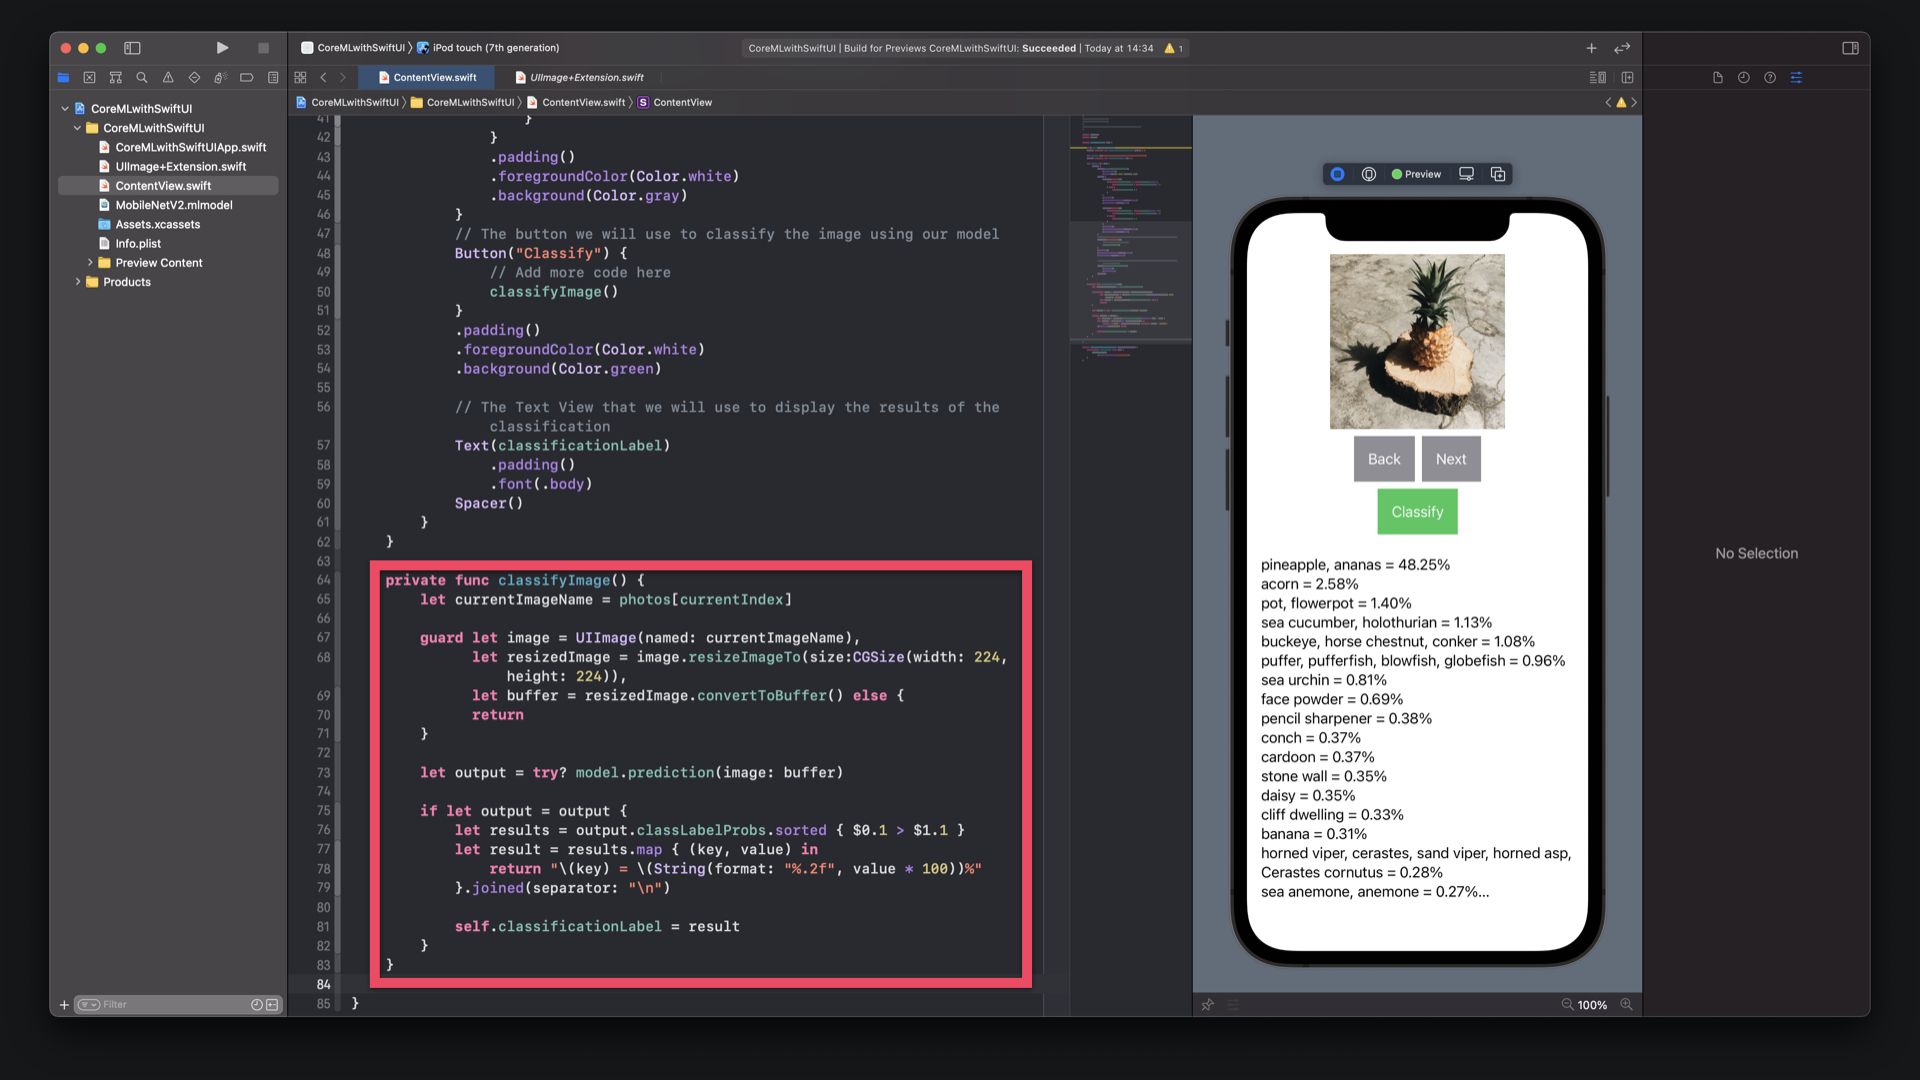
The app can now use the MobileNetV2 model to make predictions on the images in the Asset catalog. As you step through the images and tap on Classify, you will see the outcome. As you can see, depending on the image, the probability of the prediction varies significantly.
Try adding more images of your own to understand the capabilities of this Core ML model better. Of course you can also extend the app to pick images from the library or even the camera. For more advanced features you can also explore the Vision framework that can be used to make predictions on live streams of video data as well.
Download the final Project
That's it. If you want to explore this in further detail, you can become a free member to access the source code.
 create-with-swift
This tutorial is part of a series of articles derived from the presentation Creating Machine Learning Models with Create ML presented as a one time event at the Swift Heroes 2021 Digital Conference on April 16th, 2021.
Where to go next?
If you are interested into knowing more about using machine learning models or Core ML in general you can check other tutorials on:
- Core ML Explained: Apple's Machine Learning Framework
- Create ML Explained: Apple's Toolchain to Build and Train Machine Learning Models
- Use an Object Detection Machine Learning Model in an iOS App
- Use an Object Detection Machine Learning Model in Swift Playgrounds
- Use an Image Classification Machine Learning Model in Swift Playgrounds
Recommended Content provided by Apple
For a deeper dive on the topic of creating object detection machine learning models, you can watch the videos released by Apple on WWDC:
- WWDC 2019 - Core ML 3 Framework
- WWDC 2020 - Explore Computer Vision APIs
- WWDC 2019 - Understanding Images in Vision Framework
Other Resources
If you are interested into knowing more about creating machine learning models with Create ML, you can go through these resources:
- To understand how to create immersive user experiences with machine learning in your app, study the Human Interface Guidelines' dedicated section for Machine Learning.
- To explore the various Core ML models provided by the research community, refer to the Machine Learning Section on Apple's Developer Platform.
- Explore Awesome-CoreML-Models for a large collection of machine learning models in Core ML format, to help iOS, macOS, tvOS, and watchOS developers experiment with machine learning techniques.